Xunsearch is an open-source, free, high-performance, multifunctional, and easy-to-use professional full-text search technology solution. It is currently a well-known open-source search engine.
After installing Xunsearch, it is necessary to install the PHP SDK to perform searches.
I have set up an experiment in Tencent Cloud Lab, and you can directly operate on it. Of course, you can also test using your own server.
Lab address https://cloud.tencent.com/developer/labs/lab/10424
Software Environment: Centos 7
1. Install GCC dependencies
Estimated time: 10min ~ 20min
Some users may encounter errors in subsequent steps during installation due to not noticing GCC and GCC++. Many tutorials only provide one type of dependency installation, which can lead to errors later. Here, I recommend installing both GCC and GCC++.
Install GCC dependencies
Input the following command to install gcc:
yum -y install gcc
Install GCC++ dependencies
Input the following command to install gcc++ (this may take a long time):
yum -y install gcc-c++
Install zlib module
Input the following command to install, which may require a long wait:
yum -y install zlib-devel
2. Install Xunsearch
Estimated time: 1min ~ 2min
Download and unzip the installation package
Run the following command to download the installation package:
wget http://www.xunsearch.com/download/xunsearch-full-latest.tar.bz2
Run the following command to unzip the installation package:
tar -xjf xunsearch-full-latest.tar.bz2
Execute installation
Use the following command to view the directory contents:
ls
Find the directory starting with xunsearch-full and copy the directory name. Example: xunsearch-full-1.4.11.
Proceed with installation
Open the directory of the unzipped package (the directory name may vary depending on the version):
cd xunsearch-full-1.4.11
Execute installation:
sh setup.sh
Input installation directory
- If everything goes well, the terminal will prompt for the installation directory. (This step may take a while, please be patient)
- Please input
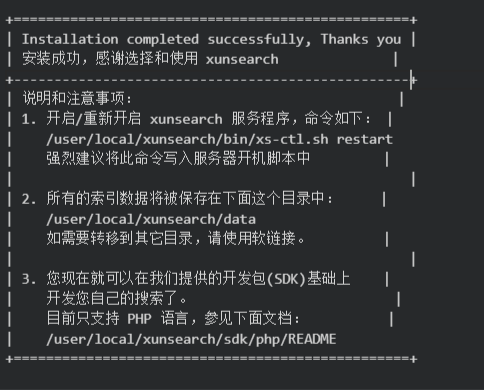
/user/local/xunsearch
- The required directory should be /user/local/xunsearch
- The default directory may be [/usr/local/xunsearch]
- Note that it is required to be
userinstead ofusr - Setting the name is not mandatory, but for convenience
- Please wait and then input
yto confirm again.
If no errors occur, the following content will appear:
Configuration and startup
Open the directory:
cd /user/local/xunsearch
Remember your IP <Your CVM IP Address> for future use.
There are four methods to start Xunsearch; now follow my method to start it. Other methods will be added later.
Copy the following command to the terminal and run it.
bin/xs-ctl.sh -b local start // Listen on local loopback address 127.0.0.1
The following content indicates success:

Other methods to start xunsearch (replace with your IP) – this can be ignored
bin/xs-ctl.sh -b local start // Listen on local loopback address 127.0.0.1
bin/xs-ctl.sh -b inet start // Listen on all local IP addresses
bin/xs-ctl.sh -b <Your CVM IP Address> start // Listen on server IP
bin/xs-ctl.sh -b unix start // Listen on tmp/indexd.sock and tmp/searchd.sock
3. Install environment, configure, run PHP SDK
Estimated time: 10min ~ 20min
Xunsearch has been installed, but it is necessary to install the environment and then create a table in MySQL. This step can be a bit tedious. Therefore, we will use the control panel to complete it.
Install control panel
This may take a while, possibly 10-20 minutes.
yum install -y wget && wget -O install.sh http://download.bt.cn/install/install.sh && sh install.sh
After a while, the control panel address and account password will appear:
Example: Bt-Panel: http://<Your CVM IP Address>:8888
username: qbqdkra5
password: eeedd1e8
Note down your account password.
Then execute the following command:
service bt restart
:8888>
Then you can access the control panel.
Install environment and configure the database
Open
:8888> Enter your username and password to log in.
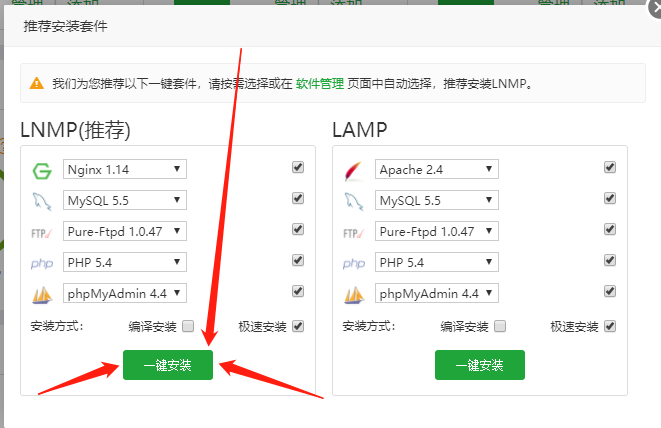
In the pop-up window, select One-click installation
(Installing the environment may take a long time, possibly 10-20 minutes)
4. Import and search data
Estimated time: 10min ~ 20min
Open directory
Open the PHP directory:
cd /user/local/xunsearch/sdk/php
Display data
Execute the following command:
util/Indexer.php --source=csv --clean demo
This command indicates clean old data and then import new data.
Import data
Copy the following content, paste it into the terminal window, press Enter, and then press Ctrl + D to finish inputting:
1,关于 xunsearch 的 DEMO 项目测试,项目测试是一个很有意思的行为!,1314336158
2,测试第二篇,这里是第二篇文章的内容,1314336160
3,项目测试第三篇,俗话说,无三不成礼,所以就有了第三篇,1314336168
4,李白:床前明月光,疑是地上霜,举头望明月,低头思故乡,13016542681
5,李白:君不见黄河之水天上来,奔流到海不复回,16816477956
Test search
Congratulations! You have set up the search engine!
Now let's perform a search!!!
Copy the following command to search:
util//Quest.php demo 项目 //Keyword is 项目
See the search results, isn't it impressive?~
Now let's try some other keywords:
util//Quest.php demo 李白 //Keyword is 李白
Simply repeat the above Display data step to test the search repeatedly.
Note: Be sure to add one space after the keyword! to search normally! Like this:
util//Quest.php demo 三 //Space added after 三!
This is not absolute; it seems to be an occasional issue where sometimes searching without a space won't work.

文章评论