SQLite is convenient to use, simple and compact. The author will not elaborate further here; those interested can refer to the following blog.
https://blog.csdn.net/qq_31930499/article/details/80420246
This article introduces how to create an ASP.NET Core program, build models and contexts, generate databases, and perform CRUD operations on the database.
Each process is detailed, allowing beginners to quickly grasp the content and relevant knowledge, thus avoiding confusion over specific points or getting stuck at certain positions.
Process & Directory
1 Create a New ASP.NET Core MVC Application
1.1 Create MVC Application
1.2 Introduce NuGet Packages
2 Create Models and Context
2.1 Create Model Class
2.2 Create Context
3 Configure Services
4 Generate Database
5 Use Tools to Manage SQLite Files
6 Generate CRUD Framework
7 Data Validation
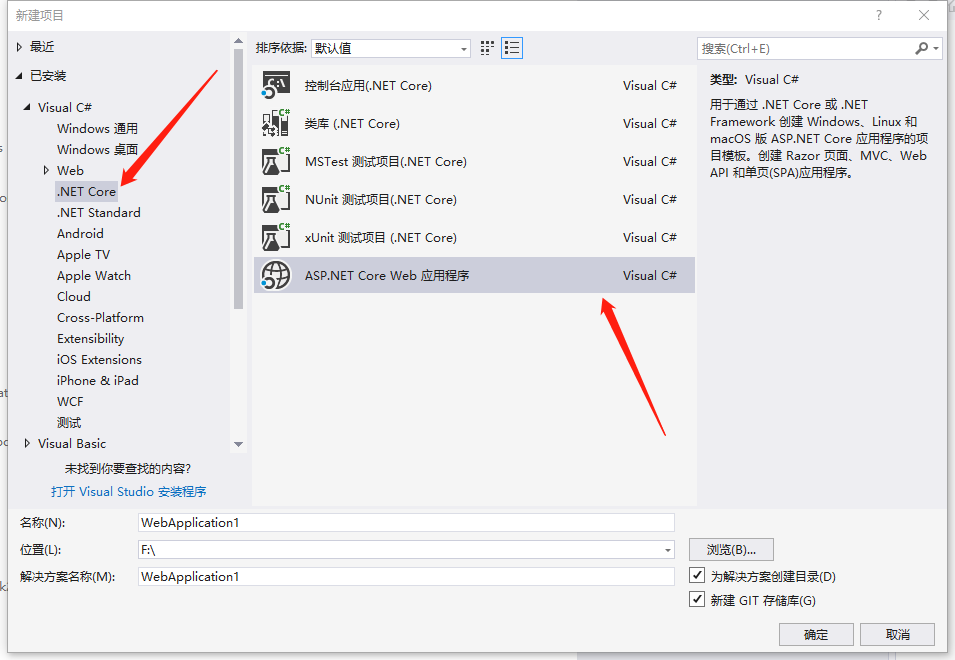
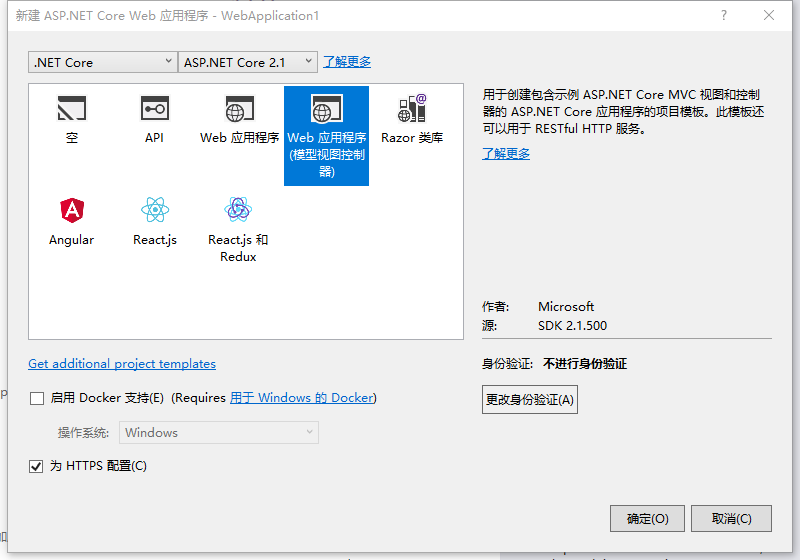
1 Create a New ASP.NET Core MVC Application
1.1 Create MVC Application
Open Visual Studio 2017, create a new ASP.NET Web Application, and select MVC (Model-View-Controller).
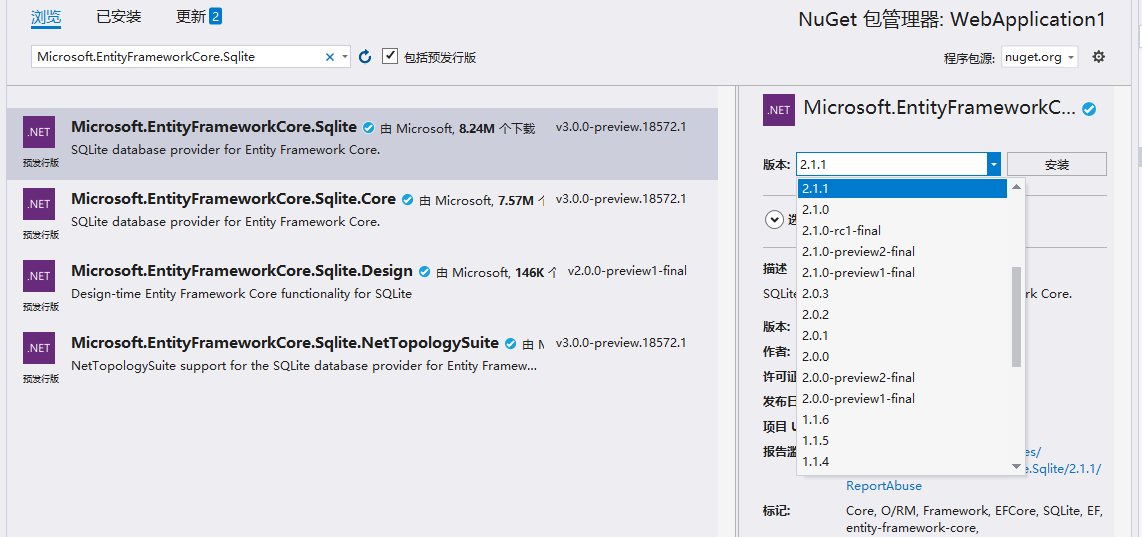
1.2 Introduce NuGet Packages
You need to introduce:
- microsoft.EntityFrameworkCore
- Microsoft.EntityFrameworkCore.Sqlite
Introduction Tutorial
Click on
Dependencies
- Right-click
-- Manage NuGet Packages
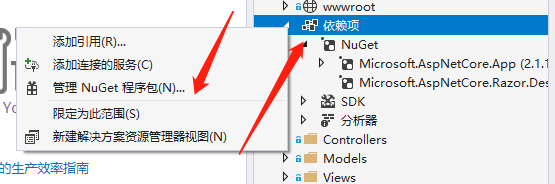
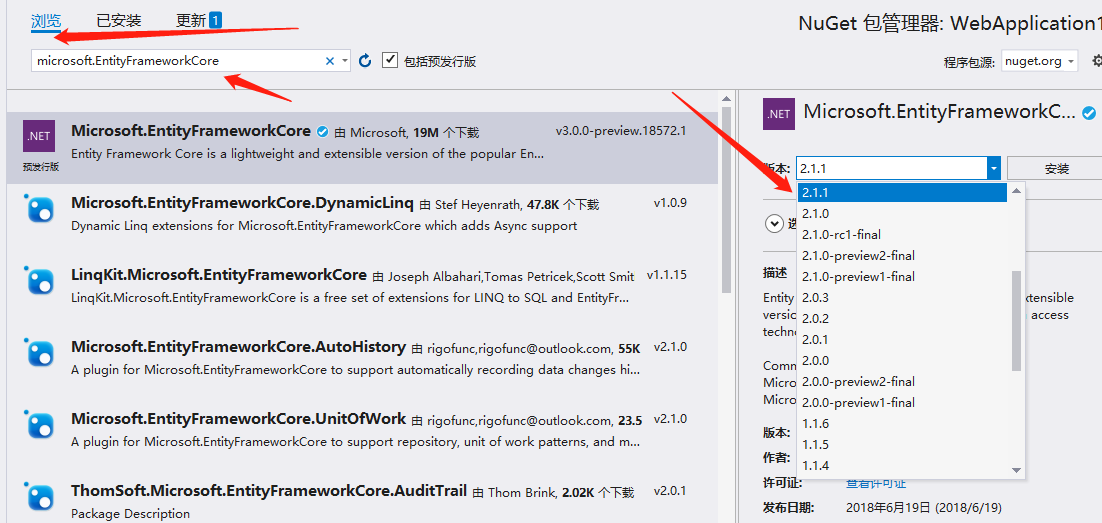
Input and install microsoft.EntityFrameworkCore and Microsoft.EntityFrameworkCore.Sqlite one after the other, as detailed below.
Note:
Select the version close to your ASP.NET Core version.
The author's version of ASP.NET Core is 2.1, and the selected NuGet package version is 2.11.
If your .NET Core is the latest, just select the latest NuGet as well.
If you encounter errors after version selection, you can reopen NuGet to uninstall and reinstall.
If there are update prompts, do not update.
2 Create Models and Context
This step establishes the models and context, which will later generate the database and database tables based on this code!
A context class and model class need to be established, containing the model class within the context class; the model classes included in the context class will generate corresponding database tables.
The following code does not require your operation, just observe (note the red bold parts).
using System; using System.Collections.Generic; using System.Linq; using System.Threading.Tasks; using Microsoft.EntityFrameworkCore; namespace WebApplication1.Models { public class SqlContext:DbContext { public SqlContext(DbContextOptions<SqlContext> Options):base(Options) { } public DbSet<A> A { get; set; } // Create data table A in the database }</span><span style="color: #0000ff;">public</span> <span style="color: #0000ff;">class</span><span style="color: #000000;"> A { </span><span style="color: #0000ff;">public</span> <span style="color: #0000ff;">int</span> ID { <span style="color: #0000ff;">get</span>; <span style="color: #0000ff;">set</span><span style="color: #000000;">; }<br /> } </span><span style="color: #0000ff;">public</span> <span style="color: #0000ff;">class</span><span style="color: #000000;"> B { </span><span style="color: #0000ff;">public</span> <span style="color: #0000ff;">int</span> ID { <span style="color: #0000ff;">get</span>; <span style="color: #0000ff;">set</span><span style="color: #000000;">; } }}
In the above code, there are three classes:
- Among them, the SqlContext class is the context class,
- A and B classes are model classes,
- However, only A will generate a database table, while B will not.
- A and B are both model classes; since A can generate a database table, it can also be called an entity class, while B, having no DbSet<B> , is only referred to as a model class and not an entity class.
- The A class will generate a real table in the database, having a corresponding relationship, hence, it is termed an “entity class”.
- The B class does not have a corresponding existence; it is merely a model and lacks an actual object, hence referred to as a “model class”.
2.1 Create Model Class
The above code has placed the model class and context class in the same file, SqlContext.cs, making it less readable.
Each model class represents a data table, while the context class serves as a configuration class. A database may have dozens of tables, each with several columns, complicating the content of the file.
We can reduce coupling by ensuring each class file contains only one class, with each class representing one table. If you need to create several tables, simply write several corresponding classes.
Practical Operation
In the Models folder:
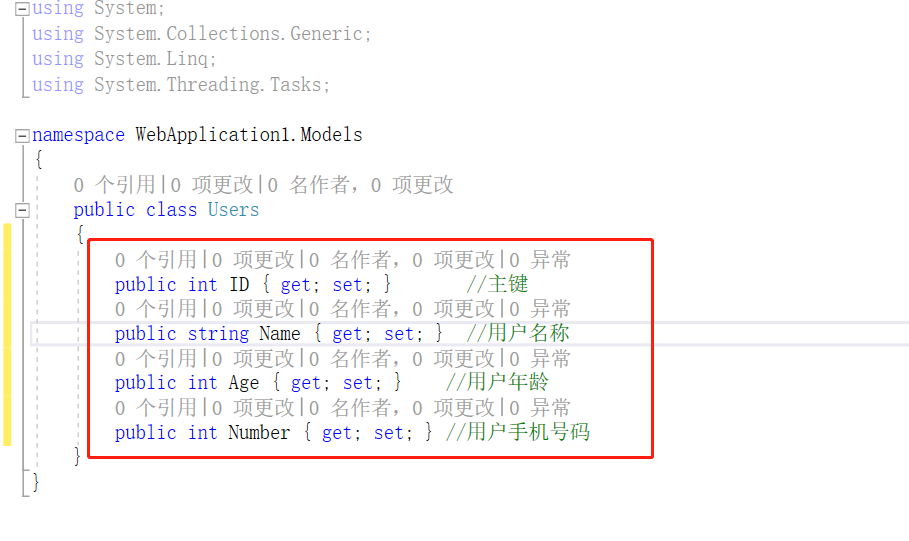
- Create a new class Users.cs
- Directly write code in the class
        public int ID { get; set; }       //Primary Key
        public string Name { get; set; }  //User Name
        public int Age { get; set; }    //User Age
        public int Number { get; set; } //User Phone Number
As shown in the figure
Note:
One model class corresponds to one data table (Table)
One property of the model class corresponds to one column.
The model class should only include properties and not methods or other elements.
Here the author only writes one table; if you want multiple tables, you can create additional classes and then include them in the context class.
2.2 Create Context
The model classes established above will directly become the data tables (Table) themselves. However, they cannot be directly mapped to generate data tables; a context is needed to map the model classes to data tables; otherwise, they are merely ordinary classes.
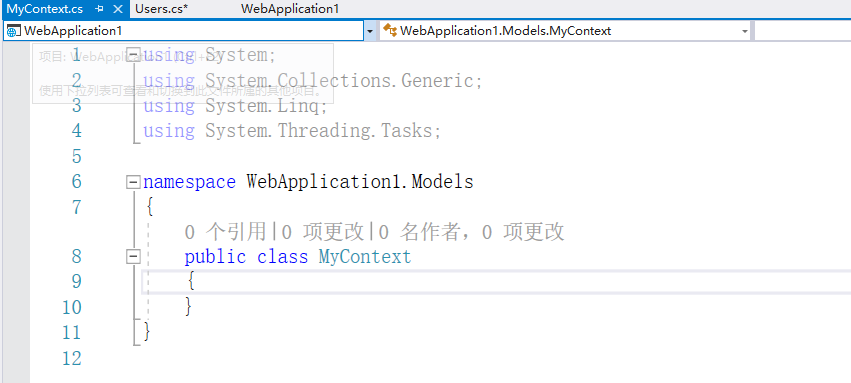
Create a class called MyContext.cs in the Models directory.
Import EF (EntityFrameworkCore) at the top.
using Microsoft.EntityFrameworkCore;
Override the MyContext Class
Step 1
public class MyContextChange to
</span><span style="color: #0000ff;">public</span> <span style="color: #0000ff;">class</span> MyContext:DbContext // This indicates that this class is a context class, the database name is My; whatever the class name is, the database name will be the same</pre>
Step 2
In the MyContext class, write a constructor.
public MyContext(DbContextOptions<MyContext> options) : base(options) {}</span></pre>
This constructor involves dependency injection; it will not be elaborated here. Just know that this constructor can configure related settings.
The constructor’s body is empty for now, as there is nothing to configure.
Step 3
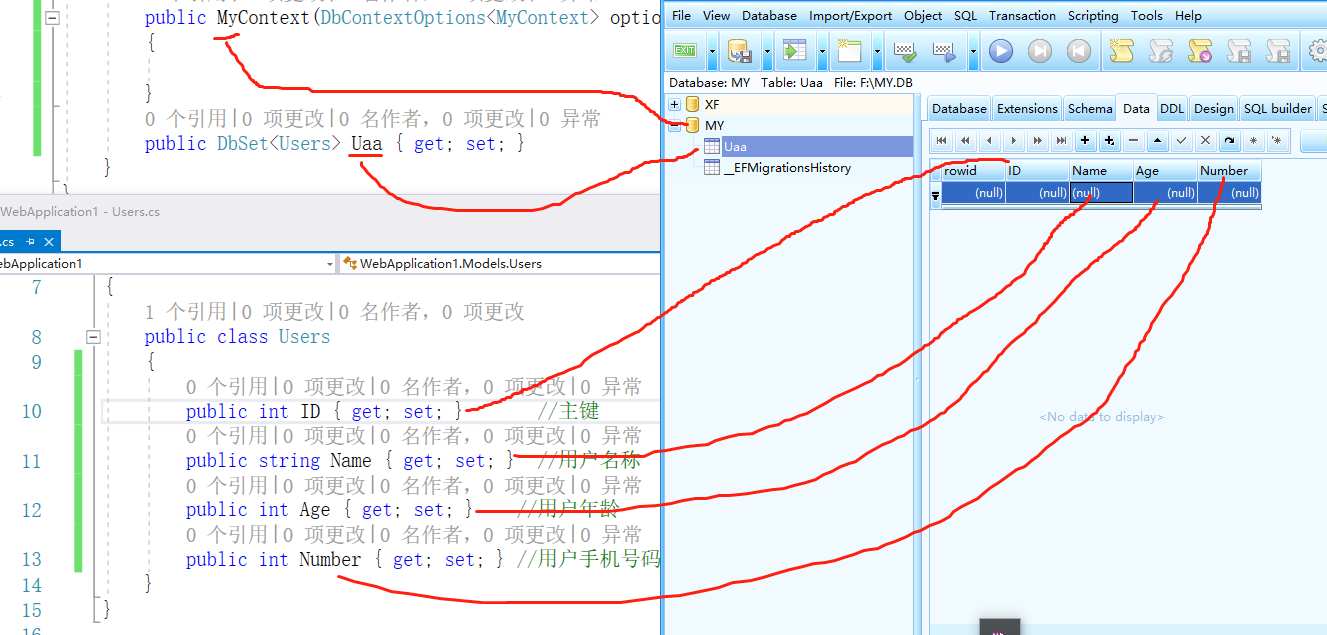
Add code below the constructor for mapping the model classes.
        public DbSet<Users> Uaa { get; set; }
//DbSet maps to a table
//DbSet<Users> means the Users class is used as the model
//Uaa is the name of the Users class that will be generated in the database
Note:
The above code indicates that a table named Uaa will be generated in the database based on the Users model class.
One context corresponds to one database; the context class MyContext, and the part in front of Context will become the database name. For example, asdwadaaContext will generate a database named asdwadaa.
A model class corresponds to a data table (Table)
The complete code is as follows
using System; using System.Collections.Generic; using System.Linq; using System.Threading.Tasks; using Microsoft.EntityFrameworkCore; namespace WebApplication1.Models { public class MyContext:DbContext { public MyContext(DbContextOptions<MyContext> options) : base(options) {} public DbSet<Users> Uaa { get; set</span></strong><span style="color: #000000;"><strong><span style="color: #ff0000;">; }</span></strong> }}
The generated effect preview
3 Configure Services
In order for the application to generate a database and use this database, you need to add code in Startup.cs
Introduce three libraries at the header
using WebApplication1.Models;  //may be named differently
using Microsoft.EntityFrameworkCore;
using Microsoft.EntityFrameworkCore.Sqlite;
Then inject services into the application, with the following methods
(to be explained later, for now just understand, no need to add)
1 Directly write the string
Add code in Startup.cs
            string connecttext = "Filename=F:\\MY.DB";
            services.AddDbContext<MyContext>(options=>options.UseSqlite(connecttext));
2 Use JSON
Add content (the red part) to appsettings.json
{
  "Logging": {
    "LogLevel": {
      "Default": "Warning"
    }
  },
  "AllowedHosts": "*",
  "ConnectionStrings": {
    "MyContext": "Filename=F:\\MY.DB"
  }
}
Then add code in Startup.cs
            string connecttext = Configuration.GetConnectionString("MyContext");
            services.AddDbContext<MyContext>(options=>options.UseSqlite(connecttext));
Note:
In the above two methods, the purpose of the connecttext variable is to obtain the database connection string. This variable has no special meaning, it is just to increase readability.
The SQLite connection string only needs to write "Filename=[absolute path]"
services.AddDbContext<MyContext>(options=>options.UseSqlite(“connection string”));
means
injecting DbContext (database context service) into the application, with the context type being MyContext>
(options=>options.UseSqlite(“connection string”)
is a lambda expression, indicating the use of the SQLite database, with the parameter being the connection string. The lambda expression is a basic knowledge of C#, if you don't know it, just remember it for now and look it up later.
Let's perform a practical operation
Please copy the code from the above Method 1, then add it in Startup.cs class -- ConfigureServices method
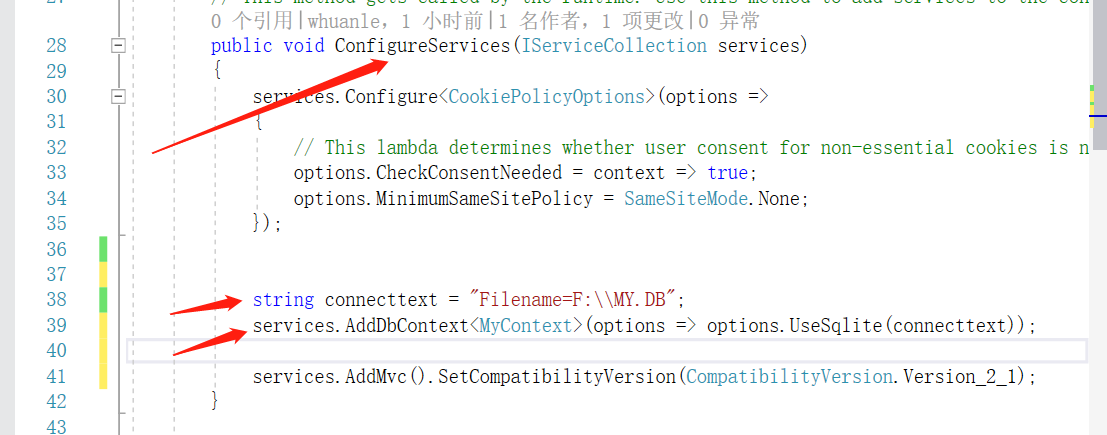
Directly copy the code below to overwrite ConfigureServerices
public void ConfigureServices(IServiceCollection services) { services.Configure<CookiePolicyOptions>(options => { // This lambda determines whether user consent for non-essential cookies is needed for a given request. options.CheckConsentNeeded = context => true; options.MinimumSameSitePolicy = SameSiteMode.None; });</span><span style="color: #0000ff;">string</span> connecttext = <span style="color: #800000;">"</span><span style="color: #800000;">Filename=F:\\MY.DB</span><span style="color: #800000;">"</span><span style="color: #000000;">; services.AddDbContext</span><MyContext>(options =><span style="color: #000000;"> options.UseSqlite(connecttext)); services.AddMvc().SetCompatibilityVersion(CompatibilityVersion.Version_2_1); }</span></pre>
Note:
The SQLite database file can be without a suffix, but having a suffix makes it easier for others to identify it as a database file. The suffix can be .DB, .SQLite, SQLite3 etc.
4 Generate Database
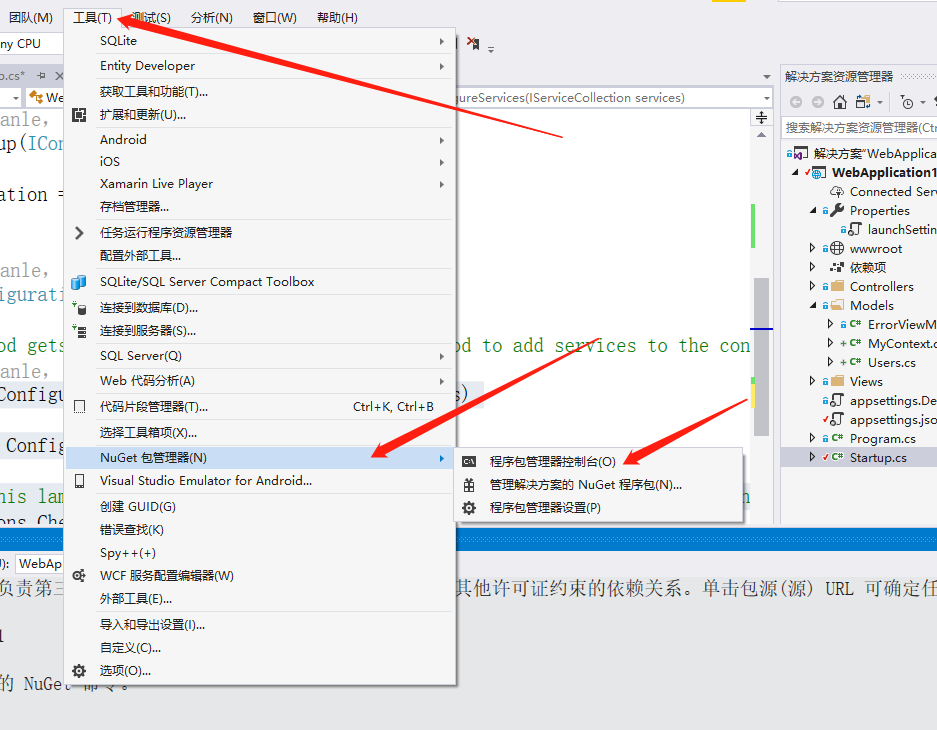
Click
Tools
-NuGet Package Manager
--Package Manager Console
Input
Add-Migration InitialCreate
Wait until it's done, then enter
Update-Database
As shown in the figure

Then you will find in the Solution Explorer, a new directory for Migrations and some files, and a new MY.DB file in the F:\ directory
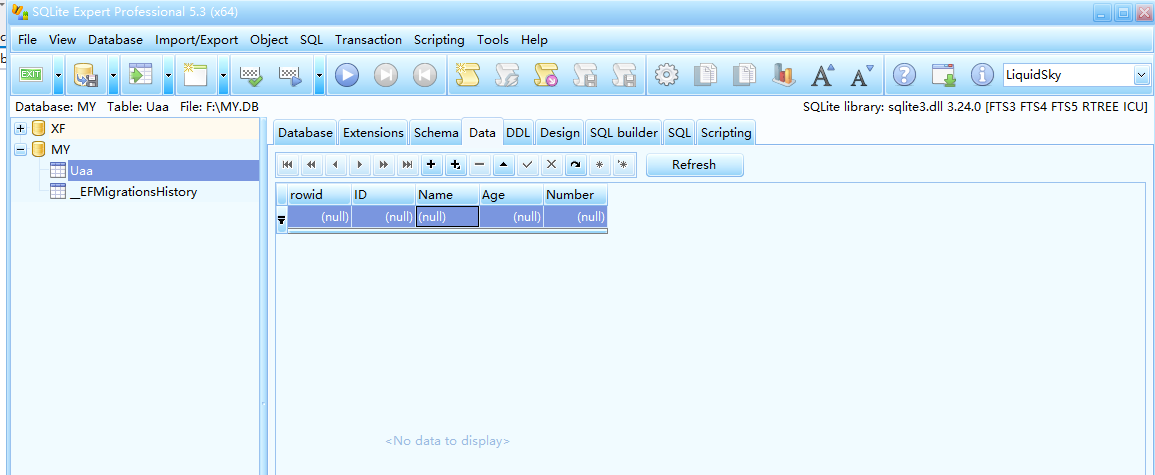
5 Use Tools to Manage SQLite Files
After generating the database file, you will find that it cannot be directly opened, not even by VS2017.
At this time, you can use the tool SQLite Expert Professional to manage the SQLite database.
Download link: http://xzc.197746.com/SQLiteExpert5.zip
Software introduction: https://www.cr173.com/soft/36343.html
After installing the software, you can open the database file.
Instructions for opening database files with the software:


6 Generate CRUD Framework
At this point, the program can perform operations on the database. For how to use it, it is best to refer to Microsoft's Entity Framework document.
The author provides a simple example here.
Step 1
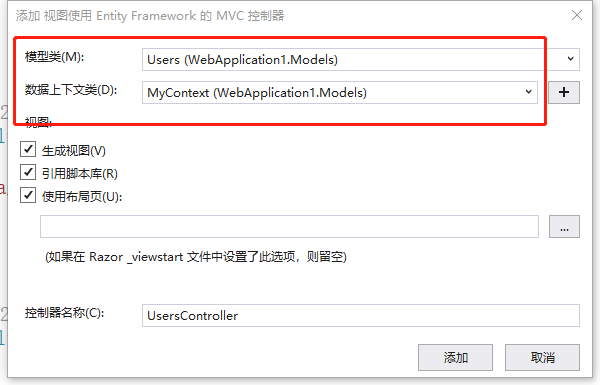
In the Controller directory, right-click and select Add -- New Scaffolded Item
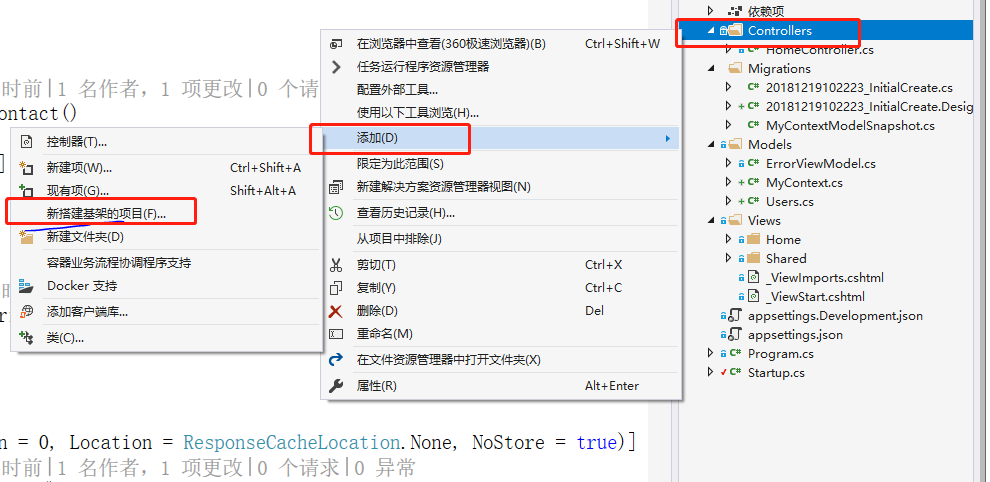
Step 2
Select MVC Controller with views, using Entity Framework
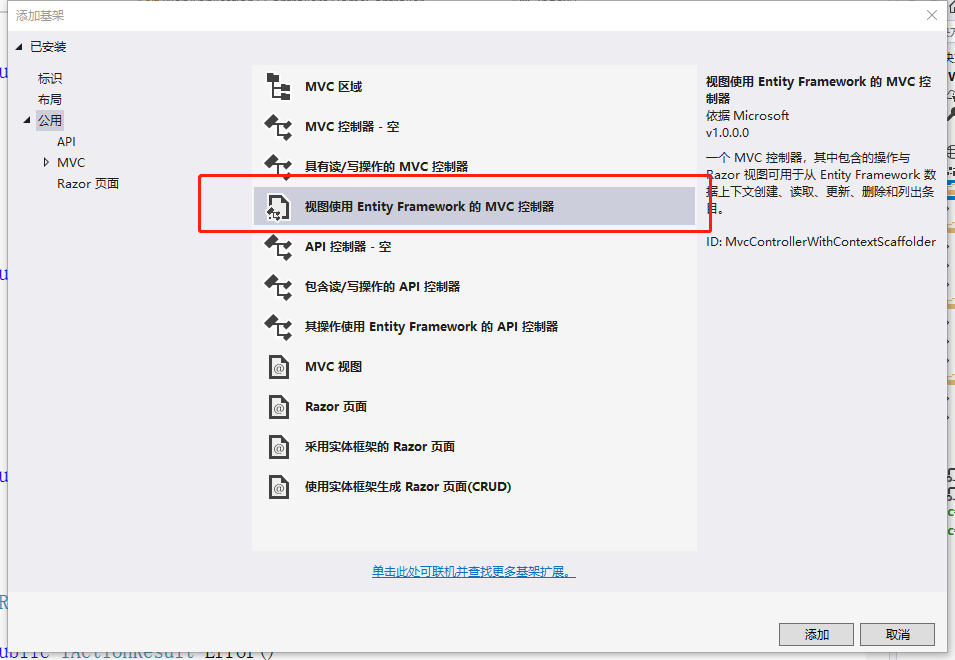
Select the model class Users ([project name].Models)
Select the database context MyContext ([project name].Models)
Click Add
Step 3
At this point, you should see
Controller now has a UsersController.cs file
Views now has a Users directory
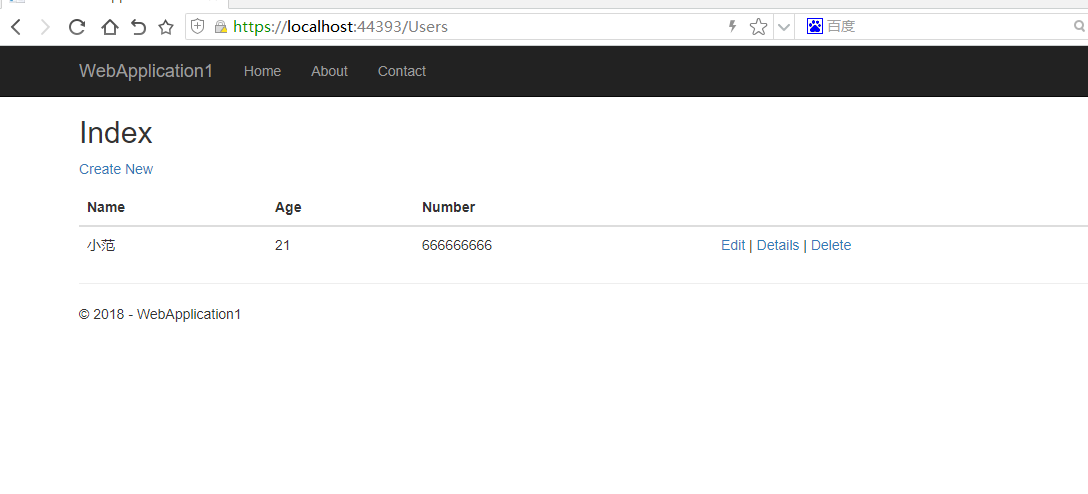
Please click Run or press F5 to start the website
Add Users at the end of the website
For example, https://localhost:[actual port]/Users, and you can do whatever you want with the Users table

Step 4 Add Data
Click Create New
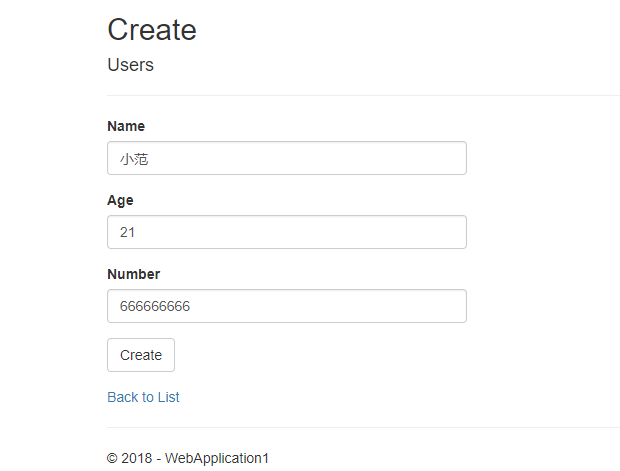
Result

7 Fill Data Cannot Be Empty
Note: This involves attributes and data validation, which I won't elaborate on. Readers can understand first, then translate other articles.
After the above operations, we can manipulate the database. In reality, although we can operate on the data, what if I want to set a certain field as required? Or that a certain field must be a phone number? We can't just let users fill in whatever they want, right?
Open Users.cs
Add the reference
using System.ComponentModel.DataAnnotations;
Modify the Users class code as follows
    public class Users
    {
        public int ID { get; set; }       //Primary Key

        [Required]
        public string Name { get; set; }  //User Name

        [Required(ErrorMessage ="cannot be empty")]
        public int Age { get; set; }    //User Age

        [Required]
        [RegularExpression(@"^1[3458][0-9]{9}$", ErrorMessage = "Phone number format is incorrect")]
        public int Number { get; set; } //User Phone Number
    }
Run the website, open URL/Users, click Create New, and then submit without filling in any content; you will find
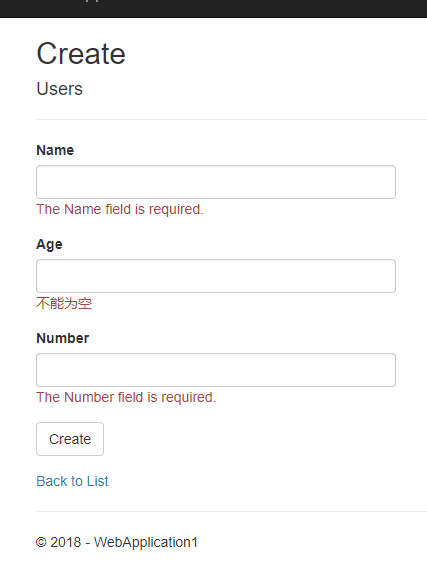
Fill in other fields and then input random numbers in the Number field; you will find

This is model validation.
It doesn’t require any code; just add the [attribute] above the property.
For further knowledge on this aspect, please refer to other resources.
Note:
- [Required] indicates that this field cannot be empty
- [Required(ErrorMessage ="cannot be empty")] ErrorMessage ="" indicates that if the requirement is not met, a prompt will appear
- [RegularExpression(@"^1[3458][0-9]{9}$", ErrorMessage = "Phone number format is incorrect")] This is a regular expression validation; if the content entered does not conform to the format, an error message will be displayed.
【The End】

文章评论