Directory
1. Introduction
2. Install Virtual Serial Port Software
3. Create a New Project and Add flyfire.CustomSerialPort
4. Description of flyfire.CustomSerialPort
5. Start Using flyfire.CustomSerialPort
6. Implement Writing Data to Serial Port
7. Implement Listening for Serial Port Messages and Communication with Multiple Devices
8. Example Implementation of Modbus Protocol
1. Introduction
Development Environment: Visual Studio 2017, .NET Core 2.x
Serial communication is used for data transmission between devices, and serial connections are widely utilized in IoT devices. The IoT communication protocols include Modbus protocol in ASCII, RTU, and TCP modes, which are application layer protocols independent of communication method.
This article implements serial communication. After implementation, the Modbus protocol can be added on the upper layer. In another article by the author, the Modbus protocol is realized over the serial port, allowing the data center to send messages to IoT devices, requesting device responses, transmitting device information, checking status, etc.
This article demonstrates the implementation of serial communication.
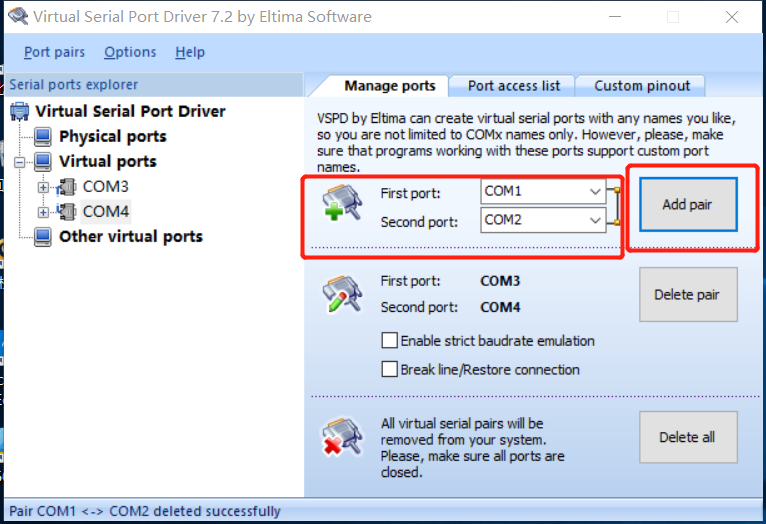
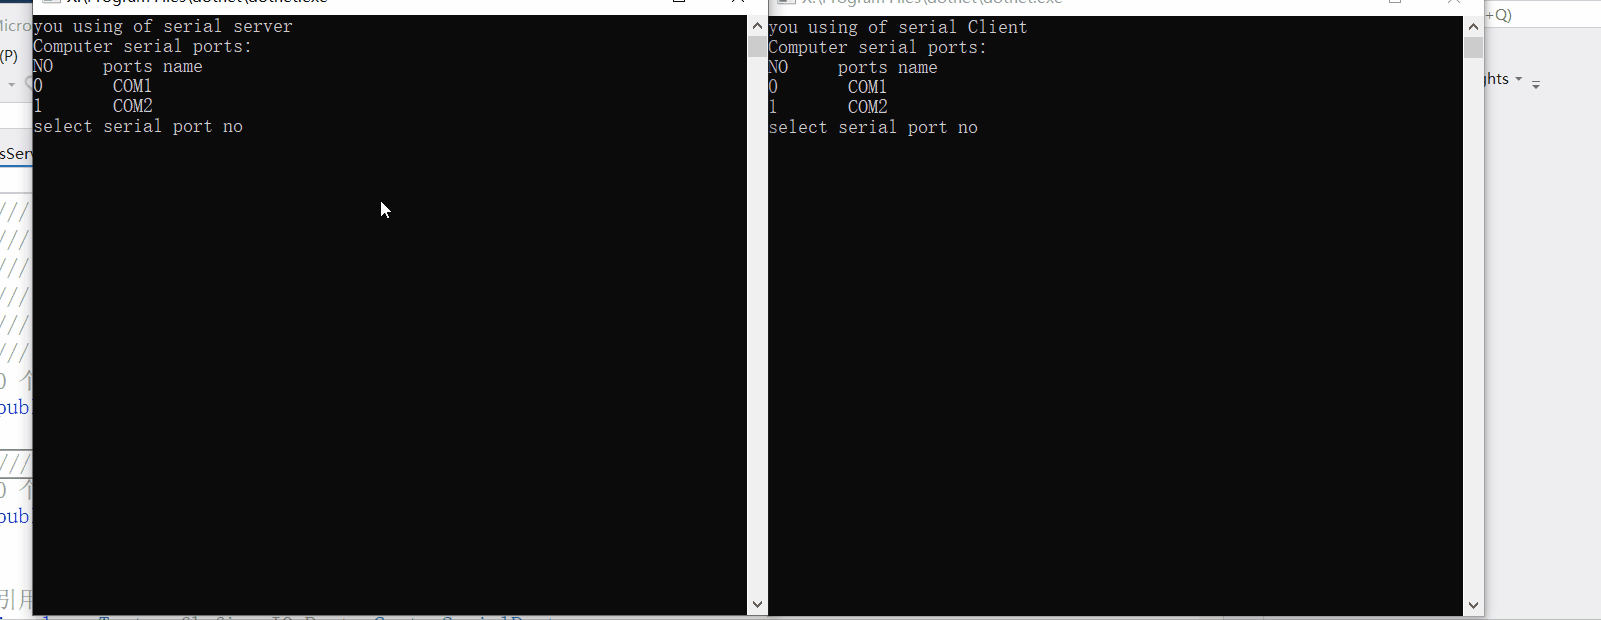
2. Install Virtual Serial Port Software
Since the development is on Windows, to facilitate debugging, the virtual serial port software needs to be installed: Virtual Serial Port Driver
After Installation

Add Serial Ports
Please add 4-6 serial ports, COM1, COM2, COM3, COM4 ... ...
Shutdown and Restart
To make the serial ports effective, please shut down and restart (it's not necessary to turn off the computer, but it's better to avoid potential issues by doing so).
After starting up, open the Device Manager and check Devices - Ports (COM & LPT). If the screenshot appears as below, it indicates normal operation.

Principle
As this is a virtual serial port, some issues need attention.

A and B (or server and client) cannot use the same serial port. When you check the serial ports in Device Manager (as shown above), you should see:
COM1 -> COM2
COM2 -> COM1
Since this is a virtual serial port, it can only be uni-directional. Therefore, A and B need to use two different serial ports for communication, while the virtual serial port connects COM1 and COM2. We do not need to worry about this; it is just for explanation.
3. Create a New Project and Add flyfire.CustomSerialPort
Create a .NET Core Console Project
The name can be arbitrary; the author used SerialPortTest. We will use this name.
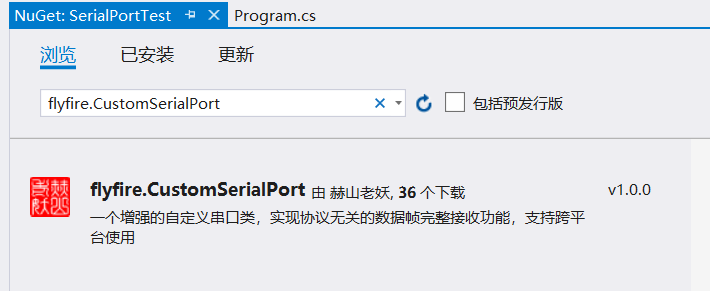
Add flyfire.CustomSerialPort
Add Nuget to the project, search for flyfire.CustomSerialPort, and then install.
Add the necessary Linux dependencies for the library to the project. For reasons and how to add, refer to another article by the author https://www.cnblogs.com/whuanle/p/10499498.html#4
4. Description of flyfire.CustomSerialPort
The CustomSerialPort class consolidates all functionalities; the author will detail the usage of the fields and methods in this class.
protected SerialPortStream sp;
- Class that supports serial communication.
public CustomSerialPort(string portName, int baudRate = 115200,
 Parity parity = Parity.None, int databits = 8, StopBits stopBits = StopBits.One);
Used to initialize a serial port for communication.
- portName: Serial port name.
- baudRate: Bit rate, referring to the number of bits transmitted per second, default is 115200 bps. If unclear, search it on Baidu.
- parity: Indicates the parity check method, an enumeration where None means no check, Odd means odd parity, Even means even parity, Space means always 0, and Mark means always 1.
- databits: Sets the number of data bits, indicating 8 bits here.
- stopBits: Indicates stop bits, which can be One, One5, or Two, representing 1, 1.5, or 2 stop bits.
Because serial device communication operates at the transport layer of the OSI model, there are corresponding regulations for these parameters. TCP/IP does not require attention to these specifics compared to serial ports.
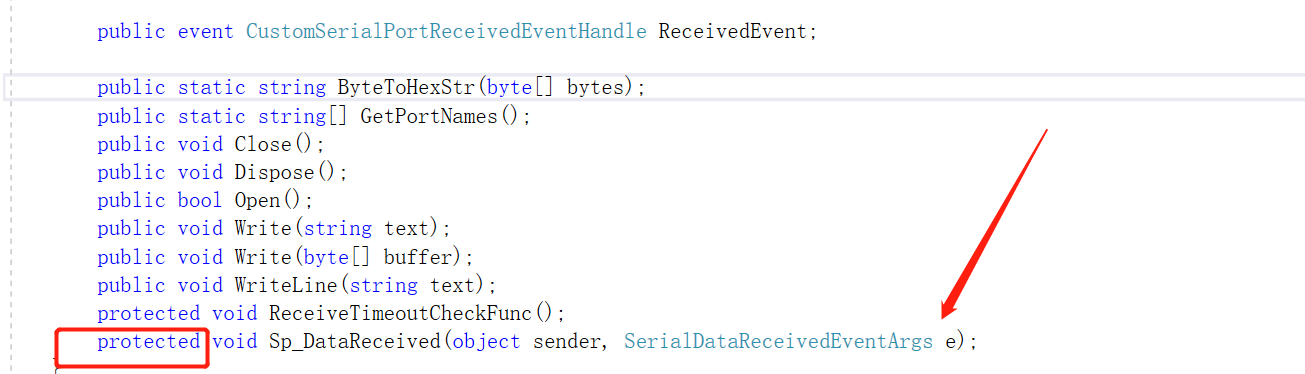
        public int ReceiveTimeout { get; set; }  //Receive timeout
        public bool ReceiveTimeoutEnable { get; set; }
        public bool RtsEnable { get; set; }    //Undocumented
        public bool DtrEnable { get; set; }    //Undocumented
        public bool IsOpen { get; }        //Check if it's in use
        public StopBits StopBits { get; set; }  //Enumeration as described above
        public int DataBits { get; set; }    //Explained above
        public Parity Parity { get; set; }    //Enumeration as explained above
        public int BaudRate { get; set; }
        public int BufSize { get; set; }
        public string PortName { get; set; }    //Name of the used serial port
public event CustomSerialPortReceivedEventHandle ReceivedEvent; //An event to bind the necessary actions to be triggered when a message is received</span><span style="color: #0000ff;">public</span> <span style="color: #0000ff;">static</span> <span style="color: #0000ff;">string</span> ByteToHexStr(<span style="color: #0000ff;">byte</span><span style="color: #000000;">[] bytes); //Convert a byte stream to a string </span><span style="color: #0000ff;">public</span> <span style="color: #0000ff;">static</span> <span style="color: #0000ff;">string</span><span style="color: #000000;">[] GetPortNames(); </span><span style="color: #0000ff;">public</span> <span style="color: #0000ff;">void</span><span style="color: #000000;"> Close(); //Close the serial port </span><span style="color: #0000ff;">public</span> <span style="color: #0000ff;">void</span><span style="color: #000000;"> Dispose(); </span><span style="color: #0000ff;">public</span> <span style="color: #0000ff;">bool</span><span style="color: #000000;"> Open(); //Open the serial port </span><span style="color: #0000ff;">public</span> <span style="color: #0000ff;">void</span> Write(<span style="color: #0000ff;">string</span><span style="color: #000000;"> text); //Write to the serial port as a string </span><span style="color: #0000ff;">public</span> <span style="color: #0000ff;">void</span> Write(<span style="color: #0000ff;">byte</span><span style="color: #000000;">[] buffer); //Write to the serial port as a byte stream (recommended) </span><span style="color: #0000ff;">public</span> <span style="color: #0000ff;">void</span> WriteLine(<span style="color: #0000ff;">string</span><span style="color: #000000;"> text); //Write a string; this is related to Modbus ASCII where a newline character is required to indicate the end of transmission </span><span style="color: #0000ff;">protected</span> <span style="color: #0000ff;">void</span><span style="color: #000000;"> ReceiveTimeoutCheckFunc(); </span><span style="color: #0000ff;">protected</span> <span style="color: #0000ff;">void</span> Sp_DataReceived(<span style="color: #0000ff;">object</span> sender, SerialDataReceivedEventArgs e); //Background thread handling to trigger events upon receiving serial port messages</pre>
The above is a description of flyfire.CustomSerialPort. Below, the author will explain how to use it.
5. Start Using flyfire.CustomSerialPort
Create a New Class SerialService.cs
Create a new class SerialService.cs designed to provide serial communication services.
In SerialSerice.cs, add
using flyfire.IO.Ports;
using RJCP.IO.Ports;
using System.Threading;
Write the following code (you might find it a bit strange, the reason will be explained later). For now, ignore these details and why it is written this way.
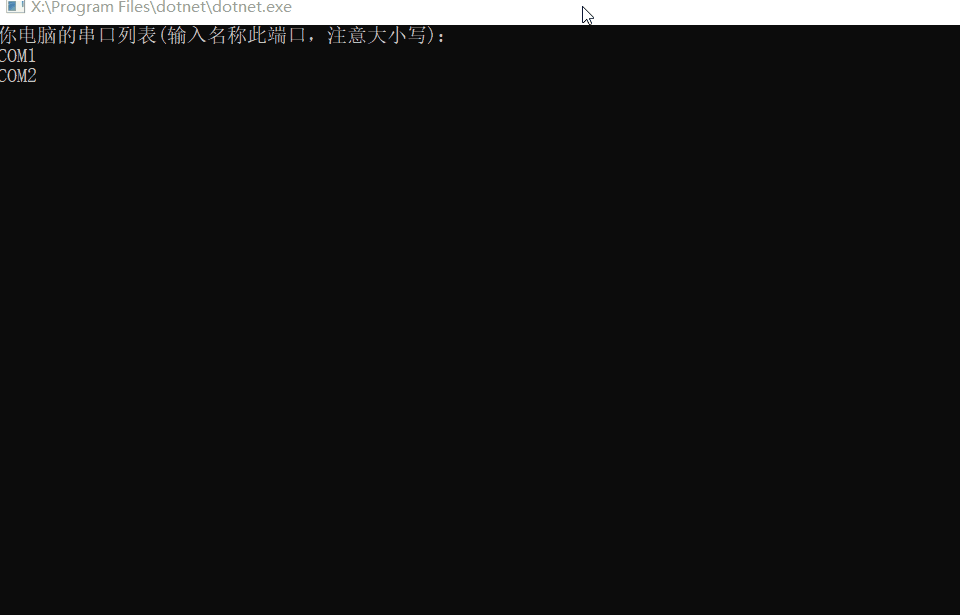
namespace SerialPortTest { /// <summary> /// Used to encapsulate the needed serial port communication /// </summary> public class SerialSerice { /// <summary> /// Get all serial ports of the computer /// </summary> public void GetSerial() {
//CustomSerialPort.GetPortNames() static method, retrieves all serial port names of the computer
//Since it has inherited, you can also use string[] vs = SerialPortCommunication.GetPortNames(); string[] vs = CustomSerialPort.GetPortNames(); Console.WriteLine("Your computer's serial port list:"); foreach (var i in vs) { Console.WriteLine(i); } } }</span><span style="color: #0000ff;">public</span> <span style="color: #0000ff;">class</span><span style="color: #000000;"> SerialPortCommunication : CustomSerialPort { </span><span style="color: #0000ff;">public</span> SerialPortCommunication(<span style="color: #0000ff;">string</span> portName, <span style="color: #0000ff;">int</span> baudRate = <span style="color: #800080;">115200</span>, Parity parity = Parity.None, <span style="color: #0000ff;">int</span> databits = <span style="color: #800080;">8</span>, StopBits stopBits =<span style="color: #000000;"> StopBits.One) :</span><span style="color: #0000ff;">base</span><span style="color: #000000;">(portName, baudRate, parity, databits, stopBits) { } }}
Start using in Program.cs
     static void Main(string[] args)
        {
            SerialSerice serialSerice = new SerialSerice();
            serialSerice.GetSerial();
            Console.ReadKey();
        }
Run and try

6. Implement Writing Data to the Serial Port
The above has retrieved the serial port. To write data to a serial port, you need to initialize the Serial Port class, implement the use of the serial port, and write different types and bases of data to the serial port.
For simplicity, we will use the default configuration.
Copy the code into your project; the author has detailed the steps.
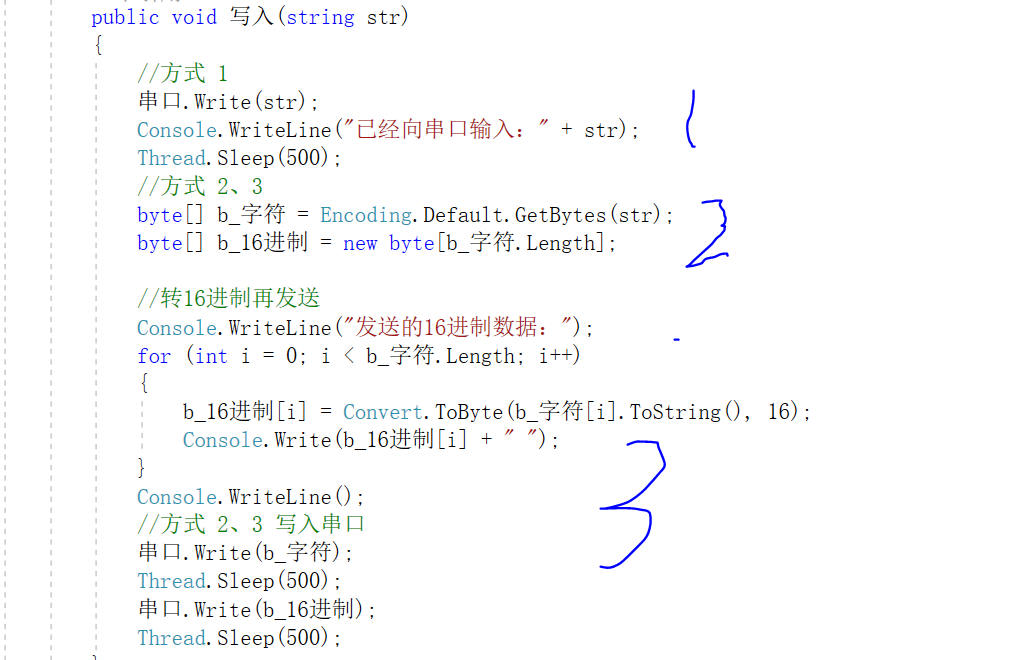
namespace SerialPortTest { /// <summary> /// Used to encapsulate the needed serial port communication /// </summary> public class SerialSerice { //Object to implement serial port communication SerialPortCommunication serialPort; /// <summary> /// Get all serial ports of the computer Step 1 /// </summary> public void GetSerial() { string[] vs = SerialPortCommunication.GetPortNames(); Console.WriteLine("Your computer's serial port list (enter the name of this port, paying attention to case):");</span><span style="color: #0000ff;">foreach</span> (<span style="color: #0000ff;">var</span> i <span style="color: #0000ff;">in</span><span style="color: #000000;"> vs) { Console.WriteLine(i); } } </span><span style="color: #008000;">//</span><span style="color: #008000;">Initialize serial port Step 2</span> <span style="color: #0000ff;">public</span> <span style="color: #0000ff;">void</span> Initialize(<span style="color: #0000ff;">string</span><span style="color: #000000;"> portname) { serialPort </span>= <span style="color: #0000ff;">new</span><span style="color: #000000;"> SerialPortCommunication(portname);<br /> serialPort.Open(); } </span><span style="color: #008000;">//</span><span style="color: #008000;">Write data to the serial port Step 3</span> <span style="color: #0000ff;">public</span> <span style="color: #0000ff;">void</span> Write(<span style="color: #0000ff;">string</span><span style="color: #000000;"> str) { </span><span style="color: #008000;">//</span><span style="color: #008000;">Method 1</span>serialPort.Write(str);
Console.WriteLine("Input to the serial port:" + str);
Thread.Sleep(500);
//Methods 2, 3
byte[] b_char = Encoding.Default.GetBytes(str);
byte[] b_hex = new byte[b_char.Length];</span><span style="color: #008000;">//</span><span style="color: #008000;">Convert to hexadecimal before sending</span> Console.WriteLine(<span style="color: #800000;">"</span><span style="color: #800000;">Sent hexadecimal data:</span><span style="color: #800000;">"</span><span style="color: #000000;">); </span><span style="color: #0000ff;">for</span> (<span style="color: #0000ff;">int</span> i = <span style="color: #800080;">0</span>; i < b_char.Length; i++<span style="color: #000000;">) { b_hex[i] </span>= Convert.ToByte(b_char[i].ToString(), <span style="color: #800080;">16</span><span style="color: #000000;">); Console.Write(b_hex[i] </span>+ <span style="color: #800000;">"</span> <span style="color: #800000;">"</span><span style="color: #000000;">); }<br /> Console.WriteLine(); </span><span style="color: #008000;">//</span><span style="color: #008000;">Methods 2, 3 writing to the serial port</span>serialPort.Write(b_char);
Thread.Sleep(500);
serialPort.Write(b_hex);
Thread.Sleep(500);
}
}</span><span style="color: #0000ff;">public</span> <span style="color: #0000ff;">class</span><span style="color: #000000;"> SerialPortCommunication : CustomSerialPort { </span><span style="color: #0000ff;">public</span> SerialPortCommunication(<span style="color: #0000ff;">string</span> portName, <span style="color: #0000ff;">int</span> baudRate = <span style="color: #800080;">115200</span>, Parity parity = Parity.None, <span style="color: #0000ff;">int</span> databits = <span style="color: #800080;">8</span>, StopBits stopBits =<span style="color: #000000;"> StopBits.One) : </span><span style="color: #0000ff;">base</span><span style="color: #000000;">(portName, baudRate, parity, databits, stopBits) { } }}
The service has been configured, and next is to use the written service.
。
class Program { static void Main(string[] args) { // Initialize serial communication service SerialSerice serialFunction = new SerialSerice();</span><span style="color: #008000;">//</span><span style="color: #008000;"> Display the serial port list and allow the user to select a port</span>serialFunction.GetSerial();
string portname= Console.ReadLine();</span><span style="color: #008000;">//</span><span style="color: #008000;"> Step 2 </span>serialFunction.初始化(portname);
Console.WriteLine(</span><span style="color: #800000;">"</span><span style="color: #800000;">Enter the content you want to send to the client, type exit to quit</span><span style="color: #800000;">"</span><span style="color: #000000;">); </span><span style="color: #008000;">//</span><span style="color: #008000;"> Because three writing methods are demonstrated, the third method requires conversion; non-numeric input will cause an error </span><span style="color: #008000;">//</span><span style="color: #008000;"> In fact, you can send any type of data, it depends on how you implement step 3</span> Console.WriteLine(<span style="color: #800000;">"</span><span style="color: #800000;">Only numbers are allowed! Octal, decimal, and hexadecimal are all valid; please do not input strings</span><span style="color: #800000;">"</span><span style="color: #000000;">); </span><span style="color: #0000ff;">while</span> (<span style="color: #0000ff;">true</span><span style="color: #000000;">) { </span><span style="color: #0000ff;">string</span> str =<span style="color: #000000;"> Console.ReadLine(); </span><span style="color: #0000ff;">if</span> (str == <span style="color: #800000;">"</span><span style="color: #800000;">exit</span><span style="color: #800000;">"</span><span style="color: #000000;">) </span><span style="color: #0000ff;">break</span><span style="color: #000000;">; </span><span style="color: #008000;">//</span><span style="color: #008000;"> Step 3</span>serialFunction.写入(str);
}Console.ReadKey(); }</span></pre>
Example:
Regarding base conversions, you can look for some articles. Serial communication has high conversion requirements between types like byte, int16, int32, and string.
7. Implementing Serial Port Message Monitoring and Communication Between Multiple Devices
Before we start, take a look at the diagram:
Click to expand the code


protected void Sp_DataReceived(object sender, SerialDataReceivedEventArgs e) { int canReadBytesLen = 0; if (ReceiveTimeoutEnable) { while (sp.BytesToRead > 0) { canReadBytesLen = sp.BytesToRead; if (receiveDatalen + canReadBytesLen > BufSize) { receiveDatalen = 0; throw new Exception("Serial port receives buffer overflow!"); } var receiveLen = sp.Read(recviceBuffer, receiveDatalen, canReadBytesLen); if (receiveLen != canReadBytesLen) { receiveDatalen = 0; throw new Exception("Serial port receives exception!"); } //Array.Copy(recviceBuffer, 0, receivedBytes, receiveDatalen, receiveLen); receiveDatalen += receiveLen; lastReceiveTick = Environment.TickCount; if (!TimeoutCheckThreadIsWork) { TimeoutCheckThreadIsWork = true; Thread thread = new Thread(ReceiveTimeoutCheckFunc) { Name = "ComReceiveTimeoutCheckThread" }; thread.Start(); } } } else { if (ReceivedEvent != null) { // Get byte length int bytesNum = sp.BytesToRead; if (bytesNum == 0) return; // Create byte array byte[] resultBuffer = new byte[bytesNum];</span><span style="color: #0000ff;">int</span> i = <span style="color: #800080;">0</span><span style="color: #000000;">; </span><span style="color: #0000ff;">while</span> (i <<span style="color: #000000;"> bytesNum) { </span><span style="color: #008000;">//</span><span style="color: #008000;"> Read data into buffer</span> <span style="color: #0000ff;">int</span> j = sp.Read(recviceBuffer, i, bytesNum -<span style="color: #000000;"> i); i </span>+=<span style="color: #000000;"> j; } Array.Copy(recviceBuffer, </span><span style="color: #800080;">0</span>, resultBuffer, <span style="color: #800080;">0</span><span style="color: #000000;">, i); ReceivedEvent(</span><span style="color: #0000ff;">this</span><span style="color: #000000;">, resultBuffer); </span><span style="color: #008000;">//</span><span style="color: #008000;">System.Diagnostics.Debug.WriteLine("len " + i.ToString() + " " + ByteToHexStr(resultBuffer));</span>}
//Array.Clear (receivedBytes,0,receivedBytes.Length );
receiveDatalen = 0;
}
}
Implementing Background Message Reception
Above is the properties, fields, and methods of flyfire.CustomSerialPort. The Sp_DataReceived() method implements the background monitoring of data and triggers predefined events, continuously receiving data in a new thread. However, this implementation is not very good.
Framework author’s blog https://www.cnblogs.com/flyfire-cn/p/10434171.html
From the above, we can see that this monitoring method is protected, so it requires using a class inheritance to access this method.
In addition, the event delegate is
public delegate void CustomSerialPortReceivedEventHandle(object sender, byte[] bytes)
Based on the above, here is a code snippet that can receive data in the background and output it to the console:
.</p>
<div class="cnblogs_code">
<pre><span style="color: #0000ff;">using</span><span style="color: #000000;"> System;
</span><span style="color: #0000ff;">using</span><span style="color: #000000;"> System.Collections.Generic;
</span><span style="color: #0000ff;">using</span><span style="color: #000000;"> System.Text;
</span><span style="color: #0000ff;">using</span><span style="color: #000000;"> System.Threading;
</span><span style="color: #0000ff;">using</span><span style="color: #000000;"> flyfire.IO.Ports;
</span><span style="color: #0000ff;">using</span><span style="color: #000000;"> RJCP.IO.Ports;
</span><span style="color: #0000ff;">namespace</span><span style="color: #000000;"> SerialPortTest
{
</span><span style="color: #808080;">///</span> <span style="color: #808080;"><summary></span>
<span style="color: #808080;">///</span><span style="color: #008000;"> Encapsulation for serial port communication
</span><span style="color: #808080;">///</span> <span style="color: #808080;"></summary></span>
<span style="color: #0000ff;">public</span> <span style="color: #0000ff;">class</span><span style="color: #000000;"> SerialSerice
{
</span><span style="color: #008000;">//</span><span style="color: #008000;"> Object for serial port communication</span>
<span style="color: #000000;"> SerialPortCommunication 串口;
</span><span style="color: #808080;">///</span> <span style="color: #808080;"><summary></span>
<span style="color: #808080;">///</span><span style="color: #008000;"> Retrieve all serial ports on the computer Step 1
</span><span style="color: #808080;">///</span> <span style="color: #808080;"></summary></span>
<span style="color: #0000ff;">public</span> <span style="color: #0000ff;">void</span><span style="color: #000000;"> GetSerial()
{
</span><span style="color: #0000ff;">string</span>[] vs =<span style="color: #000000;"> 串口通讯.GetPortNames();
Console.WriteLine(</span><span style="color: #800000;">"</span><span style="color: #800000;">List of serial ports on your computer (enter the port name, case sensitive):</span><span style="color: #800000;">"</span><span style="color: #000000;">);
</span><span style="color: #0000ff;">foreach</span> (<span style="color: #0000ff;">var</span> i <span style="color: #0000ff;">in</span><span style="color: #000000;"> vs)
{
Console.WriteLine(i);
}
}
</span><span style="color: #008000;">//</span><span style="color: #008000;"> Initialize serial port Step 2</span>
<span style="color: #0000ff;">public</span> <span style="color: #0000ff;">void</span> 初始化(<span style="color: #0000ff;">string</span><span style="color: #000000;"> portname)
{
串口 </span>= <span style="color: #0000ff;">new</span><span style="color: #000000;"> SerialPortCommunication(portname);
串口.Open();
}
</span><span style="color: #008000;">//</span><span style="color: #008000;"> Write data to the serial port Step 3</span>
<span style="color: #0000ff;">public</span> <span style="color: #0000ff;">void</span> 写入(<span style="color: #0000ff;">string</span><span style="color: #000000;"> str)
{
</span><span style="color: #008000;">//</span><span style="color: #008000;"> Method 1</span>
<span style="color: #000000;"> 串口.Write(str);
Console.WriteLine(</span><span style="color: #800000;">"</span><span style="color: #800000;">Data sent to the serial port:</span><span style="color: #800000;">"</span> +<span style="color: #000000;"> str);
Thread.Sleep(</span><span style="color: #800080;">500</span><span style="color: #000000;">);
</span><span style="color: #008000;">//</span><span style="color: #008000;"> Method 2, 3</span>
<span style="color: #0000ff;">byte</span>[] b_字符 =<span style="color: #000000;"> Encoding.Default.GetBytes(str);
</span><span style="color: #0000ff;">byte</span>[] b_16进制 = <span style="color: #0000ff;">new</span> <span style="color: #0000ff;">byte</span><span style="color: #000000;">[b_字符.Length];
</span><span style="color: #008000;">//</span><span style="color: #008000;"> Convert to hexadecimal and send</span>
Console.WriteLine(<span style="color: #800000;">"</span><span style="color: #800000;">Hexadecimal data sent:</span><span style="color: #800000;">"</span><span style="color: #000000;">);
</span><span style="color: #0000ff;">for</span> (<span style="color: #0000ff;">int</span> i = <span style="color: #800080;">0</span>; i < b_字符.Length; i++<span style="color: #000000;">)
{
b_16进制[i] </span>= Convert.ToByte(b_字符[i].ToString(), <span style="color: #800080;">16</span><span style="color: #000000;">);
Console.Write(b_16进制[i] </span>+ <span style="color: #800000;">"</span> <span style="color: #800000;">"</span><span style="color: #000000;">);
}
Console.WriteLine();
</span><span style="color: #008000;">//</span><span style="color: #008000;"> Write to the serial port using Method 2, 3</span>
<span style="color: #000000;"> 串口.Write(b_字符);
Thread.Sleep(</span><span style="color: #800080;">500</span><span style="color: #000000;">);
串口.Write(b_16进制);
Thread.Sleep(</span><span style="color: #800080;">500</span><span style="color: #000000;">);
}
</span><span style="color: #0000ff;">public</span> <span style="color: #0000ff;">void</span><span style="color: #000000;"> 开启后台监听()
{
</span><span style="color: #008000;">//</span><span style="color: #008000;"> Event triggered on receiving a message</span>
串口.ReceivedEvent +=<span style="color: #000000;"> 被触发的事件_1;
串口.开始后台监控();
}
</span><span style="color: #0000ff;">public</span> <span style="color: #0000ff;">static</span> <span style="color: #0000ff;">void</span> 被触发的事件_1(<span style="color: #0000ff;">object</span> sender, <span style="color: #0000ff;">byte</span><span style="color: #000000;">[] bytes)
{
Console.WriteLine(</span><span style="color: #800000;">"</span><span style="color: #800000;">Data received:</span><span style="color: #800000;">"</span><span style="color: #000000;">);
</span><span style="color: #0000ff;">foreach</span> (<span style="color: #0000ff;">var</span> i <span style="color: #0000ff;">in</span><span style="color: #000000;"> bytes)
{
Console.Write(i </span>+ <span style="color: #800000;">"</span> <span style="color: #800000;">"</span><span style="color: #000000;">);
}
Console.WriteLine(</span><span style="color: #800000;">""</span><span style="color: #000000;">);
}
}
</span><span style="color: #0000ff;">public</span> <span style="color: #0000ff;">class</span><span style="color: #000000;"> SerialPortCommunication : CustomSerialPort
{
</span><span style="color: #0000ff;">public</span> SerialPortCommunication(<span style="color: #0000ff;">string</span> portName, <span style="color: #0000ff;">int</span> baudRate = <span style="color: #800080;">115200</span>, Parity parity = Parity.None, <span style="color: #0000ff;">int</span> databits = <span style="color: #800080;">8</span>, StopBits stopBits =<span style="color: #000000;"> StopBits.One)
: </span><span style="color: #0000ff;">base</span><span style="color: #000000;">(portName, baudRate, parity, databits, stopBits)
{
}
</span><span style="color: #008000;">//</span><span style="color: #008000;"> No significance, just because the parent class's Sp_DataReceived() is not public</span>
<span style="color: #0000ff;">public</span> <span style="color: #0000ff;">void</span><span style="color: #000000;"> 开始后台监控()
{
Sp_DataReceived(</span><span style="color: #0000ff;">new</span> <span style="color: #0000ff;">object</span>(), <span style="color: #0000ff;">new</span><span style="color: #000000;"> SerialDataReceivedEventArgs(SerialData.Eof));
}
}
}</span></pre>
</div>
<div class="cnblogs_code">
<pre><span style="color: #0000ff;">using</span><span style="color: #000000;"> System;
</span><span style="color: #0000ff;">namespace</span><span style="color: #000000;"> SerialPortTest
{
</span><span style="color: #0000ff;">class</span><span style="color: #000000;"> Program
{
</span><span style="color: #0000ff;">static</span> <span style="color: #0000ff;">void</span> Main(<span style="color: #0000ff;">string</span><span style="color: #000000;">[] args)
{
</span><span style="color: #008000;">//</span><span style="color: #008000;"> Initialize the serial communication service</span>
SerialSerice 串口功能 = <span style="color: #0000ff;">new</span><span style="color: #000000;"> SerialSerice();
</span><span style="color: #008000;">//</span><span style="color: #008000;"> Display the serial port list and allow user to select a port</span>
<span style="color: #000000;"> 串口功能.GetSerial();
</span><span style="color: #0000ff;">string</span> portname=<span style="color: #000000;"> Console.ReadLine();
</span><span style="color: #008000;">//</span><span style="color: #008000;"> Step 2 </span>
<span style="color: #000000;"> 串口功能.初始化(portname);
串口功能.开启后台监听();
Console.WriteLine(</span><span style="color: #800000;">"</span><span style="color: #800000;">Enter the content you want to send to the client, type exit to quit</span><span style="color: #800000;">"</span><span style="color: #000000;">);
</span><span style="color: #008000;">//</span><span style="color: #008000;"> Since three writing methods are demonstrated, the third method requires conversion, and non-numeric inputs will cause errors
</span><span style="color: #008000;">//</span><span style="color: #008000;"> In fact, you can send any type of data, it depends on how you implement step 3</span>
Console.WriteLine(<span style="color: #800000;">"</span><span style="color: #800000;">Only numbers are allowed! Both octal, decimal, and hexadecimal are acceptable, do not enter strings</span><span style="color: #800000;">"</span><span style="color: #000000;">);
</span><span style="color: #0000ff;">while</span> (<span style="color: #0000ff;">true</span><span style="color: #000000;">)
{
             <span style="color: #0000ff;">string</span> str =<span style="color: #000000;"> Console.ReadLine();
             </span><span style="color: #0000ff;">if</span> (str == <span style="color: #800000;">"</span><span style="color: #800000;">exit</span><span style="color: #800000;">"</span><span style="color: #000000;">)
                 </span><span style="color: #0000ff;">break</span><span style="color: #000000;">;

             </span><span style="color: #008000;">//</span><span style="color: #008000;">Step 3</span>
<span style="color: #000000;">                SerialPortFunction.Write(str);
         }

         Console.ReadKey();
     }
 }
}</span>
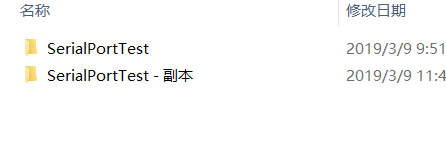
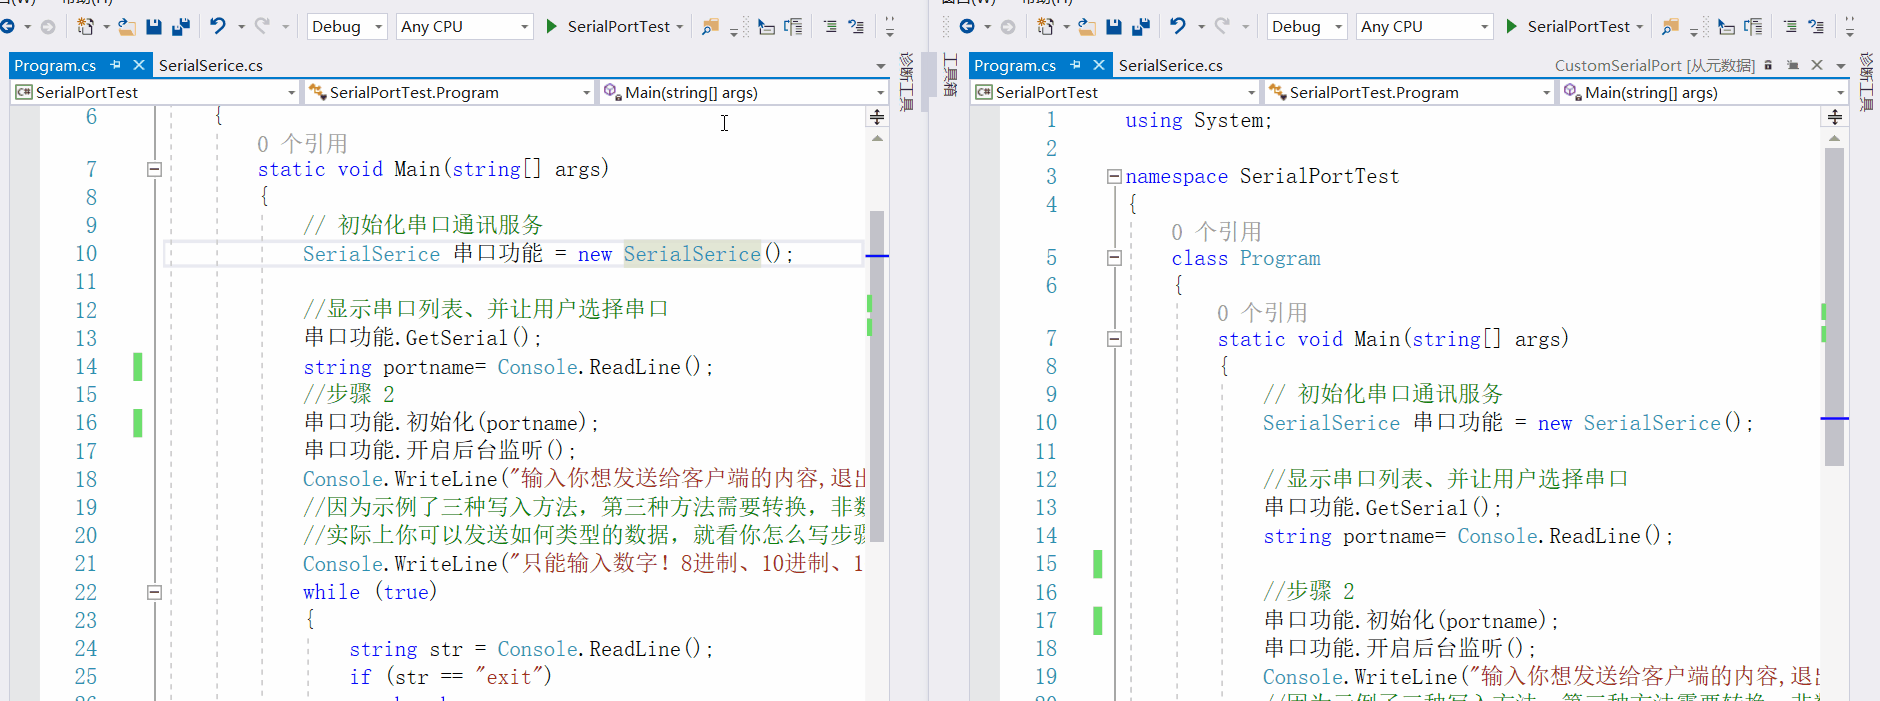
To implement serial communication, we copied this project to another directory and opened it to run. In other words, the same piece of code became two copies, resulting in two consoles during execution.
You will find that inputting a message results in receiving multiple pieces of information. This is because the author has provided three writing methods in the writing part; simply remove two of them.
To facilitate understanding, the author used Chinese to name the methods.
Serial communication has been achieved. How to implement the Modbus protocol and establish agreed communication with devices (such as microcontrollers, development boards, etc.)? ~ Refer to the author's other article ~
The project source code has been uploaded to http://pan.whuanle.cn/?dir=uploads/dotnet-core-串口
8. Example of Implementing Modbus Protocol
Due to time and length constraints, I will briefly discuss Modbus and present an implementation example.
Modbus is a communication protocol with implementations such as ASCII, RTU, and TCP, widely used in IoT devices, industrial control, and automation scenarios.

The protocol consists of one master and multiple slaves. Let's imagine it as a smart home, where a computer is the master and devices like air conditioners, televisions, and refrigerators are the slaves. These devices can only send data to the master and cannot communicate directly; each device has its own address.

The format of the data flow transmitted is as follows:
(The above two images are from the Internet.)
I then implemented the Modbus protocol, validating, encapsulating, packaging messages into frames, receiving, and processing the sending.
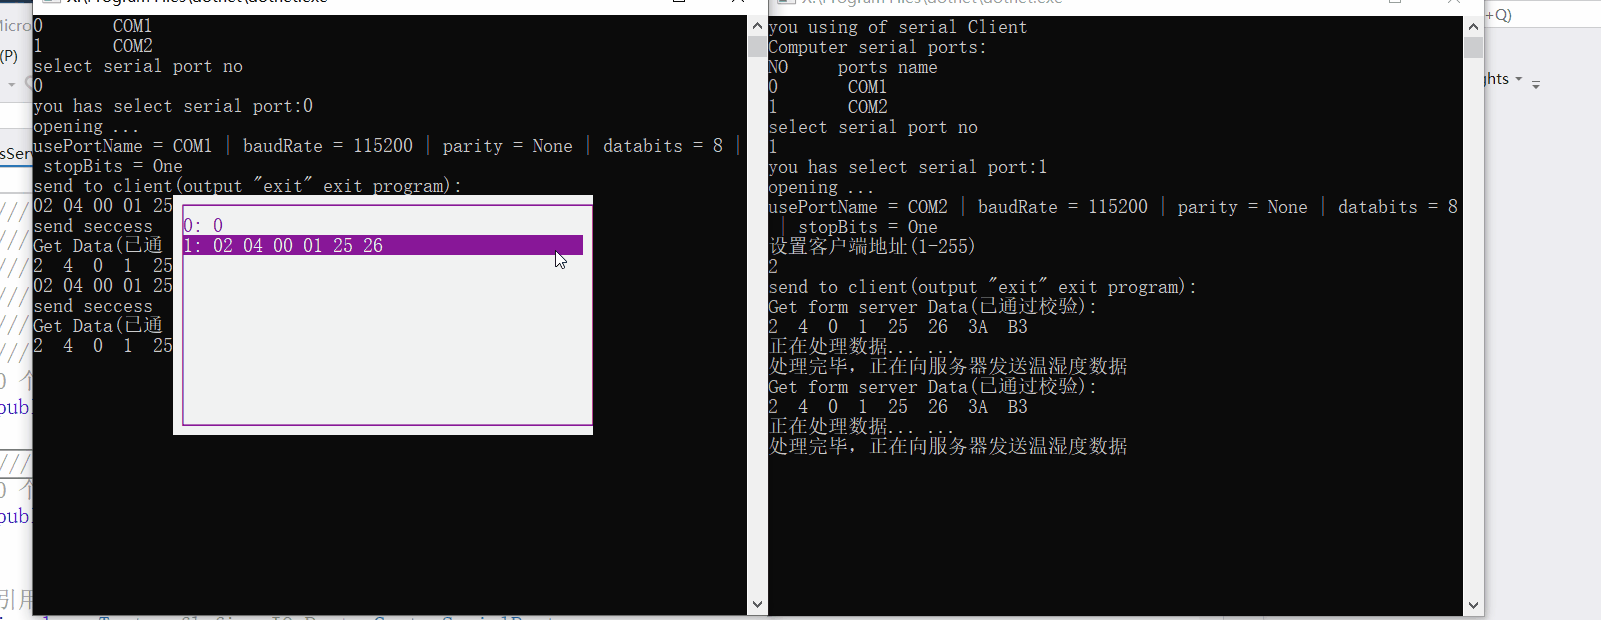
It is divided into server and client. Each client has an address. Below is a demonstration:
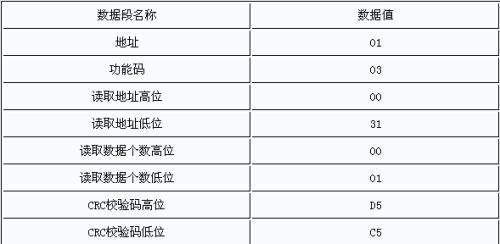
I used 02 04 00 01 25 26 on the server, representing: client address 02, function code: 04 (indicating what the device is supposed to do), intending to read the device's temperature and humidity data: 00 01 (00 02, 00 03 represent reading other data). The last two bytes, 25 26, have other functional purposes, which I haven't implemented due to the lack of real devices; understanding is sufficient.
The server sends data to the client (02), with the function to read registers (04). The next step is to determine whether to read temperature or humidity data (00 01 indicates reading both), and 25 26 (converted to decimal is 9510) can define that the client should return 9510 records.
The returned data 2 4 0 1 25 26 BB 4B includes the last two bytes for CRC check. Due to data transmission, there may be loss or errors, so the last two bytes are used to verify if the data was received correctly.
The above shows inputting hexadecimal numbers in the console, while below demonstrates directly inputting decimal numbers.
I just started my internship~ Wish everything goes smoothly~~~
Due to limited skills, if there are any mistakes in the article, please comment and point them out~ Thank you~

文章评论