Series Tutorial Directory
(1) Connecting to Alibaba Cloud IOT
(2) Setting Up Delegated Events
(3) Reporting Properties
(4) SDK Documentation: Properties, Methods, Delegates, Classes
http://pan.whuanle.cn/index.php?dir=uploads/阿里云IOT/AliIOTXFclient-dll类库&response
Download the three libraries and include them in the header to use.
using AliIOTXFClient;
Example download link
http://pan.whuanle.cn/index.php?dir=uploads/阿里云IOT/demo示例
This chapter uses the example AliIOTXF.One
II. Creating Product Devices on Alibaba Cloud IOT
Open the address https://iot.console.aliyun.com/product
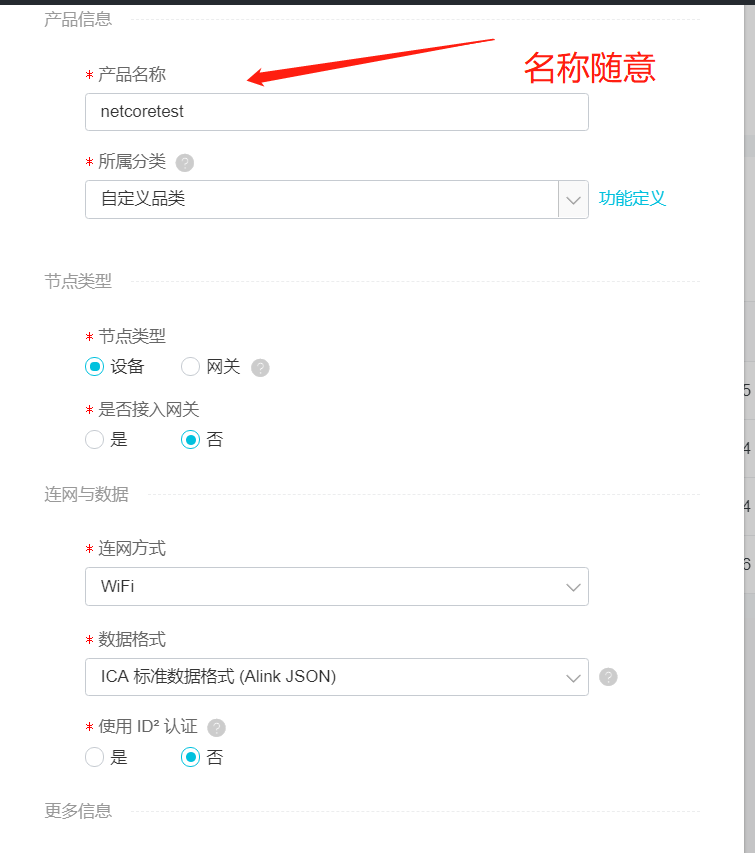
Creating a Product
Choose node type as device, non-gateway, because it directly connects to devices with network capabilities. Transparent transmission requires writing JS parsing scripts. Alink Json is convenient, less prone to errors, and easier to understand. ID2 provides bidirectional identity authentication capability but comes at a cost.
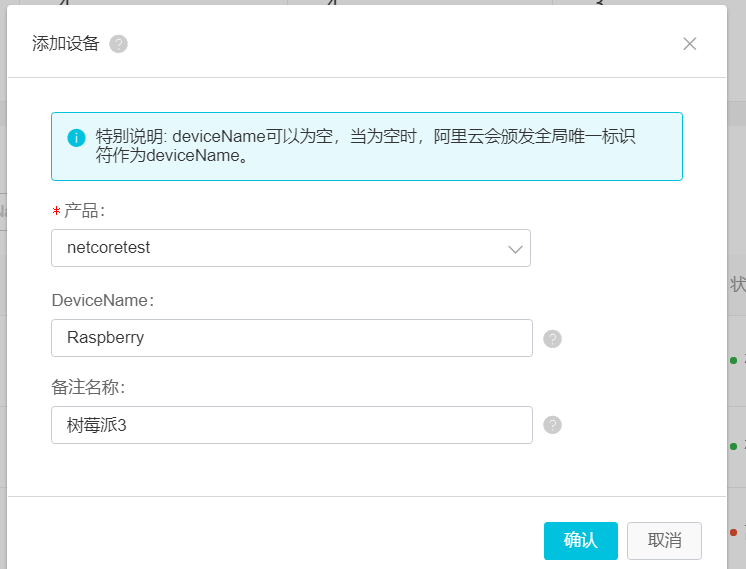
Creating Devices
After successful creation, remember to use "Copy" to store it in a notepad or similar. (It doesn't matter if you save it, you can copy it later)
Attached is the documentation for creating products on Alibaba Cloud https://help.aliyun.com/document_detail/73705.html?spm=a2c4g.11174283.6.553.3a8b1668QRyRs7
Devices after creation

III. Creating Projects, Connecting to Alibaba Cloud
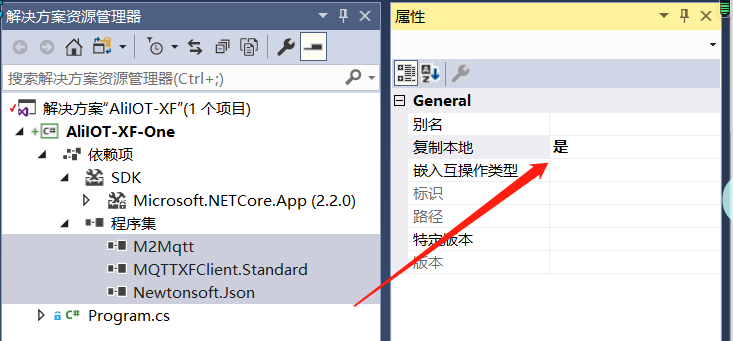
Create a .NET Core project of your choice, include the three DLLs, remember to select "Copy to local".
Header Inclusion
using AliIOTXFClient;

Creating Connection Client
Copy the content from "Copy" or go to the console--Specific Device to copy ProductKey and DeviceName.
XFMQTT client = new XFMQTT(ProductKey, DeviceName); // Create connection object
Initializing Configuration
Copy DeviceSecret from the console, the Region ID refers to the region, which you can see at the top-left corner of the console, click View Alibaba Cloud IOT Regions, and copy the corresponding Region ID. For example, mine is Huadong 2, corresponding to cn-shanghai.
client.Init(DeviceSecret, Region ID); // Initialize client
Adding Topics to Subscribe
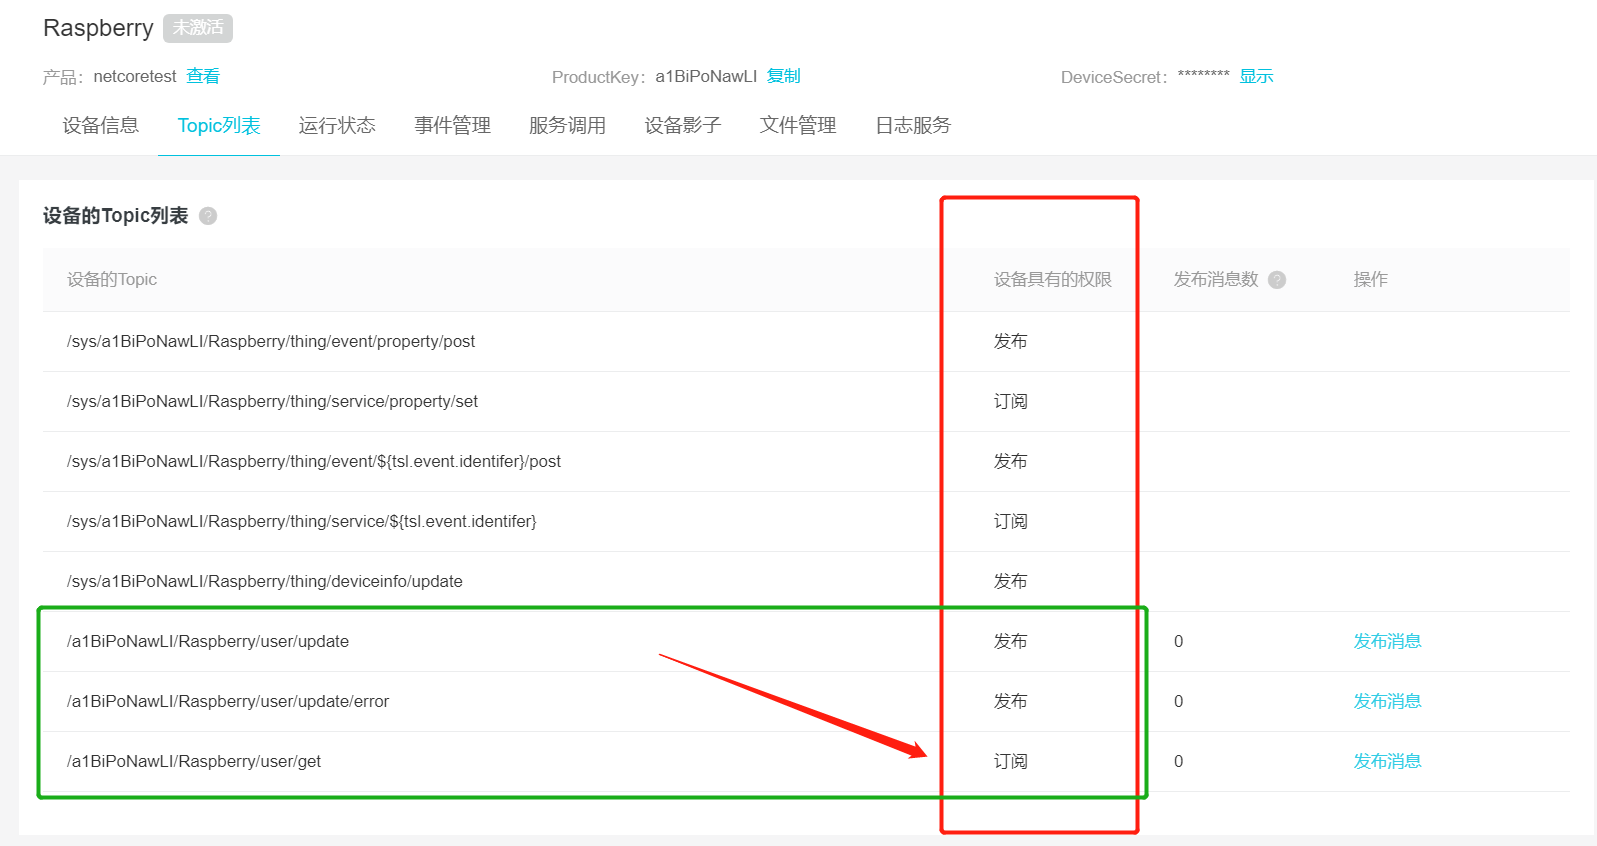
Only Topics with “subscription” permissions can be subscribed. Also, only .../user/... series belong to standard Topics. We'll discuss this later, see the picture.
update, update/error, get are default Topics.
We create custom Topics, click the corresponding "product" -- view Topic class list, "Custom Topic Class"
Add two custom Topics


Multiple Topics string[] topic = { top1, top2.,,,, };
Binding Event Delegates
In connecting to the server, receiving Topics, publishing Topics, reporting properties, service calls, etc., there are corresponding delegates.
We use the default delegated events here, and will gradually customize them later.
            // Use default delegated events
            client.UseDefaultEventHandler();
Starting Connection to IOT Server
            // Connect to server
            client.ConnectMqtt(topic);
Don't forget to add a line Console.ReadKey();
Complete Code
// Create connection object XFMQTT client = new XFMQTT("a1BiPoNawLI", "Raspberry"); // Initialize client configuration client.Init("2NOaBeqXcIzLQEhlJFEfKbWeug0o3m0c", "cn-shanghai"); // Topics to subscribe string[] topic = { client.CombineHeadTopic("PubData") };</span><span style="color: #008000;">//</span><span style="color: #008000;"> Use default delegated events</span>client.UseDefaultEventHandler();
</span><span style="color: #008000;">//</span><span style="color: #008000;"> Connect to server</span>client.ConnectMqtt(topic);
Console.ReadKey();</span></pre>
The steps to create a general connection client have been completed, run the program.
IV. Subscribing to Topics and Publishing Topics
After running the program, open the console -- device list, you will find

Sending Topics
Open the device, find PubData in the Topic list, click "Publish", enter any characters (Chinese may get garbled), and check if the client receives the content.
Note: Only Topics with subscription permissions can send data to the device.
On the device, only by setting subscription to this Topic, can it receive this Topic when publishing messages from the console. Browse through more Topics in the console, try publishing them to find out.
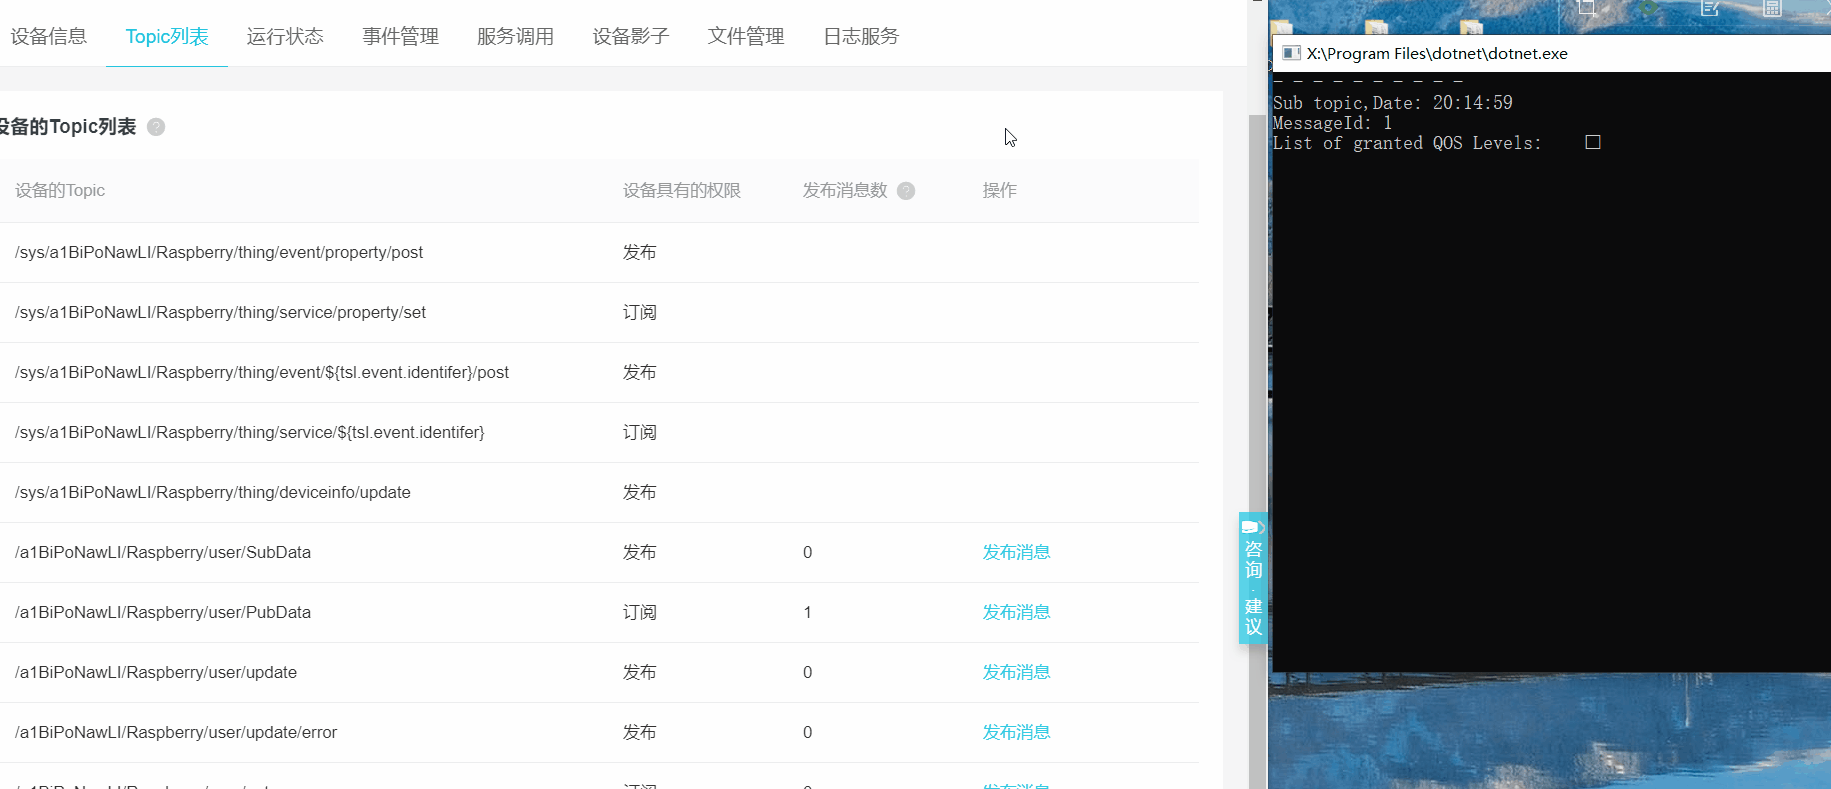
Publishing Topics
The above steps achieved connecting to the IOT platform and subscribing to Topics. This way, you can receive server push or data. Multiple Topics can be subscribed to, and the server can successfully send to the client devices based on Topics set in the client. Below is a demonstration of how to publish data content to the server.
Add the following to the end of the code
while (true) { string str=Console.ReadLine();</span><span style="color: #008000;">//</span><span style="color: #008000;"> Push content to a specific Topic</span> client.Subscribe(client.CombineHeadTopic(<span style="color: #800000;">"</span><span style="color: #800000;">SubData</span><span style="color: #800000;">"</span><span style="color: #000000;">),str); }</span></pre>
SubData is the Topic we want to push to.
。
The complete code is as follows (please replace the corresponding contents of {***}), with the added code highlighted in red:
// Create connection object XFMQTT client = new XFMQTT("{*Product Name*}", "{*Device Name*}"); // Initialize client configuration client.Init("{*Key*}", "{*cn-shanghai*}"); // Topic to subscribe string[] topic = { client.CombineHeadTopic("PubData") };</span><span style="color: #008000;">//</span><span style="color: #008000;"> Use default delegate events</span>client.UseDefaultEventHandler();
</span><span style="color: #008000;">//</span><span style="color: #008000;"> Connect to the server</span>client.ConnectMqtt(topic);
</span><strong><span style="color: #ff0000;">while (true) { string str=Console.ReadLine(); // Push content to specific Topic client.Subscribe(client.CombineHeadTopic("SubData"</span></strong><span style="color: #000000;"><strong><span style="color: #ff0000;">),str); }</span></strong> Console.ReadKey();</span></pre>
Run the program and enter content at will. Check the console log service to analyze the device's uplink messages.
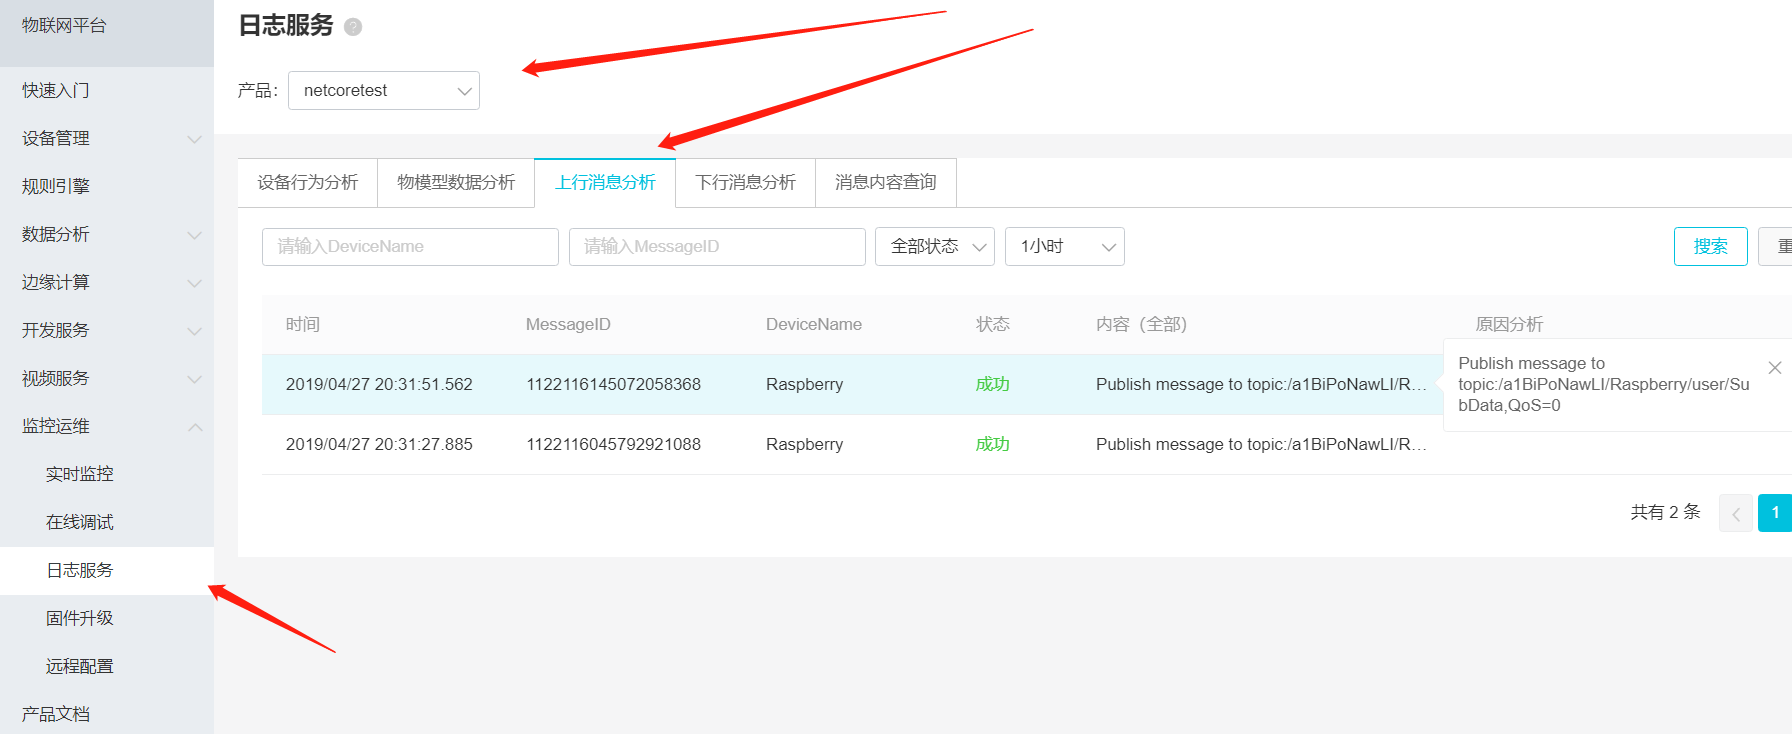
You cannot view the uploaded message content in the IOT console for now.
The default delegate method has been used; you can copy text in the console and use JSON formatting to see the results.
This concludes the simple tutorial on using the SDK.

文章评论