C# Xamarin Data Binding Basics
[TOC]
About Data Binding
Xamarin One-way and Two-way Binding
Xaml Binding
C# Code Binding
Before diving deeper, here are some pseudocode snippets to help beginners like myself get started...
Suppose we have two controls: a Slider and a Label.
            Slider slider = new Slider()
            {
                Maximum = 1,
                Value = 10
            };

            Label label = new Label();
            label.Text = slider.Value.ToString();
The Slider's minimum sliding unit is 1, and its initialized value is 10.
We want the Label to display the Slider's value, which can be directly assigned in code.
label.Text = slider.Value.ToString();
However, this only retrieves the value once. We want the Label to dynamically display the Slider's value each time it slides, which requires binding.
Method 1:
            Slider slider = new Slider()
            {
                Maximum = 1,
                Value = 10
            };

            Label label = new Label();
            label.Text = "666"; // Just initializing with a random value

            label.BindingContext = slider;      // Associate with an object

            // Set a binding
            // Bind the Label's Text property to the Slider's Value property
            label.SetBinding(Label.TextProperty, "Value");
Method 2:
            Slider slider = new Slider()
            {
                Maximum = 1,
                Value = 10
            };

            Label label = new Label();
            label.Text = "666"; // Just initializing with a random value

            Binding binding = new Binding()
            {
                Source = slider, // Bind to this data source
                Path = "Value"   // Bind to the property's attribute in the data source
            };

            // Bind
            label.SetBinding(Label.TextProperty, binding);
The keywords to remember are:
BindingContext(), SetBinding(), Binding, Source, Path.
View-View Binding
View-View Binding refers to the binding between UI controls, which can be accomplished using Xaml code without needing C# code.
In the previous section, we demonstrated two binding methods with pseudocode. Now, let's implement those binding examples in Xaml.
First, we need to establish the data source.
<Slider x:Name="slider" Maximum="1.0" VerticalOptions="CenterAndExpand" />
To bind data, we use {Binding ... ...}
Now we can implement the first binding method.
        <Label x:Name="label"
               BindingContext="{x:Reference Name=slider}"
               Text="{Binding Path=Value}" />
x:Reference is an extension markup that references an instance declared elsewhere in the XAML markup by its x:Name. It is a fixed format primarily filled with the Name of the data control's X:Name attribute.
{Binding Path=Value} indicates that the operation is a Binding, meaning that we are binding to the data, specifically to the Value property of the slider.
In this binding method, we first bind the data source object to the BindingContext property and then bind the Value property of the data source object to the Text property.
For the second method:
<Label Text="{Binding Source={x:Reference Name=slider}, Path=Value}" />
In the second method, we directly use {Binding ... ...} to bind data, where the Source parameter specifies the data source object to bind, and the Path binds to a particular property of that object.
To make the layout more appealing, let's summarize the above code in a StackLayout:
    <StackLayout>
        <Label x:Name="label"
               BindingContext="{x:Reference Name=slider}"
               Text="{Binding Path=Value}" />

        <Slider x:Name="slider" Maximum="1.0" VerticalOptions="CenterAndExpand" />

        <Label Text="{Binding Source={x:Reference Name=slider}, Path=Value}" />

    </StackLayout>
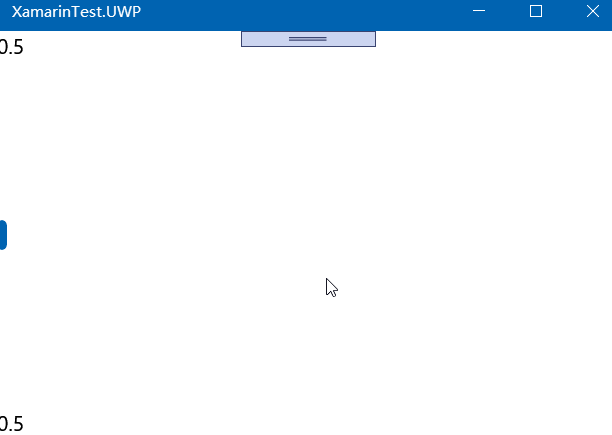
However, the number of decimal places above is too many and does not match our desired format. We can format the data using StringFormat.
Text="{Binding Path=Value,StringFormat='{0:F1}'}"
Binding Modes
Binding Enumeration
The BindingMode enum for binding types:
DefaultOneWay- value flows from source to targetOneWayToSource- value flows from target to sourceTwoWay- value flows in both directions between source and targetOneTime- data flows from source to target, but only when theBindingContextchanges
The previous data binding is one-to-one and unidirectional, meaning the Slider control exists first, followed by binding in the Label.
In practical scenarios, we need one-to-one with two-way influence, and one-to-many where multiple data sources aggregate into one control.
Different properties of a single control can also be bound. However, each control can only have one BindingContext, meaning that multiple data bindings on that view must all reference properties of the same object.
If you were to use the first method from the previous section, you could only bind to one object and utilize that object's properties.
Using the second method allows binding to multiple data sources.
One-to-Many - Target Binding Source Data
Based on the previous example, if a Label has multiple properties that need different data bindings, we could write it like this.
    <Grid>
        <Grid.RowDefinitions>
            <RowDefinition Height="*" />
            <RowDefinition Height="Auto" />
            <RowDefinition Height="Auto" />
            <RowDefinition Height="Auto" />
            <RowDefinition Height="Auto" />
        </Grid.RowDefinitions>

        <Grid.ColumnDefinitions>
            <ColumnDefinition Width="*" />
            <ColumnDefinition Width="Auto" />
        </Grid.ColumnDefinitions>

        <!-- Scale: Size, Rotation: Angle -->
        <Label x:Name="label"
               Text="TEXT"
               Scale="{Binding Source={x:Reference Name=slider1},Path=Value}"
               Rotation="{Binding Source={x:Reference Name=slider2},Path=Value}"
               HorizontalOptions="Center"
               VerticalOptions="CenterAndExpand" />

        <!-- Control Size -->
        <Slider x:Name="slider1"
                Grid.Row="1" Grid.Column="0"
                Value="5"
                Maximum="10" />

        <!-- Control Rotation Angle -->
        <Slider x:Name="slider2"
                Grid.Row="2" Grid.Column="0"
                Maximum="360" />
    </Grid>
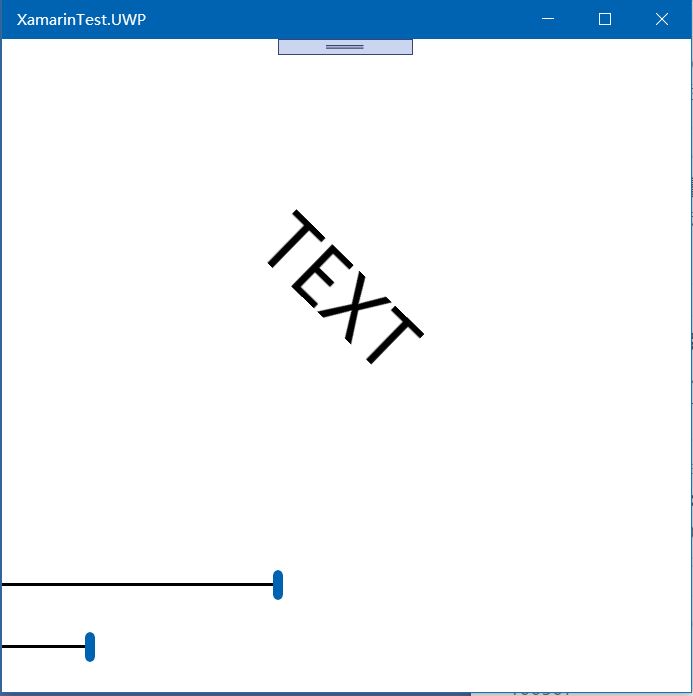
One-to-Many - Source Object Binding Target
Using the method above can be inflexible. Suppose the Label is common, and we want to configure multiple properties' data sources for the Label. This would require us to implement bindings manually, and each property can only bind to one data object.
To reduce coupling and minimize the complexity of data binding in the Label, allowing multiple objects to modify the Label's properties, we can reverse it. Create multiple controls where the Label acts as a data source, while other controls are the target sources; the data is provided to the Label from these controls. It sounds convoluted, but we’ll clarify with an example.
        <!-- Scale: Size, Rotation: Angle -->
        <Label x:Name="label"
               Text="TEXT"
               HorizontalOptions="Center"
               VerticalOptions="CenterAndExpand" />

        <!-- Control Size -->
        <Slider x:Name="scaleSlider"
                BindingContext="{x:Reference label}"
                Grid.Row="1" Grid.Column="0"
                Maximum="10"
                Value="{Binding Scale, Mode=TwoWay}" />

        <!-- Control Rotation Angle -->
        <Slider x:Name="rotationSlider"
                BindingContext="{x:Reference label}"
                Grid.Row="2" Grid.Column="0"
                Maximum="360"
                Value="{Binding Rotation, Mode=OneWayToSource}" />
In this scenario, the label doesn't handle anything. The scaleSlider and rotationSlider bind to the label as their data source. According to the binding definition, the label is the data source, and the label's property data acts as the property values for the target controls scaleSlider and rotationSlider.
Wait, it seems we've got it wrong. We want to use other controls to modify the label's properties, but now it appears we're using the label's property values as those of the controls.
The reason lies in the Mode.
The OneWayToSource enumeration means values flow from the target to the source.
From the perspective of binding and definition, the label is the data source, and the sliders are the targets, but the data flows reversely.
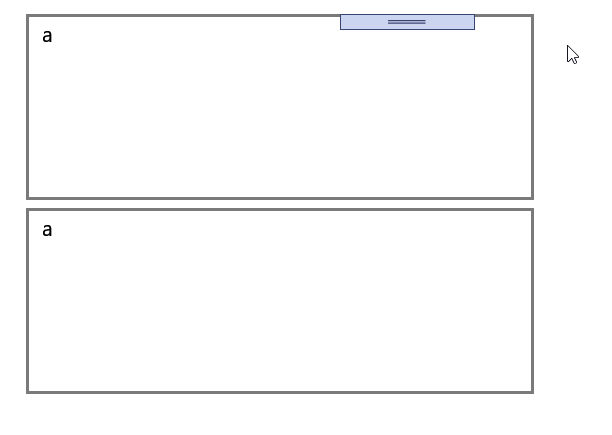
Two-way Binding in Text Box
The sample code is as follows:
    <Grid>
        <Grid.RowDefinitions>
            <RowDefinition Height="2*" />
            <RowDefinition Height="2*" />
            <RowDefinition Height="2*" />
            <RowDefinition Height="2*" />
            <RowDefinition Height="2*" />
        </Grid.RowDefinitions>

        <Grid.ColumnDefinitions>
            <ColumnDefinition Width="2*" />
            <ColumnDefinition Width="2*" />
            <ColumnDefinition Width="2*" />
            <ColumnDefinition Width="2*" />
            <ColumnDefinition Width="2*" />
        </Grid.ColumnDefinitions>
        <Editor x:Name="edit1"
                Grid.Row="0"
                Grid.Column="1"
                Grid.ColumnSpan="2"
                Text="a"/>

        <Editor x:Name="edit2"
                Grid.Row="1"
                Grid.Column="1"
                Grid.ColumnSpan="2"
                Text="{Binding Source={x:Reference edit1},Path=Text,Mode=TwoWay}"/>
    </Grid>
Official Example
The Microsoft official documentation has a more extensive example code, which you can refer to if interested:
<ContentPage xmlns="http://xamarin.com/schemas/2014/forms"
             xmlns:x="http://schemas.microsoft.com/winfx/2009/xaml"
             x:Class="XamlSamples.SliderTransformsPage"
             Padding="5"
             Title="Slider Transforms Page">
    <Grid>
        <Grid.RowDefinitions>
            <RowDefinition Height="*" />
            <RowDefinition Height="Auto" />
            <RowDefinition Height="Auto" />
            <RowDefinition Height="Auto" />
            <RowDefinition Height="Auto" />
        </Grid.RowDefinitions>

        <Grid.ColumnDefinitions>
            <ColumnDefinition Width="*" />
            <ColumnDefinition Width="Auto" />
        </Grid.ColumnDefinitions>

        <!-- Scaled and rotated Label -->
        <Label x:Name="label"
               Text="TEXT"
               HorizontalOptions="Center"
               VerticalOptions="CenterAndExpand" />

        <!-- Slider and identifying Label for Scale -->
        <Slider x:Name="scaleSlider"
                BindingContext="{x:Reference label}"
                Grid.Row="1" Grid.Column="0"
                Maximum="10"
                Value="{Binding Scale, Mode=TwoWay}" />

        <Label BindingContext="{x:Reference scaleSlider}"
               Text="{Binding Value, StringFormat='Scale = {0:F1}'}"
               Grid.Row="1" Grid.Column="1"
               VerticalTextAlignment="Center" />

        <!-- Slider and identifying Label for Rotation -->
        <Slider x:Name="rotationSlider"
                BindingContext="{x:Reference label}"
                Grid.Row="2" Grid.Column="0"
                Maximum="360"
                Value="{Binding Rotation, Mode=OneWayToSource}" />

        <Label BindingContext="{x:Reference rotationSlider}"
               Text="{Binding Value, StringFormat='Rotation = {0:F0}'}"
               Grid.Row="2" Grid.Column="1"
               VerticalTextAlignment="Center" />

        <!-- Slider and identifying Label for RotationX -->
        <Slider x:Name="rotationXSlider"
                BindingContext="{x:Reference label}"
                Grid.Row="3" Grid.Column="0"
                Maximum="360"
                Value="{Binding RotationX, Mode=OneWayToSource}" />

        <Label BindingContext="{x:Reference rotationXSlider}"
               Text="{Binding Value, StringFormat='RotationX = {0:F0}'}"
               Grid.Row="3" Grid.Column="1"
               VerticalTextAlignment="Center" />

        <!-- Slider and identifying Label for RotationY -->
        <Slider x:Name="rotationYSlider"
                BindingContext="{x:Reference label}"
                Grid.Row="4" Grid.Column="0"
                Maximum="360"
                Value="{Binding RotationY, Mode=OneWayToSource}" />

        <Label BindingContext="{x:Reference rotationYSlider}"
               Text="{Binding Value, StringFormat='RotationY = {0:F0}'}"
               Grid.Row="4" Grid.Column="1"
               VerticalTextAlignment="Center" />
    </Grid>
</ContentPage>
Simple Collection Binding
In MainPage.xaml, add:
    <ListView x:Name="lview">
    </ListView>
In MainPage.xaml.cs, change to:
    public partial class MainPage : ContentPage
    {
        public static List<string> lists = new List<string> {"a","b","c","d","e","f" };
        public MainPage()
        {
            InitializeComponent();
            lview.ItemsSource = lists;
        }
    }
After running, the list will automatically appear.
More detailed information about ListView will be covered in upcoming articles.

文章评论