GitHub repository source code address https://github.com/whuanles/2020-07-12
Policy-Based Authorization in ASP.NET Core
First, let's create a WebAPI application.
Then, include the Microsoft.AspNetCore.Authentication.JwtBearer package.
Policy
In the ConfigureServices method of the Startup class, add a policy as follows:
    services.AddAuthorization(options =>
    {
        options.AddPolicy("AtLeast21", policy =>
            policy.Requirements.Add(new MinimumAgeRequirement(21)));
    });
Let’s break it down.
services.AddAuthorization is used to add authorization schemes, currently only supporting AddPolicy.
In ASP.NET Core, there are three types of authorization forms based on roles, claims, and policies, all of which are added using AddPolicy.
Among these, there are two APIs as follows:
        public void AddPolicy(string name, AuthorizationPolicy policy);
        public void AddPolicy(string name, Action<AuthorizationPolicyBuilder> configurePolicy);
name = "AtLeast21"; here, "AtLeast21" is the name of the policy.
policy.Requirements.Add() is used to add a requirement for the policy (storing data for this policy), and this requirement must implement the IAuthorizationRequirement interface.
How should the name of the policy be set? How should the policy be written and how to use Requirements.Add()?
Let’s hold off on that for now; we will cover it next.
Defining a Controller
Let’s add a Controller:
    [ApiController]
    [Route("[controller]")]
    public class BookController : ControllerBase
    {
        private static List<string> BookContent = new List<string>();
        [HttpGet("Add")]
        public string AddContent(string body)
        {
            BookContent.Add(body);
            return "success";
        }

        [HttpGet("Remove")]
        public string RemoveContent(int n)
        {
            BookContent.Remove(BookContent[n]);
            return "success";
        }

        [HttpGet("Select")]
        public List<object> SelectContent()
        {
            List<object> obj = new List<object>();
            int i = 0;
            foreach (var item in BookContent)
            {
                int tmp = i;
                i++;
                obj.Add(new { Num = tmp, Body = item });
            }
            return obj;
        }

        [HttpGet("Update")]
        public string UpdateContent(int n, string body)
        {
            BookContent[n] = body;
            return "success";
        }
    }
The functionality is simple—performing basic CRUD (Create, Read, Update, Delete) operations on the list content.
Setting Permissions
Previously, we created the BookController, which has CRUD functionality. Each functionality should have a corresponding permission set.
In ASP.NET Core, a permission requirement needs to inherit from the IAuthorizationRequirement interface.
Let’s set five permissions:
Add a file with the following code:
    /*
     IAuthorizationRequirement is an empty interface, and the specific requirements for authorization are custom properties and information.
     Thus, the inheritance relationship has no significance.
     */

    // Permission to access Book
    public class BookRequirment : IAuthorizationRequirement
    {
    }

    // Permissions for adding, removing, selecting, and updating Book
    // Can inherit from IAuthorizationRequirement, or from BookRequirment
    public class BookAddRequirment : BookRequirment
    {
    }
    public class BookRemoveRequirment : BookRequirment
    {
    }
    public class BookSelectRequirment : BookRequirment
    {
    }
    public class BookUpdateRequirment : BookRequirment
    {
    }
BookRequirment represents the permission to access BookController, while the other four represent the permissions for adding, removing, selecting, and updating.
Defining Policies
After setting permissions, we start to define policies.
In the ConfigureServices of Startup, add:
            services.AddAuthorization(options =>
            {
                options.AddPolicy("Book", policy =>
                {
                    policy.Requirements.Add(new BookRequirment());
                });

                options.AddPolicy("Book:Add", policy =>
                {
                    policy.Requirements.Add(new BookAddRequirment());
                });

                options.AddPolicy("Book:Remove", policy =>
                {
                    policy.Requirements.Add(new BookRemoveRequirment());
                });

                options.AddPolicy("Book:Select", policy =>
                {
                    policy.Requirements.Add(new BookSelectRequirment());
                });

                options.AddPolicy("Book:Update", policy =>
                {
                    policy.Requirements.Add(new BookUpdateRequirment());
                });

            });
Here, we set only one permission for each policy; of course, multiple permissions can be added to each policy.
The naming convention uses : to separate, primarily for readability, allowing a quick understanding of the hierarchical relationship.
Storing User Information
To keep it simple, we won’t use a database.
The following user information structure is arbitrary. Users - Roles - Permissions associated with Roles.
You can store this permission in any type, as long as it can identify which permission it is.
    /// <summary>
    /// Storing user information
    /// </summary>
    public static class UsersData
    {
        public static readonly List<User> Users = new List<User>();
        static UsersData()
        {
            // Adding an administrator
            Users.Add(new User
            {
                Name = "admin",
                Email = "admin@admin.com",
                Role = new Role
                {
                    Requirements = new List<Type>
                    {
                        typeof(BookRequirment),
                        typeof(BookAddRequirment),
                        typeof(BookRemoveRequirment),
                        typeof(BookSelectRequirment),
                        typeof(BookUpdateRequirment)
                    }
                }
            });

            // No delete permission
            Users.Add(new User
            {
                Name = "author",
                Email = "writer",
                Role = new Role
                {
                    Requirements = new List<Type>
                    {
                        typeof(BookRequirment),
                        typeof(BookAddRequirment),
                        typeof(BookRemoveRequirment),
                        typeof(BookSelectRequirment),
                    }
                }
            });
        }
    }

    public class User
    {
        public string Name { get; set; }
        public string Email { get; set; }
        public Role Role { get; set; }
    }

    /// <summary>
    /// Storing role authorization, string, numbers, etc. can all function as long as it can store representations.
    /// <para>This holds no significance as such, it's just a way of identification.</para>
    /// </summary>
    public class Role
    {
        public List<Type> Requirements { get; set; }
    }
Marking Access Permissions
Once the policies have been defined, we must mark the access permissions for the Controllers and Actions.
Use the [Authorize(Policy = "{string}")] attribute to set the required permissions to access this Controller or Action.
Here we separate the settings, marking one permission for each functionality (the minimum granularity should be a functionality, not an API).
    [Authorize(Policy = "Book")]
    [ApiController]
    [Route("[controller]")]
    public class BookController : ControllerBase
    {
        private static List<string> BookContent = new List<string>();

        [Authorize(Policy = "Book:Add")]
        [HttpGet("Add")]
        public string AddContent(string body) { }

        [Authorize(Policy = "Book:Remove")]
        [HttpGet("Remove")]
        public string RemoveContent(int n) { }

        [Authorize(Policy = "Book:Select")]
        [HttpGet("Select")]
        public List<object> SelectContent() { }

        [Authorize(Policy = "Book:Update")]
        [HttpGet("Update")]
        public string UpdateContent(int n, string body) { }
    }
Authentication: Token Credentials
Since we are using WebAPI, Bearer Token authentication is used; of course, cookies, etc., can also be utilized. Any authentication method can be used.
            // Set the validation method to Bearer Token.
            // Add using Microsoft.AspNetCore.Authentication.JwtBearer;
            // You can also use the string "Bearer" instead of JwtBearerDefaults.AuthenticationScheme
            services.AddAuthentication(JwtBearerDefaults.AuthenticationScheme)
                .AddJwtBearer(options =>
                {
                    options.TokenValidationParameters = new TokenValidationParameters
                    {
                        ValidateIssuerSigningKey = true,
                        IssuerSigningKey = new SymmetricSecurityKey(Encoding.UTF8.GetBytes("abcdABCD1234abcdABCD1234")),    // Key for encrypting and decrypting the Token.

                        // Whether to validate the issuer
                        ValidateIssuer = true,
                        // Issuer name
                        ValidIssuer = "server",

                        // Whether to validate the audience
                        // Audience name
                        ValidateAudience = true,
                        ValidAudience = "client007",

                        // Whether to validate the token's validity period
                        ValidateLifetime = true,
                        // Each time when the token is issued, this is its validity duration.
                        ClockSkew = TimeSpan.FromMinutes(120)
                    };
                });
The above code is a template and can be modified as needed. The authentication method here is unrelated to our policy-based authorization.
Issuing Login Credentials
The following Action is placed in the BookController for login functionality. This part is not very significant; its primary purpose is to issue credentials to users and identify users. A user's Claim can store a unique identifier for this user.
        /// <summary>
        /// User login and issue credentials
        /// </summary>
        /// <param name="name"></param>
        /// <returns></returns>
        [AllowAnonymous]
        [HttpGet("Token")]
        public string Token(string name)
        {
            User user = UsersData.Users.FirstOrDefault(x => x.Name.Equals(name, StringComparison.OrdinalIgnoreCase));
            if (user is null)
                return "User not found";

            // Define user information
            var claims = new Claim[]
            {
                new Claim(ClaimTypes.Name, name),
                new Claim(JwtRegisteredClaimNames.Email, user.Email)
            };

            // Consistent with the configuration in Startup
            SymmetricSecurityKey key = new SymmetricSecurityKey(Encoding.UTF8.GetBytes("abcdABCD1234abcdABCD1234"));

            JwtSecurityToken token = new JwtSecurityToken(
                issuer: "server",
                audience: "client007",
                claims: claims,
                notBefore: DateTime.Now,
                expires: DateTime.Now.AddMinutes(30),
                signingCredentials: new SigningCredentials(key, SecurityAlgorithms.HmacSha256)
            );

            string jwtToken = new JwtSecurityTokenHandler().WriteToken(token);
            return jwtToken;
        }
Add the following two lines in Configure:
            app.UseAuthentication();
            app.UseAuthorization();
Custom Authorization
Custom authorization requires inheriting the IAuthorizationHandler interface, and classes that implement this interface can determine whether to authorize user access.
Implementation code as follows:
    /// <summary>
    /// Determine if the user has permission
    /// </summary>
    public class PermissionHandler : IAuthorizationHandler
    {
        public async Task HandleAsync(AuthorizationHandlerContext context)
        {
            // The permissions required for accessing the current Controller/Action (policy authorization)
            IAuthorizationRequirement[] pendingRequirements = context.PendingRequirements.ToArray();

            // Retrieve user information
            IEnumerable<Claim> claims = context.User?.Claims;

            // Not logged in or unable to retrieve user information
            if (claims is null)
            {
                context.Fail();
                return;
            }

            // Retrieve username
            Claim userName = claims.FirstOrDefault(x => x.Type == ClaimTypes.Name);
            if (userName is null)
            {
                context.Fail();
                return;
            }
            // ... Some verification process omitted ...

            // Get this user's information
            User user = UsersData.Users.FirstOrDefault(x => x.Name.Equals(userName.Value, StringComparison.OrdinalIgnoreCase));
            List<Type> auths = user.Role.Requirements;

            // Check each one
            foreach (IAuthorizationRequirement requirement in pendingRequirements)
            {
                // If this permission is not found in the user's permission list
                if (!auths.Any(x => x == requirement.GetType()))
                    context.Fail();

                context.Succeed(requirement);
            }

            await Task.CompletedTask;
        }
    }
Process:
- Get user information from the context (context.User)
- Retrieve the user's role and get the permissions associated with this role
- Get the permissions required for this request (context.PendingRequirements)
- Check if the user has all the required permissions (using foreach loop)
Lastly, register this interface and service in the container:
services.AddSingleton<IAuthorizationHandler, PermissionHandler>();
After doing this, you can test the authorization.
IAuthorizationService
The preceding class implements the IAuthorizationHandler interface, which is used to customize whether a user is authorized to access this Controller/Action.
The IAuthorizationService interface is used to determine whether authorization is successful, defined as follows:
public interface IAuthorizationService
    {
        Task<AuthorizationResult> AuthorizeAsync(ClaimsPrincipal user, object? resource, IEnumerable<IAuthorizationRequirement> requirements);

        Task<AuthorizationResult> AuthorizeAsync(ClaimsPrincipal user, object? resource, string policyName);
    }
The DefaultAuthorizationService interface implements IAuthorizationService, and ASP.NET Core uses DefaultAuthorizationService by default to confirm authorization.
Previously, we used the IAuthorizationHandler interface to customize authorization, and if we dig deeper, we trace back to IAuthorizationService.
The DefaultAuthorizationService is the default implementation of IAuthorizationService, with some of the code as follows:
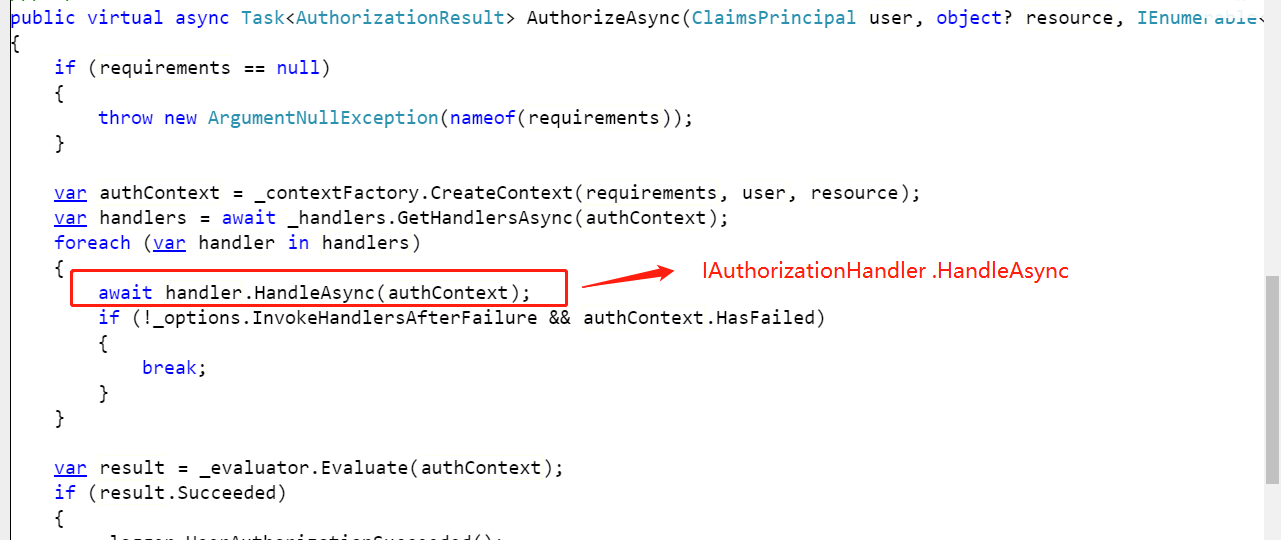
The DefaultAuthorizationService is relatively complex, and generally, just implementing IAuthorizationHandler is sufficient.
ABP Authorization
We have introduced policy authorization in ASP.NET Core, and now we introduce authorization in ABP, continuing to utilize the ASP.NET Core code already implemented.
Create ABP Application
Install Volo.Abp.AspNetCore.Mvc, Volo.Abp.Autofac via NuGet.
Create the AppModule class with the following code:
    [DependsOn(typeof(AbpAspNetCoreMvcModule))]
    [DependsOn(typeof(AbpAutofacModule))]
    public class AppModule : AbpModule
    {
        public override void OnApplicationInitialization(
            ApplicationInitializationContext context)
        {
            var app = context.GetApplicationBuilder();
            var env = context.GetEnvironment();

            if (env.IsDevelopment())
            {
                app.UseDeveloperExceptionPage();
            }
            else
            {
                app.UseExceptionHandler("/Error");
            }

            app.UseStaticFiles();
            app.UseRouting();
            app.UseConfiguredEndpoints();
        }
    }
In the Program's Host, add .UseServiceProviderFactory(new AutofacServiceProviderFactory()), as shown below:
        public static IHostBuilder CreateHostBuilder(string[] args) =>
            Host.CreateDefaultBuilder(args)
            .UseServiceProviderFactory(new AutofacServiceProviderFactory())
            ...
            ...
Then, in the ConfigureServices method in Startup, add the ABP module and set it to use Autofac.
        public void ConfigureServices(IServiceCollection services)
        {
            services.AddApplication<AppModule>(options =>
            {
                options.UseAutofac();
            });
        }
Define Permissions
ABP uses the PermissionDefinitionProvider class to define permissions. Create a class with the following code:
    public class BookPermissionDefinitionProvider : PermissionDefinitionProvider
    {
        public override void Define(IPermissionDefinitionContext context)
        {
            var myGroup = context.AddGroup("Book");
            var permission = myGroup.AddPermission("Book");
            permission.AddChild("Book:Add");
            permission.AddChild("Book:Remove");
            permission.AddChild("Book:Select");
            permission.AddChild("Book:Update");
        }
    }
Here, we define a group Book, with a permission Book, which has four child permissions.
Remove services.AddAuthorization(options =>... from Startup.
Move the remaining dependency injection service code into ConfigureServices in AppModule.
Change Startup's Configure to:
app.InitializeApplication();
Change AbpModule's Configure to:
            var app = context.GetApplicationBuilder();
            var env = context.GetEnvironment();

            if (env.IsDevelopment())
            {
                app.UseDeveloperExceptionPage();
            }
            else
            {
                app.UseExceptionHandler("/Error");
            }

            app.UseStaticFiles();
            app.UseRouting();

            app.UseAuthentication();
            app.UseAuthorization();

            app.UseConfiguredEndpoints();
PermissionHandler needs to change to:
    public class PermissionHandler : IAuthorizationHandler
    {
        public Task HandleAsync(AuthorizationHandlerContext context)
        {
            // The permissions required for accessing the current Controller/Action (policy authorization)
            IAuthorizationRequirement[] pendingRequirements = context.PendingRequirements.ToArray();

            // Check each one
            foreach (IAuthorizationRequirement requirement in pendingRequirements)
            {
                context.Succeed(requirement);
            }

            return Task.CompletedTask;
        }
    }
Delete the UserData file; the BookController needs to modify the login and credentials.
For specific details, please refer to the source code in the repository.

文章评论