Part One: Consul Basics
1. Introduction to Consul
According to the official documentation: Consul is a network tool that provides a full-featured service mesh and service discovery.
What can it do? Automate network configuration, discover services, and enable secure connections across any cloud or runtime.
So, our understanding of Consul is that it involves service mesh and service discovery. What exactly do these two features mentioned in the official documentation mean? Across what clouds?
Next, we will gradually understand Consul through practical operations and set up a real Consul service for experience.
2. Installing Consul
Consul needs to be installed on both servers. The specific steps are outlined below.
Ubuntu/Debian Systems
# Add GPG key

curl -fsSL https://apt.releases.hashicorp.com/gpg | sudo apt-key add -

# Add repository
# If you get an error saying apt-add-repository: command not found
# Install first: apt-get install software-properties-common

sudo apt-add-repository "deb [arch=amd64] https://apt.releases.hashicorp.com $(lsb_release -cs) main"

# Update the source and install consul

sudo apt-get update && sudo apt-get install consul
Centos/RHEL Systems
# Use yum-config-manager to manage repositories
sudo yum install -y yum-utils

# Connect to repository
sudo yum-config-manager --add-repo https://rpm.releases.hashicorp.com/RHEL/hashicorp.repo

# Install
sudo yum -y install consul
Check Installation
You can enter consul to check if the installation was successful. If there is any output, it indicates that the installation was successful.
root@50skbjiynxyxkcfh:~# consul
Usage: consul [--version] [--help] <command> [<args>]

Available commands are:
    acl            Interact with Consul's ACLs
    agent          Runs a Consul agent
    catalog        Interact with the catalog
    config         Interact with Consul's Centralized Configurations
    connect        Interact with Consul Connect
    debug          Records a debugging archive for operators
    event          Fire a new event
    exec           Executes a command on Consul nodes
... ...
3. Running Consul Agent
Articles generally refer to a Consul service or instance, which is called Agent in the official documentation. This is important to remember. To avoid misunderstanding, the term "proxy" in this article refers to proxy, while "agent" refers specifically to agent.
An Agent can run in server mode or client mode, and multiple Agents form a Consul datacenter, where at least one Agent in a Consul datacenter must be in server mode.
Single-server deployments are not recommended by the official documentation.
Starting the Agent
As mentioned earlier, the agent represents a Consul instance.
Since we are currently in the exploratory practical stage, to avoid various encryption and security issues, we need to start with the -dev option, enabling development mode.
# $> consul agent
# Runs a Consul agent

consul agent -dev
After executing this command, Consul will start and occupy the terminal.
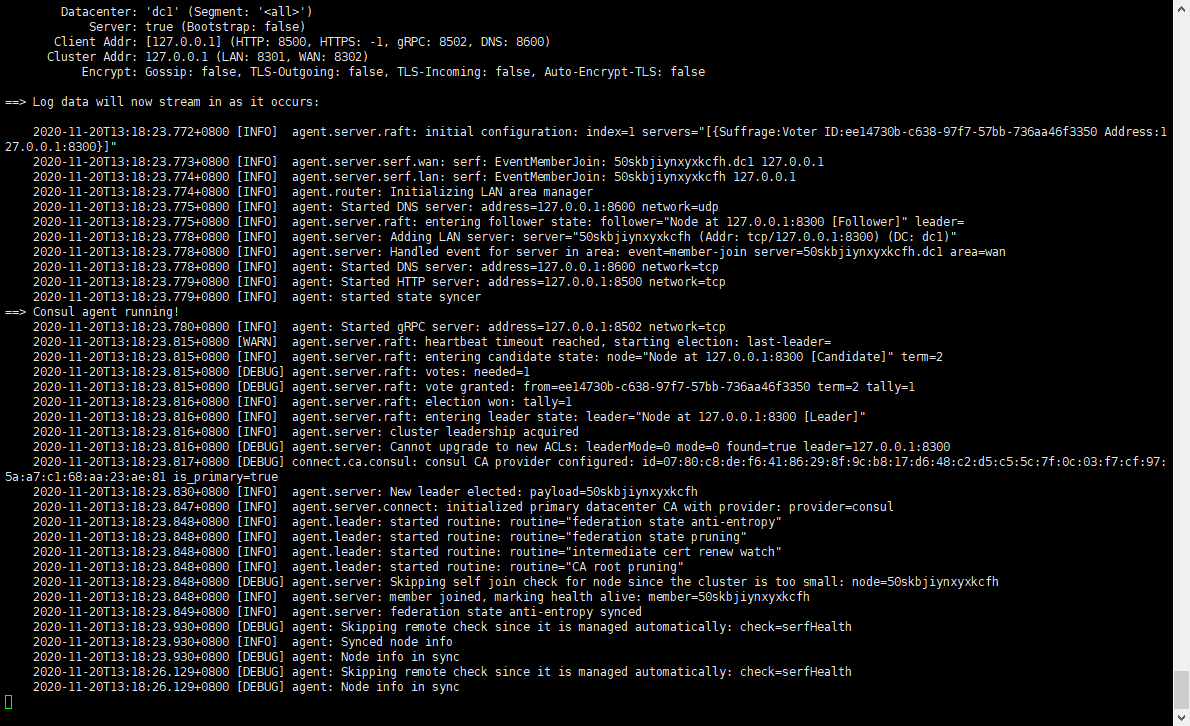
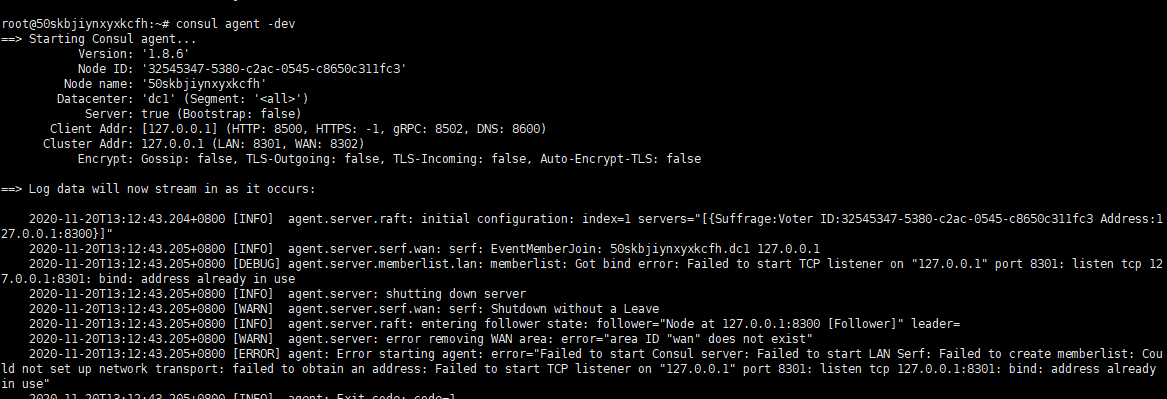
During the startup process, pay attention to the information. If it fails to start, you need to resolve the issue according to the prompts, such as handling port conflicts:
Discovering Datacenter Members
You can discover the datacenter members by executing the consul members command.
root@50skbjiynxyxkcfh:~# consul members
Node              Address          Status  Type    Build  Protocol  DC   Segment
50skbjiynxyxkcfh  172.31.0.6:8301  alive   client  0.5.2  2         dc1  <default>
This means checking the current composition of the Consul service members. Currently, it's a single server, so there's only one member.
You don’t need to worry about its purpose, just remember this command; we will use it to check information later.
Viewing UI
If the server IP is 172.31.0.6, you can access the Consul UI service (http APIs) through http://172.31.0.6:8500.
4. Registering Services in Consul Service Discovery
This section introduces some networking knowledge in Consul, explains ports and DNS;
Then through an example, it demonstrates how to define services and register them in Consul — Consul Service Discovery.
Ports
Let’s first explain some ports used by Consul.
Official documentation: Before running Consul, you should ensure the following bind ports are accessible.
Translation: Before running Consul, ensure the following ports are accessible.
Documentation link: https://www.consul.io/docs/install/ports.html
For important configurations, always refer to the official documentation. Don’t rely on Baidu; many articles are just machine translations or copied commands that might lead you into pitfalls.
| Use | Default Ports |
| :----------------------------------------------------------- | :--------------- |
| DNS: The DNS server (TCP and UDP) | 8600 |
| HTTP: The HTTP API (TCP Only) | 8500 |
| HTTPS: The HTTPs API | disabled (8501)* |
| gRPC: The gRPC API | disabled (8502)* |
| LAN Serf: The Serf LAN port (TCP and UDP) | 8301 |
| Wan Serf: The Serf WAN port (TCP and UDP) | 8302 |
| server: Server RPC address (TCP Only) | 8300 |
| Sidecar Proxy Min: Inclusive min port number to use for automatically assigned sidecar service registrations. | 21000 |
| Sidecar Proxy Max: Inclusive max port number to use for automatically assigned sidecar service registrations. | 21255 |
*For HTTPS and gRPC, the ports specified in the table are recommendations.
-
The three interfaces 8500(http), 8501(https), and 8502(gRPC) can be called through remote requests or accessed directly.
-
Ports 8501 and 8502 are both disabled, so we can first look at the role of port 8500, while the other ports will be explained as needed later.
Open your browser, visit http://{yourip}:8500, and you will find it redirects to a UI page.
- If you want to see which process occupies a port, you can use the
lsof -i:8081command, where 8081 is the port you want to check.
Defining Services
This section explains how to define services through configuration files and commands and register them with Consul.
Open or create (if it does not exist) the directory /etc/consul.d, which will be used as the storage location for Consul configuration files.
In this directory, create a web.json file to define the service.
touch web.json
Edit the file and change its contents to:
{
  "service": {
    "name": "web",
    "tags": [
      "rails"
    ],
    "port": 8080
  }
}
The port can be set freely; here, we defined a service named web with port 8080.
Starting the Service Using Configuration
After defining the configuration directory and configuration file, we can restart the node with the configuration file:
consul agent -dev -enable-script-checks -config-dir=/etc/consul.d
The -enable-script-checks option can enable checks in configuration files, enhancing security since configuration files may enable scripts that could introduce remote execution vulnerabilities. However, this practical step will not require that for now; consider it as a preliminary preparation.
If everything goes smoothly, you will see the following message:
2020/11/21 10:09:25 [INFO] agent: Synced service "web"
2020/11/21 10:09:25 [DEBUG] agent: Node info in sync
2020/11/21 10:09:25 [DEBUG] agent: Service "web" in sync
2020/11/21 10:09:25 [DEBUG] agent: Node info in sync
How to Reload Configuration Files
If you have modified the configuration file, you can use a command to trigger Consul to reload the configuration without needing to restart.
$ consul reload
Configuration reload triggered
5. Querying Services
After we add services to Consul, we can use the DNS interface or HTTP API to query them. Other applications can query what services Consul provides through its network interface, which is the essence of service discovery (I hope my understanding is correct).
Querying via HTTP API
Through the Consul HTTP API, we can query the service list, with the URL being /v1/catalog/service/web.
Query via command:
curl http://localhost:8500/v1/catalog/service/web
You can also access it via a browser.
The returned JSON lists all service nodes and the information and status of each service instance, allowing you to discover services based on this JSON information.
Once you discover the service, you can get its IP and port from the JSON, enabling you to connect to this service.
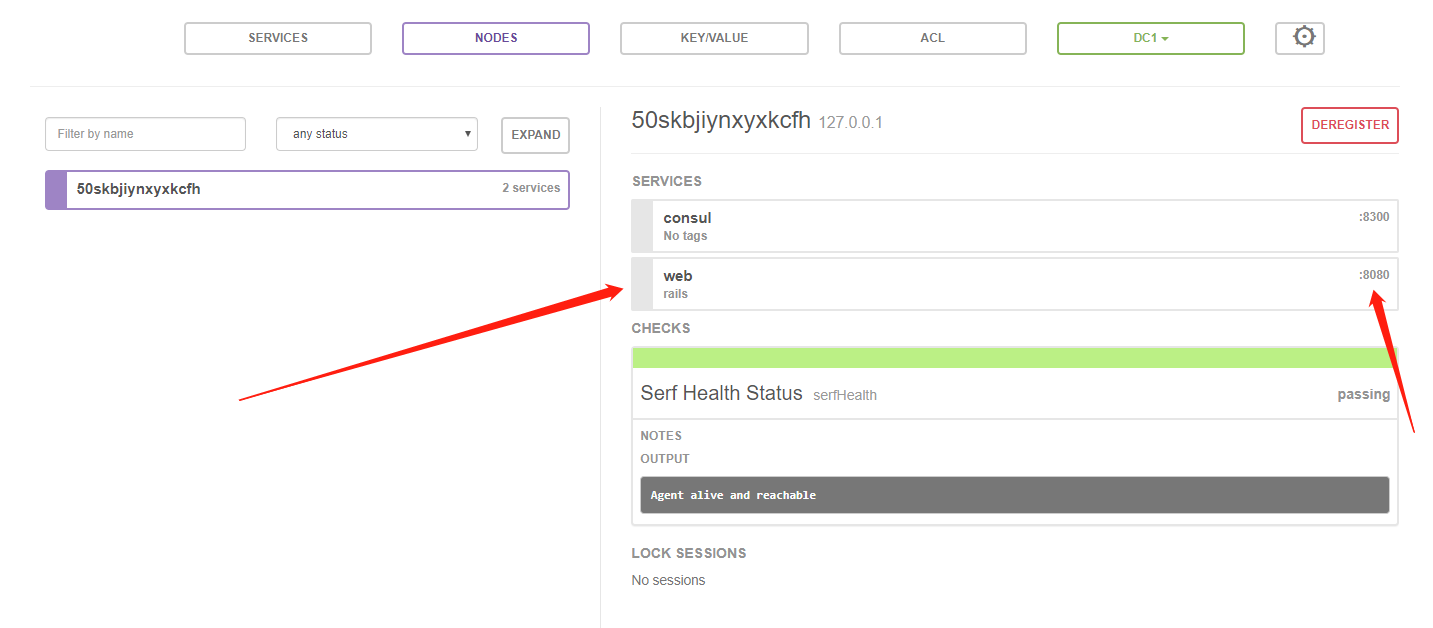
Querying via UI
By visiting http://{yourip}:8500, you will find a registered service named web in the UI.
6. DNS Knowledge and Queries
Basic Knowledge
In Linux, the dig command is used to query DNS information of a domain name. For example:
dig baidu.com
... ...
baidu.com.		375	IN	A	220.181.38.148
baidu.com.		375	IN	A	39.156.69.79
... ...
The standard port number for DNS queries is 53, which allows you to query more domain name information from the DNS server.
DNS has types such as A records (resolving to IP), CNAME (alias, resolving to another domain), etc. You can find more information on your own if you're interested.
For the dig command, refer to https://linux.die.net/man/1/dig
One of the query formats for dig is:
dig [@server] [-p {port}] [name]
dig @127.0.0.1 -p 8600 specifies port 8600 for DNS service queries; the name part refers to the resource name you wish to query.
Remember this query format.
Querying Consul Service Information via DNS
Having registered the web service earlier, how can we query the information of the web service through Consul's DNS interface (port 8600)?
You can run the following command on the default host:
dig @127.0.0.1 -p 8600 web.service.consul
Regarding the dig command, as explained earlier, web.service.consul is the [name] part. Consul will append .service.consul to the registered service name.
What is the use of querying this DNS? Note this down for now; we will explore further later.
Summary
At this point, we have learned how to register services using commands, but because we only "configured" the web (port 8080) service, it does not actually exist as a true service. We will later deploy a real web service and register it in Consul.
7. Storing Data in Consul KV
Open your Consul UI interface as shown below:

You can create key-value data via the UI interface, or perform CRUD operations on key-value data via the command line. Here’s a command line example:
To add or modify:
consul kv put {key} {value}
To get value:
consul kv get {key}
To delete a key:
consul kv delete {key}
Example:
consul kv put name whuanle
Part Two: Deep Dive into Consul
This chapter will introduce how to use Consul Service Mesh to connect services, proxy services; establish data centers, and deploy multiple instances.
8. Consul Service Mesh
Understanding Consul Service Mesh
Consul Service Mesh creates a consistent platform for modern application networking and security by offering identity-based authorization, L7 traffic management, and service-to-service encryption.
What is its purpose?
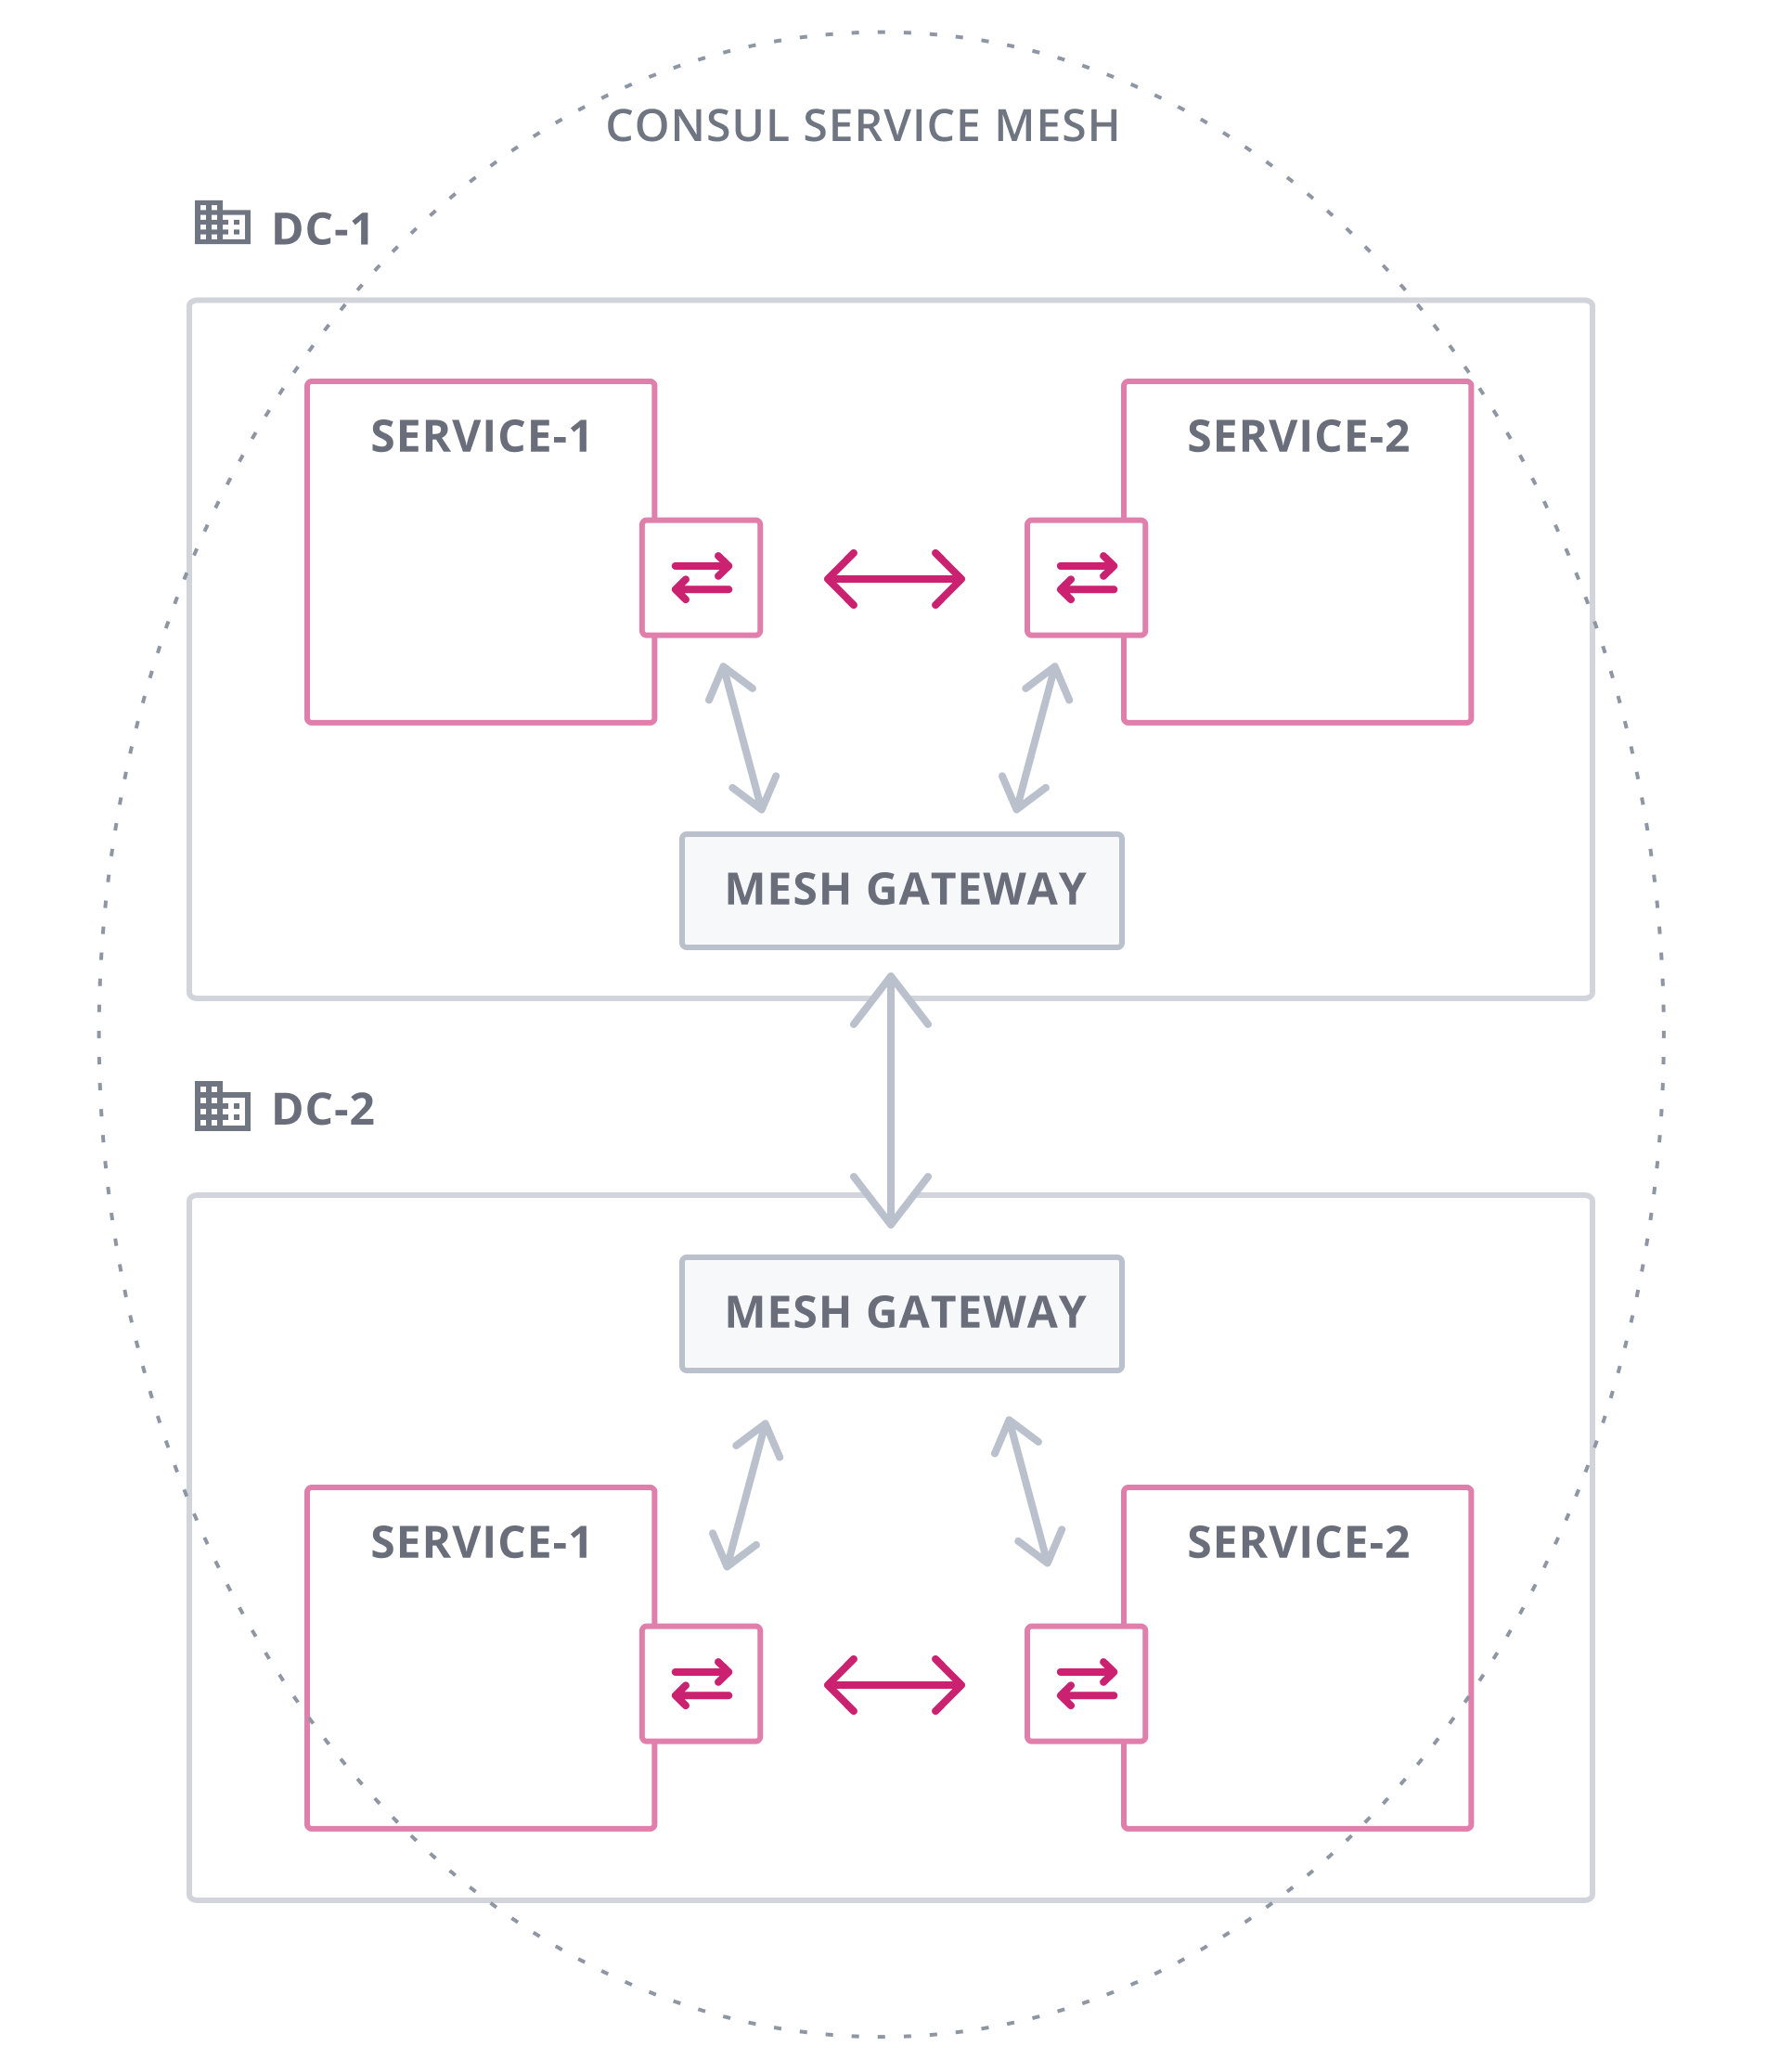
For example, to federate Consul across multiple clusters and environments to create a global service mesh. Applying policies and security consistently across platforms, as illustrated below:
Author’s note: envoy is a third-party open-source edge and service proxy, not a feature of Consul; Consul provides its own functionality through Consul Connect.

Refer to the application scenarios of Consul Service Mesh: https://www.consul.io/use-cases/multi-platform-service-mesh
Consul Service Mesh can associate services across multiple servers via proxies, enabling them to access each other through a private network.
。
For more details, please click https://www.consul.io/docs/connect/gateways/mesh-gateway
Deploying a Real Service
In the official Consul documentation, socat is used to demonstrate a service and register it with Consul. The author finds this approach too complicated, so to better learn Consul, a lightweight web service has been written in Rust. The service is 4MB on Windows and 8MB on Linux, with no installation of dependencies required.
Readers are encouraged to use this web demo as a real service deployment, which has been open-sourced. Download it here:
https://github.com/whuanles/consulweb/releases
After downloading the file, upload it to an empty directory on the server.
To customize the web service binding address, create a new file named option.txt with the following content:
0.0.0.0:8081
Quick file creation command:
echo "0.0.0.0:8081" > option.txt
The web service supports static file deployment. You can create a static webpage file like index.html, place it in the program directory, and access it via the bound IP and port.
Remember to grant the web service execution permission:
chmod +x web
Run ./web to start the web service and execute nohup ./web & to run the web service in the background.
Now we have a real web service which can be tested using a browser.
Registering the Real Service
After using the author's or a custom-written service, it needs to be registered with Consul.
In the /etc/consul.d directory, create a realweb.json file.
{
  "service": {
    "name": "realweb",
    "port": 8081,
    "connect": {
      "sidecar_service": {}
    }
  }
}
Then execute consul reload to reload the configuration file.
Registering the Proxy
Why do we need to register a proxy?
Through previous practice, we have learned how to register services and service discovery. When we first introduced Consul, we also saw phrases like “Consul provides powerful service mesh” and “secure connections.” By following the steps here (proxy), we are experiencing this feature of Consul.
Having already registered the realweb service, we now activate the proxy by executing in a new terminal window:
consule connect proxy -sidecar-for realweb

It's visible that Consul is using port 21000 to proxy the realweb service.
This proxy function is called Consul Connect.
However, this port is not accessible, and its basic structure is as follows:
        Source                      After Proxying
------------------        ------------------
|8081 <----> 21000| <----> |21001 <----> 9191|
------------------        ------------------
Both 8081 (source) and 9191 (proxy port) are accessible, while 21000 and 21001 are bridge ports and not accessible.
Proxying the Service
Having registered the realweb proxy service (8081 <----> 21000), we begin to proxy it (21001 <----> 9191).
The process of proxying here connects services with each other through Consul Service Mesh using a Sidecar proxy, and this function is called service mesh.
        Source                                             After Proxying
--------------------------                 --------------------------
|8081 <-----------|21000| <--------> |21001 <-----------|9191|
|     Consul Connect     |     Sidecar    |      Consul Connect    |
--------------------------                 --------------------------
To implement proxying, a new configuration file must be created to register the service.
Open a new terminal window and create a proxyweb.json file in the /etc/consul.d/ directory.
Its content is as follows:
{
  "service": {
    "name": "proxyweb",
    "connect": {
      "sidecar_service": {
        "proxy": {
          "upstreams": [
            {
              "destination_name": "realweb",
              "local_bind_port": 9191
            }
          ]
        }
      }
    }
  }
}
Each upstream for the Connect proxy can be configured to route through a mesh gateway. The local_bind_port indicates which port to use as the proxy port after the service is registered.
Possible binding proxy ports include the following scenarios (copied directly from the documentation):
-
local- In this mode, Connect proxy establishes outbound connections to the gateways running in the same data center. The gateway is then responsible for ensuring data is forwarded to the gateways in the target data center. -
remote- In this mode, the Connect proxy establishes outbound connections to the gateways running in the target data center. The gateway then forwards data to the ultimate target service. -
none- In this mode, no gateway is used, and the Connect proxy directly connects its outbound connections to the target service.
After the configuration is created (service registered), execute consul reload to reload the configuration file.
Then execute the command to start the proxy service.
consul connect proxy -sidecar-for proxyweb
Validating the Proxy
After creating the proxy, we check if it functions correctly.
Open a new terminal window and execute the access command:
curl http://127.0.0.1:9191
root@50skbjiynxyxkcfh:~# curl http://127.0.0.1:9191
<h3>Congratulations, your Consul service has been deployed successfully!</h3><br/><br/><br/><br/>Remember to give the author whuanle a thumbs up~~~
Originally, the realweb service exposed port was 8081, and then a proxy named proxyweb was created with port changed to 9191, allowing us to access the realweb service using 9191.
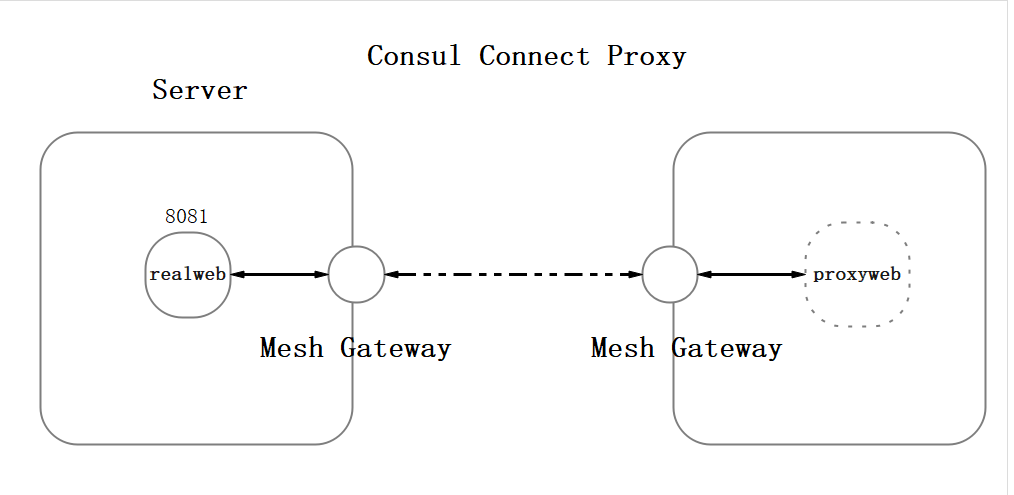
The following image is taken from the official website, and can be referenced for better understanding.
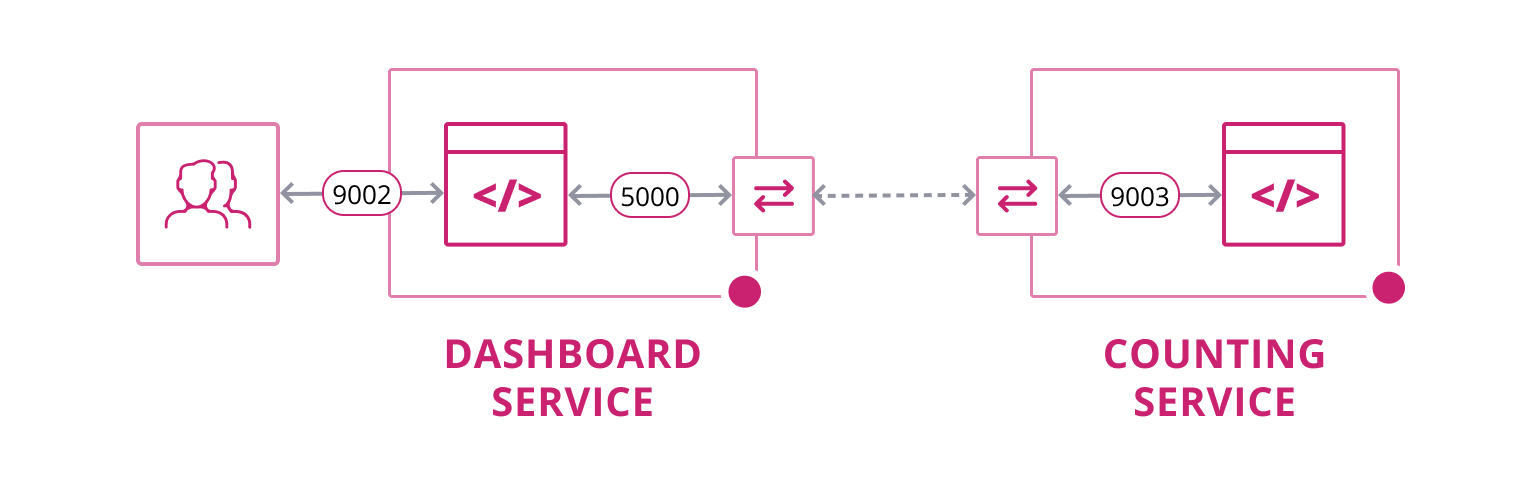
If a microservice is built where one of the hosts has a Redis service on port 9003, would you expose Redis to the public? Certainly not. Therefore, by using the proxy function, the Redis service can be proxied to another web server, changing the port to 5000, allowing the web program to access the Redis service while keeping it inaccessible from the outside.
Then, the web service provides port 9002 for user access to the web page service.
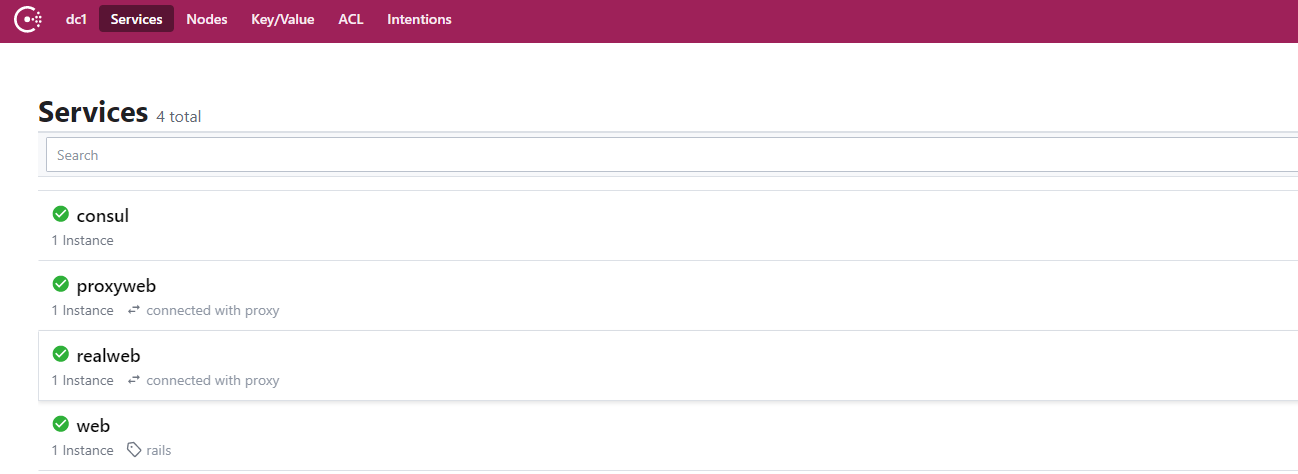
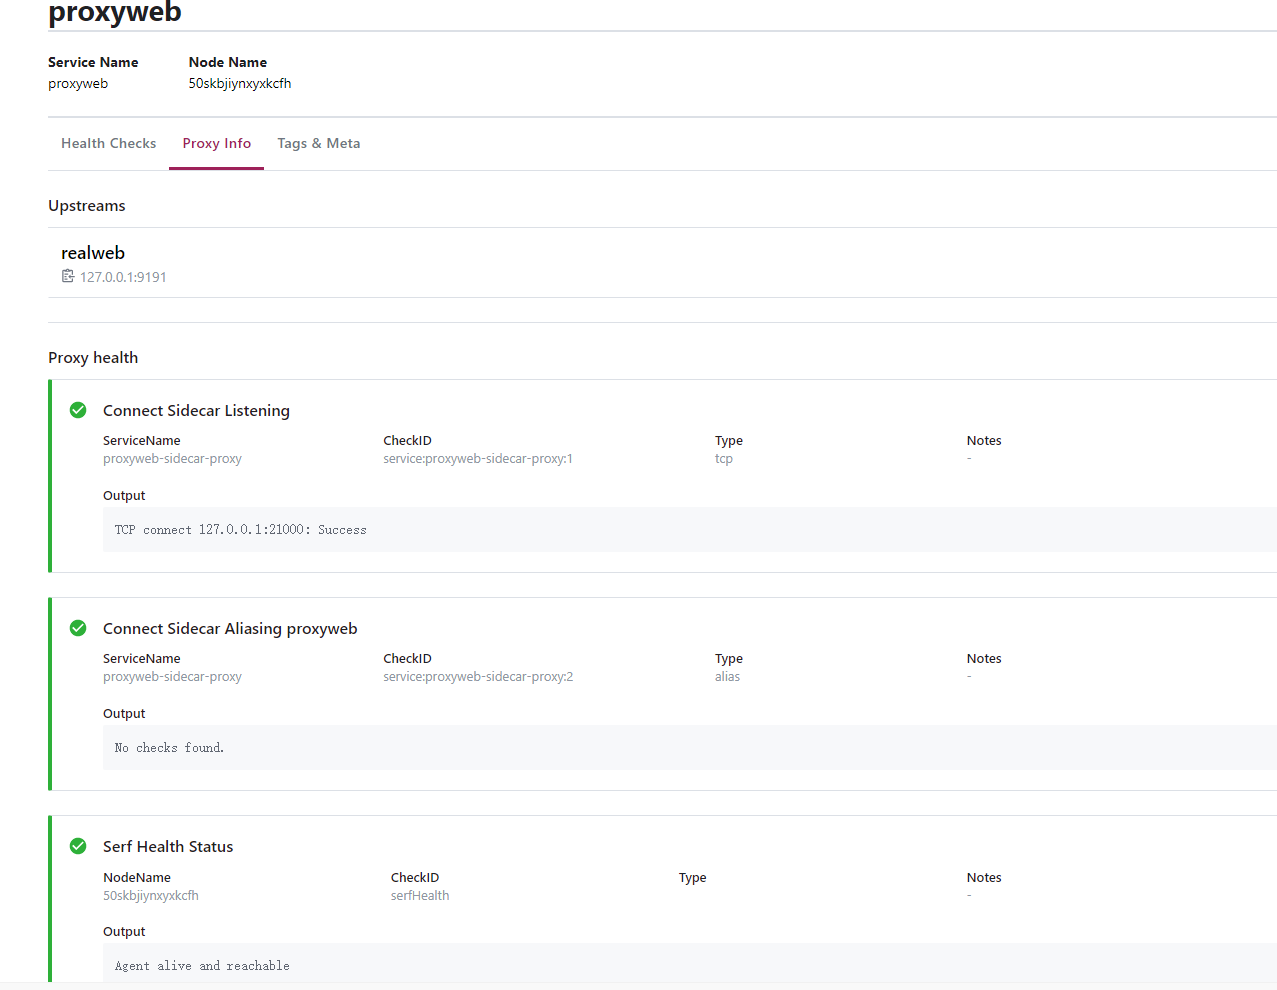
Viewing the UI Interface
Open the Consul user interface to see the proxy service.
9. Consul Cluster/Data Center
This chapter will introduce how to associate two server agents to establish a data center.
Preparation
Two servers are required for this. The official documentation provides methods to use virtual machines to deploy another system, but this is not advocated here; it is better to work with two actual servers to truly learn about clusters and microservices.
Fast deployment of virtual machines on Linux: https://learn.hashicorp.com/tutorials/consul/get-started-create-datacenter?in=consul/getting-started
Switch to the secondary server/virtual machine, install Consul following the tutorial from the previous section.
On the primary server, stop Consul and close other terminal windows, leaving only one terminal window open.
root@50skbjiynxyxkcfh:~# top | grep consul
32318 root      20   0  785168  66096  49008 S  1.3  3.2  13:52.93 consul
root@50skbjiynxyxkcfh:~# kill 32318
Starting the Consul Center
Execute the following command on the primary server to start the Consul instance.
# -bind fill in the subnet IP or public IP that can be accessed by the other server
consul agent \
  -dev \
  -server \
  -bootstrap-expect=1 \
  -node=agent-one \
  -bind=172.31.0.6 \
  -data-dir=/tmp/consul \
  -config-dir=/etc/consul.d
-
server- This flag indicates that you want the agent to start in server mode. -
-bootstrap-expect- This tells Consul how many servers should be expected in the datacenter. -
-node- Each node in the datacenter must have a unique name. -
-bind- This is the address the agent will listen on to communicate with other Consul members. Fill in the subnet IP or public IP. -
data-dir- This flag tells the Consul agent where to store states, which can include sensitive data such as ACL tokens for servers and clients. -
config-dir- This flag tells Consul where to look for its configuration.
After successfully starting, it will prompt:
    2020-11-21T07:46:59.903+0800 [INFO]  agent.server: federation state anti-entropy synced
    2020-11-21T07:46:59.903+0800 [INFO]  agent: Synced node info
    2020-11-21T07:46:59.911+0800 [INFO]  agent: Synced service: service=web
    2020-11-21T07:46:59.923+0800 [INFO]  agent: Synced service: service=proxyweb
    2020-11-21T07:46:59.939+0800 [INFO]  agent: Synced service: service=proxyweb-sidecar-proxy
    2020-11-21T07:46:59.961+0800 [INFO]  agent: Synced service: service=realweb
    2020-11-21T07:46:59.971+0800 [INFO]  agent: Synced service: service=realweb-sidecar-proxy
- If there are error messages regarding
realwebor proxy, they can be ignored.
Starting the Client
On the secondary server, execute the following command to start a new agent.
consul agent \
  -node=agent-two \
  -bind=172.31.0.7 \
  -enable-script-checks=true \
  -data-dir=/tmp/consul \
  -config-dir=/etc/consul.d
Checking Member Information
At this point, we have two servers, each running a Consul instance, but they are still independent and not yet associated.
We can check the member information by executing the following command on each server:
consul members
# consul server 1
Node       Address          Status  Type    Build  Protocol  DC   Segment
agent-one  172.31.0.6:8301  alive   server  1.8.6  2         dc1  <all>

# consul server 2
Node       Address          Status  Type    Build  Protocol  DC   Segment
agent-two  172.31.0.7:8301  alive   client  1.8.6  2         dc1  <default>
Associating Servers
Now, we will join the secondary server (172.31.0.7) to the primary server (172.31.0.6).
Execute the following command on the secondary server:
consul join 172.31.0.6
Re-run the consul members command on each server to check the member information:
# consul server 1
Node       Address          Status  Type    Build  Protocol  DC   Segment
agent-one  172.31.0.6:8301  alive   server  1.8.6  2         dc1  <all>
agent-two  172.31.0.7:8301  alive   client  1.8.6  2         dc1  <default>


# consul server 2
Node       Address          Status  Type    Build  Protocol  DC   Segment
agent-one  172.31.0.6:8301  alive   server  1.8.6  2         dc1  <all>
agent-two  172.31.0.7:8301  alive   client  1.8.6  2         dc1  <default>
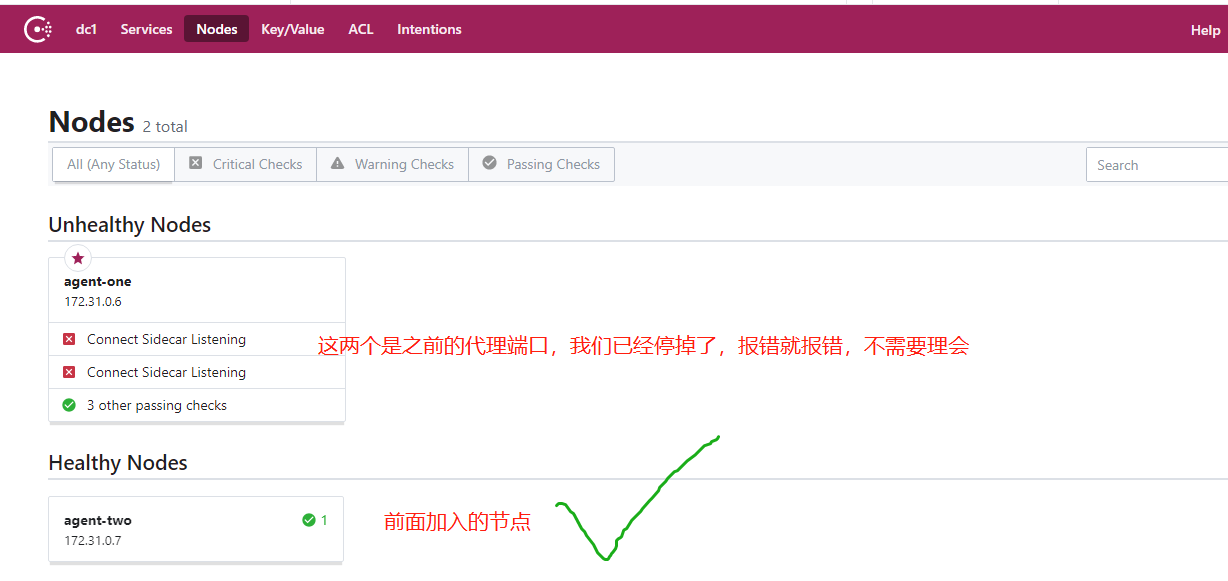
Opening the UI to View Service Node Information
Open the Consul UI at port 8500, click on Nodes to view all server nodes in Consul.
10. Cluster Proxy Service
This chapter discusses how to use the proxy function to proxy a service from one host to be accessible on another server.
Providing Proxy Service
On the primary server, close the proxy web terminal (if already closed, ignore this), go to the /etc/consul.d directory to delete the proxyweb.json, and reload the configuration:
consul reload
Then activate the proxy function (Consul connect):
consul connect proxy -sidecar-for realweb
Proxy on Another Server
In the /etc/consul.d/ directory of the secondary server, create a new proxyweb.json file with the following content:
{
  "service": {
    "name": "proxyweb",
    "connect": {
      "sidecar_service": {
        "proxy": {
          "upstreams": [
            {
              "destination_name": "realweb",
              "local_bind_port": 9191
            }
          ]
        }
      }
    }
  }
}
Reload the configuration:
consul reload
Start the proxy service
consul connect proxy -sidecar-for proxyweb
Validating the Proxy
Open a new window on the secondary server and execute:
curl http://127.0.0.1:9191
The output will be:
<h3>Congratulations, your Consul service has been successfully deployed!</h3><br/><br/><br/><br/>Remember to give the author whuanle a thumbs up~~~
This indicates that through the proxy service, a service from one host (port) can be accessed on another host using a different port (the same port can also be used).
This concludes the introduction tutorial for Consul. The author will continue to write about Consul, so stay tuned!

文章评论