Remote Deployment of .NET Core/Framework to IIS via Jenkins Pipeline
Introduction
In this chapter, we will discuss how to compile .NET Core and .NET Framework projects on Windows Jenkins and remotely deploy them to IIS.
Windows
First, we need to set up the required environment on Windows.
Jenkins depends on JDK 11, and you can look for methods to install it.
You can download the Windows Jenkins version from https://www.jenkins.io/download/. After downloading, install it directly, and it will automatically start upon completion.
The default installation directory for Jenkins is: C:\Windows\System32\config\systemprofile\AppData\Local\Jenkins.jenkins. The password/key is usually in the secret-file located in this directory.
After installing Jenkins, access it via port 8080, then follow the instructions in the section https://www.cnblogs.com/whuanle/p/14928651.html#安装插件 to install the required plugins, especially the powershell plugin.
Installing Git
Next, install Git on the Windows server; the typical installation directory for Git is C:\Program Files\Git.
Then add the following two Git-related directories to the system environment variables.
C:\Program Files\Git\cmd
C:\Program Files\Git\usr\bin
If you do not add
C:\Program Files\Git\usr\binto the environment variables, you will encounter a nohup error, as Jenkins relies on the nohup command.
WebDeploy
WebDeploy is a remote deployment tool for IIS that allows us to easily package applications for remote deployment to IIS without needing to manually restart, replace website files, or restart application pools. The download link for WebDeploy is: https://www.microsoft.com/zh-cn/download/details.aspx?id=43717
After installation, the default installation directory for the program is:
C:\Program Files\IIS\Microsoft Web Deploy V3
Please add this directory to the system environment variables.
Additionally, WebDeploy should also be installed on the server that will be remotely deployed.
Windows Node
If you have a Jenkins Master server and want to add a Windows Jenkins Node to create a master/slave Jenkins configuration, you can follow the method below to add Windows to a Linux node.
If you are only deploying Windows, then the Jenkins on the Windows machine will be the Master, and you can skip this step.
Open the Web interface of the Master Jenkins, navigate to Manage Jenkins in the left-side menu, and then select Manage Nodes and Clouds under System Configuration.
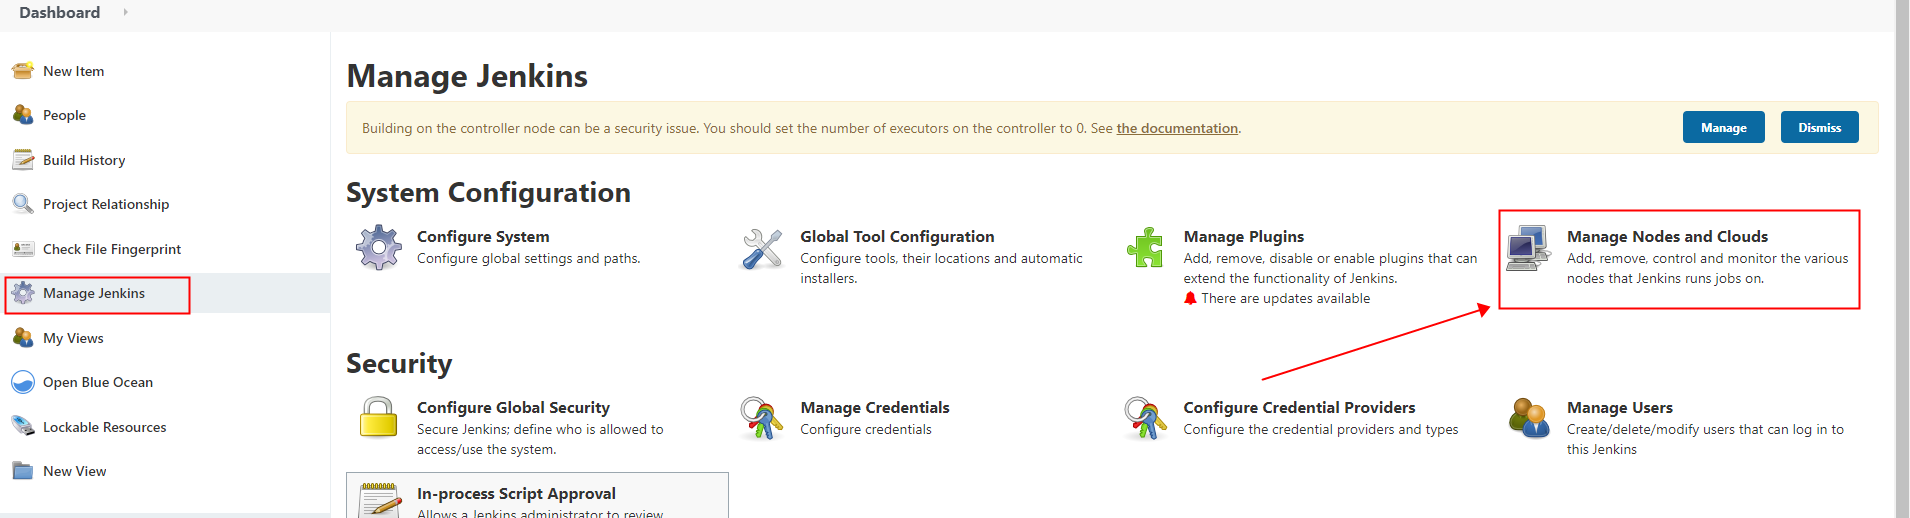
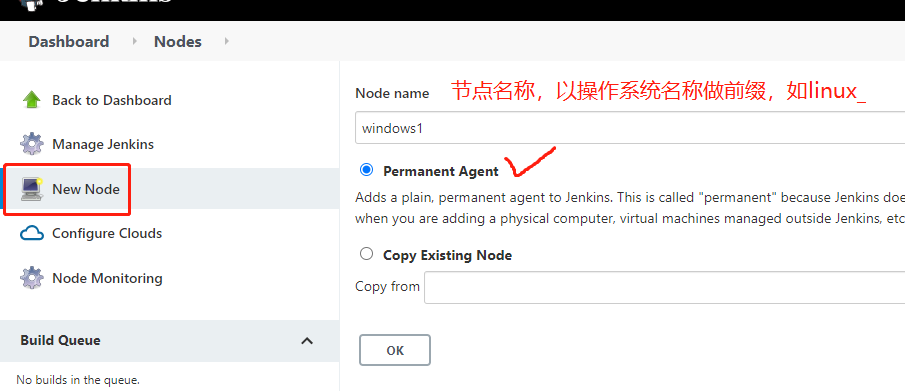
Then add a new node “New Node”.
You can name the node freely, but in the Label field that follows, you need to enter “windows”. Of course, you can use another identifier, but generally, the Label is used to identify the system characteristics. You'll also be asked to provide a build directory, which is where Jenkins will store working files, such as pulled code, executed commands, etc.
Click the blue text for agent.jar to download the Java package.
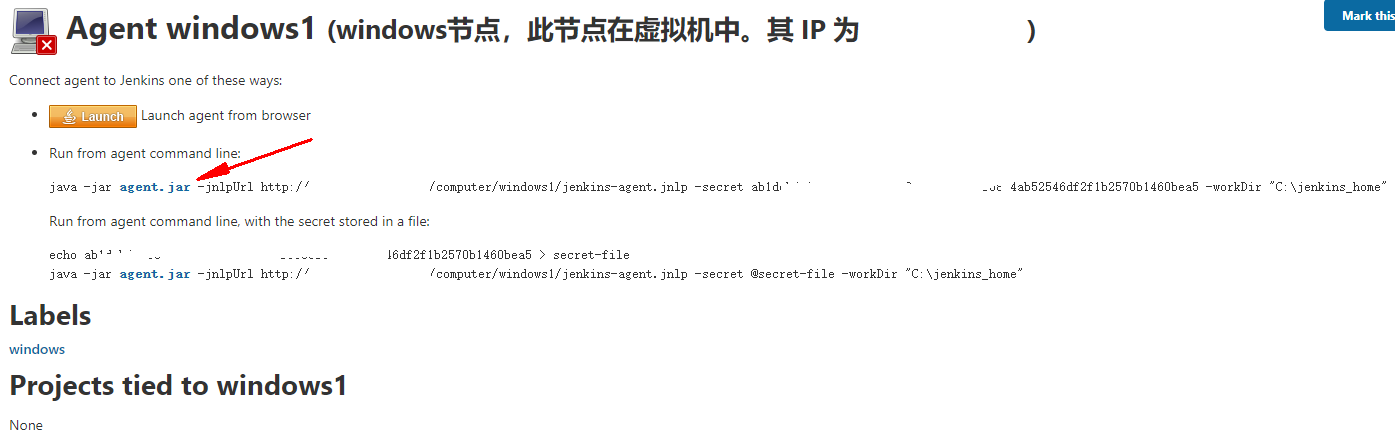
Place the agent.jar file in the Windows machine where Jenkins is hosted, then start agent.jar using the command provided.
Simply place agent.jar in the directory, open PowerShell or CMD, copy the command
Java -jar agent.jar -jnlpUrl .....and execute it directly.
Then, you will see that another Windows slave node has been added in the Jenkins interface.

.NET Core
This section introduces how to build and remotely deploy .NET Core applications to IIS.
For .NET Core applications, the process is relatively straightforward; just install the .NET Core SDK without any additional operations.
The download link for various versions of .NET Core is:
https://dotnet.microsoft.com/download/dotnet
Download link for .NET Core 3.1:
https://download.visualstudio.microsoft.com/download/pr/56131147-65ea-47d6-a945-b0296c86e510/44b43b7cb27d55081e650b9a4188a419/dotnet-sdk-3.1.201-win-x64.exe
Handling IIS
On the Windows server where you want to deploy the application, open IIS, click on "Application Pools," and then add a new one.

Next, add a website.
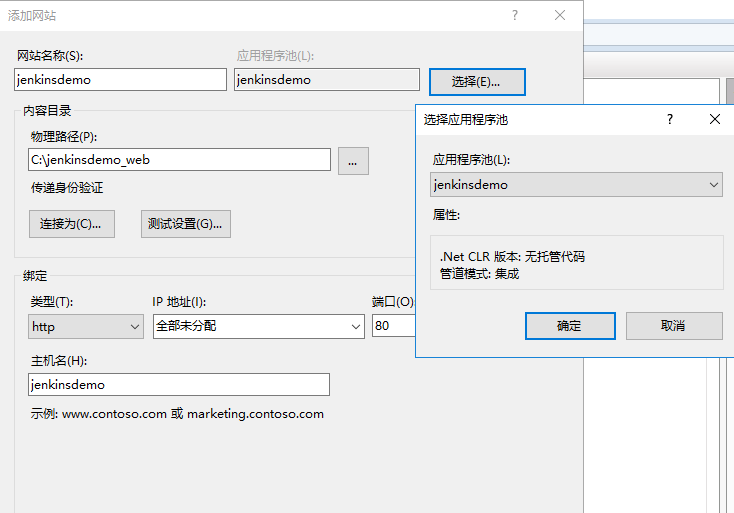
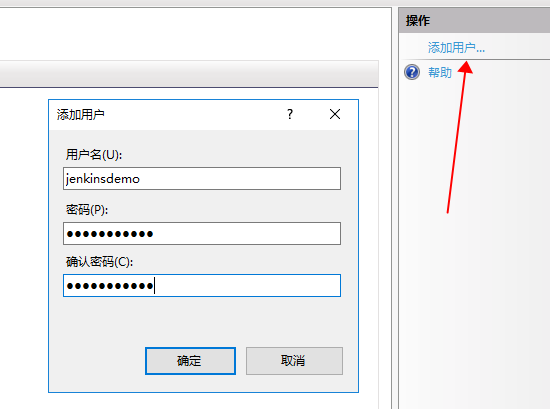
Then start by adding a new user, click on the hostname, then click “IIS Manager Users” and add a user.
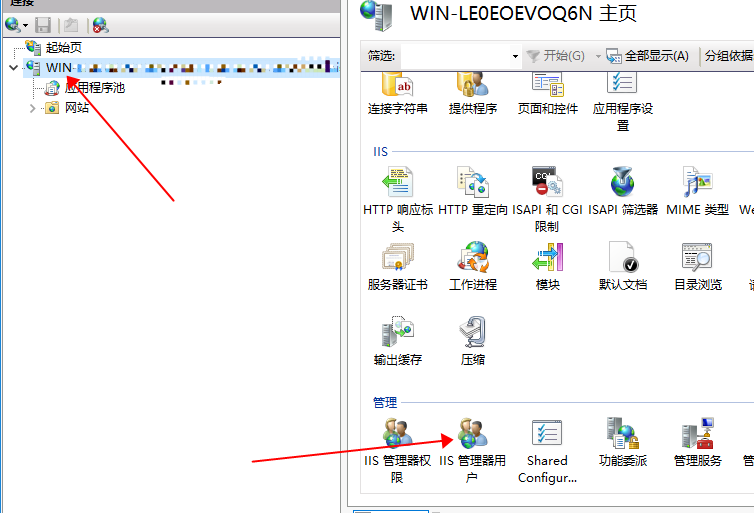
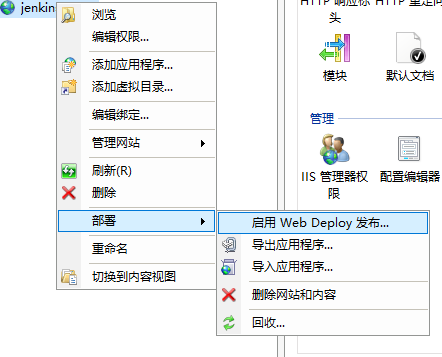
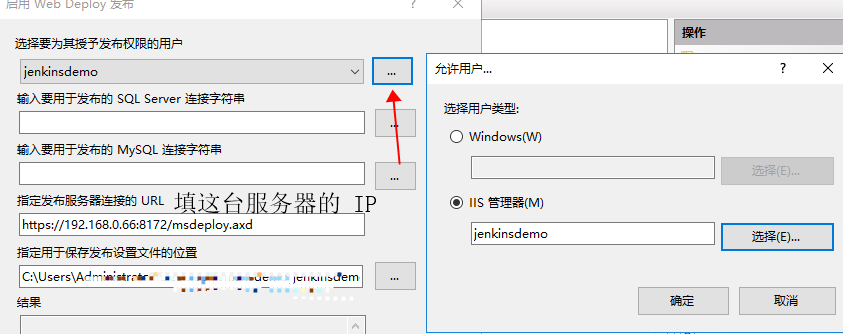
Then enable WebDeploy deployment for the website.
Handling Project Jenkinsfile
The author has uploaded a demo project along with the Jenkinsfile; readers can fork the project directly. The example project is in the coreiis branch.
https://github.com/whuanle/DotNetCoreJenkinsDemo/tree/coreiis
Next, download the source code and modify the Jenkinsfile.
        // IIS configuration, variables for remote publishing
        IISTMP     =   'C:/webdemo_tmp'                            // Temporary directory for packaging and deployment
        IISAPP     =   'jenkinsdemo.com'                           // Website name
        IISADDR    =   'https://192.168.0.66:8172/msdeploy.axd'    // WebDeploy address
        IISUSER    =   'jenkinesdemo'                         // Account/password to log into IIS
        IISADMIN   =   'jenkinesdemo'
According to the author’s demo, readers only need to change the IP and the username/password in IISADDR.
Next, use Jenkins to add the pipeline deployment. The details on creating a new workflow in Jenkins will not be elaborated here. Readers can refer to the author's other article:
https://www.cnblogs.com/whuanle/p/14928651.html#构建流水线
.NET Framework
To compile .NET Framework applications, we need to set up a compilation environment for .NET Framework applications. Since .NET Framework heavily relies on Visual Studio, if you want to operate outside of the VS environment, you will need to install many environment tools to compile the program via command line, which can be cumbersome, so readers need to be patient.
The example project has been uploaded at https://github.com/whuanle/DotNetCoreJenkinsDemo/tree/fxiis.
Installing the Environment
.NET Framework SDK
The .NET Framework package provides the environment for compiling and running .NET programs.
Install the .NET Framework, the version of which may vary depending on the project's requirements. You can install multiple versions, for example, .NET Framework 4.6.1 and .NET Framework 4.6.1 Developer Pack.
Download link: https://dotnet.microsoft.com/download/dotnet-framework
MSBuild
MSBuild is a compilation tool for .NET programs that can be used outside of the VS environment.
To compile .NET Framework projects, such as version 4.6, please use MSBuild 14 (corresponding to VS 2015), typically the file name is BuildTools_Full_14.exe.
Download links:
https://www.microsoft.com/en-US/download/details.aspx?id=48159
https://github.com/EWSoftware/SHFB/releases
After installing MSBuild, its directory is located at:
C:\Program Files (x86)\MSBuild\14.0\Bin
Please add this directory path to the system environment variables.
Nuget
Nuget is used to restore project dependencies. For .NET Framework projects, the version of Nuget should not be above 5.0; it is recommended to use around version 4.5; otherwise, there may be compatibility issues!
After installation, the Nuget program directory is:
C:\Program Files\nuget
Please add this directory to the system environment variables.
After installing all required tools, the environment variables need to include the following entries:
C:\Program Files (x86)\MSBuild\14.0\Bin
C:\Program Files\Git\cmd
C:\Program Files\nuget
C:\Program Files\Git\usr\bin
C:\Program Files\IIS\Microsoft Web Deploy V3
Please check carefully to ensure no entries are left out.
Configuring the Project
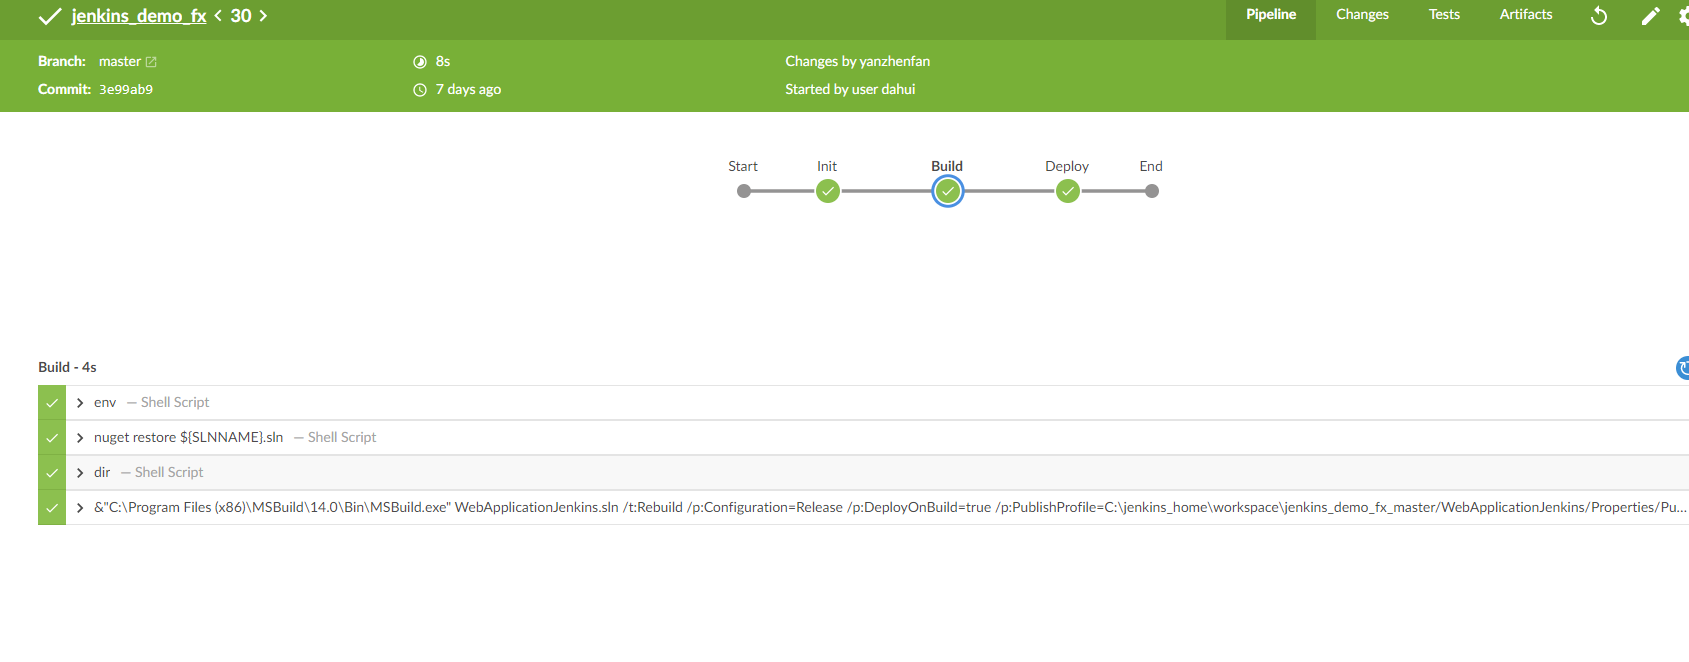
To automate the build of .NET Framework applications outside of the VS environment requires modifications to many configuration files and settings. This section will describe how to configure the automated pipeline for .NET Framework builds, using Jenkins configuration and writing Jenkins scripts.
Generally, a solution includes a main program that needs to be published (mainly web applications). Please add Nuget references for the web project that needs to be published and search the package MSBuild.Microsoft.VisualStudio.Web.targets to add it to the project.
Since .NET Framework projects rely on Visual Studio for publishing, without using VS for publishing, many issues may arise. To operate outside of the VS environment, someone has encapsulated a complete targets file that instructs MSBuild how to compile the program.
For the web project that needs to be published, you need to define web publish properties. During automation builds, these pre-configured properties will be utilized to generate a .pubxml file, which will be uploaded to the repository alongside the source code.

Then click to publish and manually publish once to a directory.
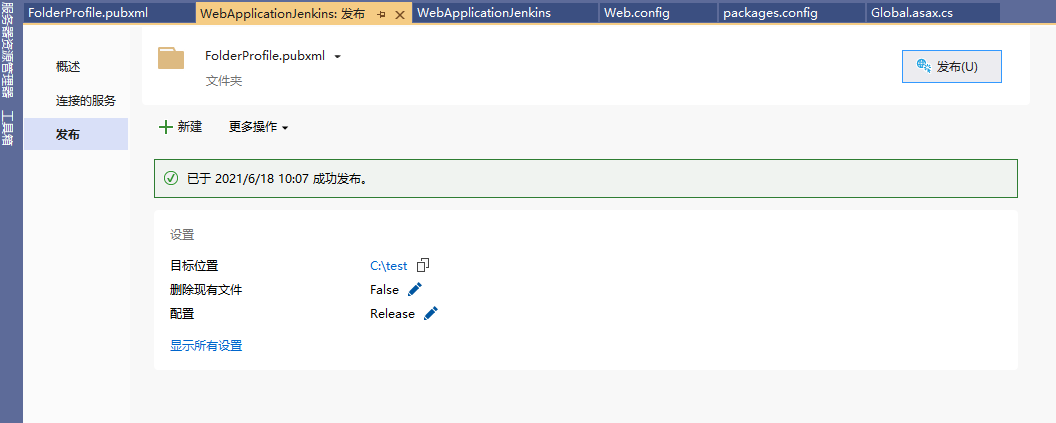
After saving the settings, you can find the FolderProfile.pubxml file in the project’s Properties\PublishProfiles directory, which contains a PublishUrl attribute indicating the output directory for web publication.
<PublishUrl>C:\test</PublishUrl>
This directory configuration will affect the output during automated builds; when compiled, the generated files will output to this directory, so please ensure it is stored in this drive on Windows Jenkins!
Then you can directly operate on the Jenkins Web interface.
Frontend and Backend Separation Strategy
When we have completed creating the website for the .NET Core / .NET Framework project, the program and front end are together, making packaging and publishing inconvenient.
We can create a separate empty website for the frontend project.
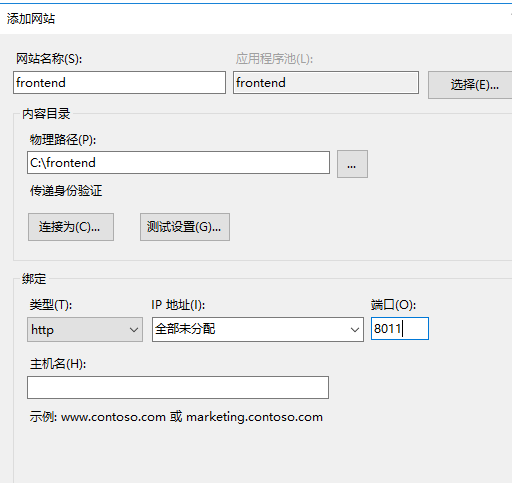
I can write a pipeline script to automatically package and publish the frontend files to this website via WebDeploy.
Next, in the backend website, add a virtual directory that matches the directory of the frontend website.
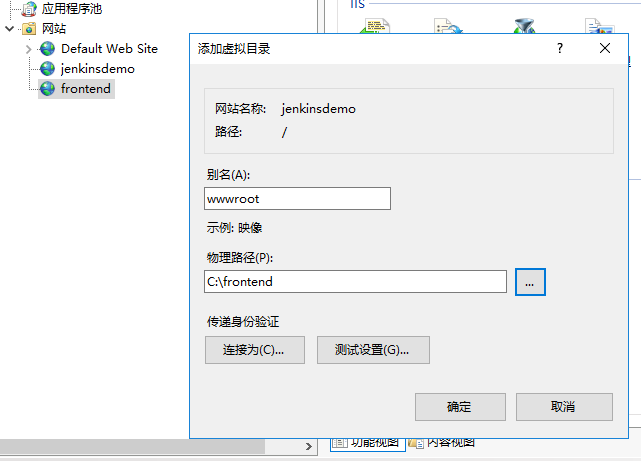
This way, both frontend and backend can be deployed separately, allowing the backend website to directly access the frontend files.

文章评论