What to Write
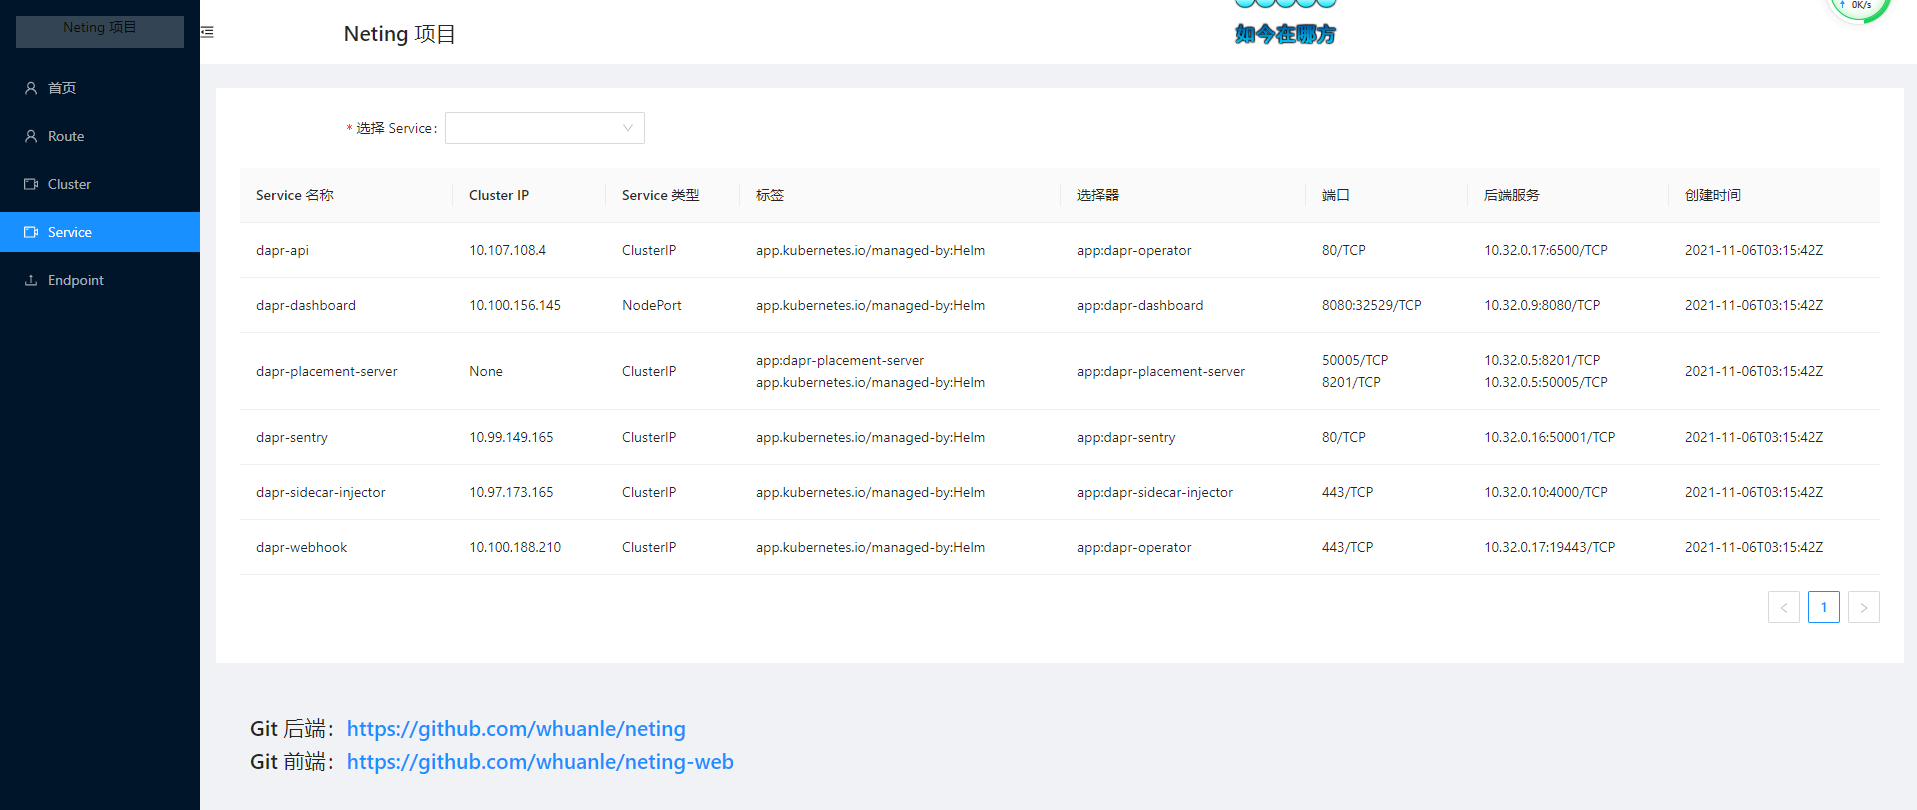
Not long ago, I wrote a project using C#, which utilizes the Kubernetes API Server to retrieve information and monitor Kubernetes resources, then combines it with Neting to create an API gateway.
Experience link: http://neting.whuanle.cn:30080/
Account: admin, Password: admin123
This article will mainly introduce how to develop a Kubernetes-based application using C# to obtain information about various resources in Kubernetes and the prerequisite knowledge for building a Controller. In the next article, I will explain how to implement a Controller and Kubernetes Operator.
Kubernetes API Server
kube-apiserver is one of the main processes in k8s. The apiserver component exposes the Kubernetes API (HTTP API), serving as the frontend of the Kubernetes control plane. We can write code in Go, C#, and other programming languages to remotely call Kubernetes and control the cluster's operation. The endpoint exposed by the apiserver is port 6443.
In order to control the operation of the cluster, Kubernetes provides a command-line tool named kubectl. It is the apiserver that provides the interface service. The kubectl tool parses user input commands and makes HTTP requests to the apiserver, then feeds back the results to the user.
kubectl
kubectl is a powerful tool included with Kubernetes for managing the entire cluster through command-line operations.
Kubernetes has many visual panels, such as the Dashboard, which also utilizes the apiserver's API, effectively serving as frontend calls to the backend.
In short, all the tools we use to manage clusters are backed by the apiserver. Through the apiserver, we can also customize various tools for cluster management, such as the service mesh tool istio. Cloud platforms like Tencent Cloud and Alibaba Cloud offer online Kubernetes services, along with a console for visual operations, also utilizing the apiserver.
You can refer to the Kubernetes e-book written by the author for more information: https://k8s.whuanle.cn/1.basic/5.k8s.html
In summary, the Kubernetes API Server is the entry point for third-party operations on Kubernetes.
Exposing the Kubernetes API Server
First, check the Kubernetes components running in the kube-system namespace, and you will see that kube-apiserver-master is running.
root@master:~# kubectl get pods -o wide  -n kube-system
NAME                             READY   STATUS    RESTARTS         AGE   IP          NODE     NOMINATED NODE   READINESS GATES
... ...
kube-apiserver-master            1/1     Running   2 (76d ago)      81d   10.0.0.4    master   <none>           <none>
... ...
Although these components are important, there will only be one instance running as a Pod, not a Deployment, and these components can only run on the master node.
Then view the admin.conf file, which can be found at /etc/kubernetes/admin.conf or $HOME/.kube/config.
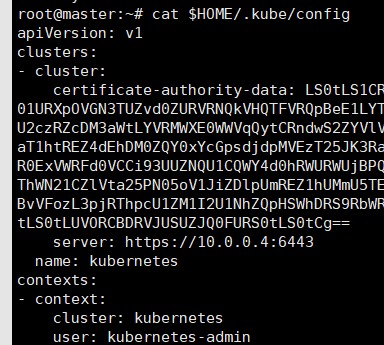
The admin.conf file is the credential for accessing the Kubernetes API Server. With this file, we can access the Kubernetes API programmatically.
However, the admin.conf file is a very important file. If it's a development environment, you can improvise, but in a production environment, please avoid using it and restrict API access permissions via role bindings and other methods.
Next, download the admin.conf or config file to your local machine.
You can use the command kubectl edit pods kube-apiserver-master -n kube-system to check some configuration information about the Kubernetes API Server.
Since the Kubernetes API Server is, by default, accessible only from within the cluster, you need to expose it outside of the cluster for remote access (this is relevant to being within the cluster, not whether everything is on the internal network).
To expose the API Server outside the cluster:
kubectl expose pod kube-apiserver-master --type=NodePort --port=6443 -n kube-system
Check the randomly assigned port for the nodes:
root@master:~# kubectl get svc -n kube-system
NAME                    TYPE        CLUSTER-IP       EXTERNAL-IP   PORT(S)                  AGE
kube-apiserver-master   NodePort    10.101.230.138   <none>        6443:32263/TCP           25s
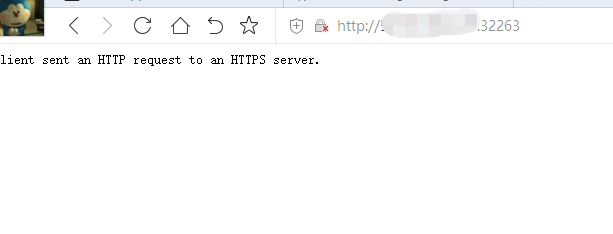
Port 32263 is assigned automatically by Kubernetes; each one is different.
You can test access through IP:32263.
If your cluster has CoreDNS installed, this service can also be accessed via the IP address of other nodes.
Then rename the downloaded admin.conf or config file to admin.conf and modify the server property in it, as we are now accessing it remotely.
Connecting to the API Server
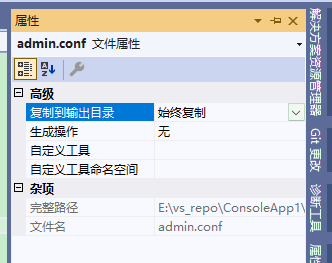
Create a new MyKubernetes console project, then copy the admin.conf file into the project to be included in the project's output.
Next, search for the KubernetesClient package in NuGet; the version I am currently using is 7.0.1.
Then set an environment variable in the project:
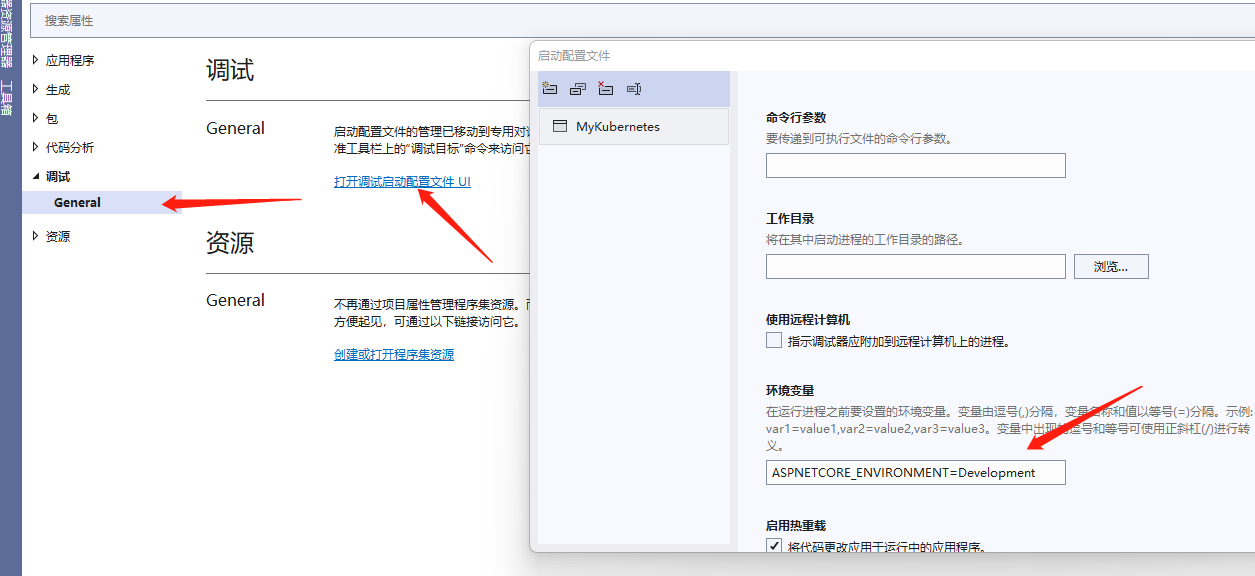
This environment variable is inherent to ASP.NET Core and is not present in console applications.
Below is a method to instantiate and acquire a Kubernetes client:
    private static Kubernetes GetClient()
    {
        KubernetesClientConfiguration config;
        if (Environment.GetEnvironmentVariable("ASPNETCORE_ENVIRONMENT") == "Development")
        {
            // Access via configuration file
            config = KubernetesClientConfiguration.BuildConfigFromConfigFile("./admin.conf");
        }
        else
        {
            // Access via default Service Account; must be running in Kubernetes.
            config = KubernetesClientConfiguration.BuildDefaultConfig();
        }
        return new Kubernetes(config);
    }
The logic is straightforward: access using the admin.conf file if in a development environment; otherwise,
BuildDefaultConfig()automatically gets access credentials, which is only valid when running in a Pod, utilizing Service Account authentication.
Next, let’s test to retrieve all namespaces:
    static async Task Main()
    {
        var client = GetClient();
        var namespaces = await client.ListNamespaceAsync();
        foreach (var item in namespaces.Items)
        {
            Console.WriteLine(item.Metadata.Name);
        }
    }
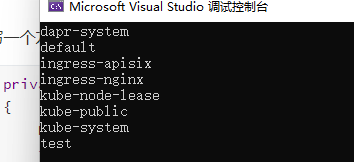
Great! You can now retrieve Kubernetes resources; you've taken the first step in getting started! Show off!
Quick Client Knowledge
While you've taken the first step, don't rush to use various APIs just yet. Let's first understand how different Kubernetes resources are defined in the client and how to parse structures.
In the Kubernetes Client C# code, all the model classes for Kubernetes resources are recorded in k8s.Models.
If we want to view the definition of an object in Kubernetes, such as in the kube-system namespace:
kubectl get namespace kube-system -o yaml
apiVersion: v1
kind: Namespace
metadata:
  creationTimestamp: "2021-11-03T13:57:10Z"
  labels:
    kubernetes.io/metadata.name: kube-system
  name: kube-system
  resourceVersion: "33"
  uid: f0c1f00d-2ee4-40fb-b772-665ac2a282d7
spec:
  finalizers:
  - kubernetes
status:
  phase: Active
In C#, the model's structure is identical:
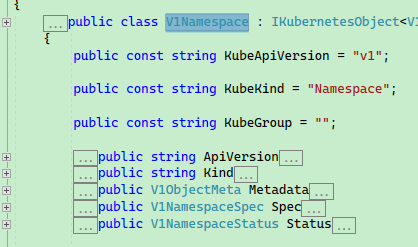
In the client, models are prefixed with the apiVersion version, and the list of such objects is retrieved through V1NamespaceList.
To get resources of a particular type, the interfaces all start with List, such as client.ListNamespaceAsync(), client.ListAPIServiceAsync(), client.ListPodForAllNamespacesAsync(), etc.
It seems that learning is on the right track. Let's practice and experiment!
How to Parse a Service
Here, I've thoughtfully prepared an exercise for readers; the first exercise is to parse out the information of a Service.
View the previously created Service:
kubectl get svc kube-apiserver-master -n kube-system -o yaml
The corresponding structure is as follows:
apiVersion: v1
kind: Service
metadata:
  creationTimestamp: "2022-01-24T12:51:32Z"
  labels:
    component: kube-apiserver
    tier: control-plane
  name: kube-apiserver-master
  namespace: kube-system
  resourceVersion: "24215604"
  uid: ede0e3df-8ef6-45c6-9a8d-2a2048c6cb12
spec:
  clusterIP: 10.101.230.138
  clusterIPs:
  - 10.101.230.138
  externalTrafficPolicy: Cluster
  internalTrafficPolicy: Cluster
  ipFamilies:
  - IPv4
  ipFamilyPolicy: SingleStack
  ports:
  - nodePort: 32263
    port: 6443
    protocol: TCP
    targetPort: 6443
  selector:
    component: kube-apiserver
    tier: control-plane
  sessionAffinity: None
  type: NodePort
status:
  loadBalancer: {}
In C#, we can define a model class like this:
    public class ServiceInfo
    {
        /// <summary>
        /// SVC Name
        /// </summary>
        public string Name { get; set; } = null!;

        /// <summary>
        /// One of three types <see cref="ServiceType"/>
        /// </summary>
        public string? ServiceType { get; set; }
        /// <summary>
        /// Namespace
        /// </summary>
        public string Namespace { get; set; } = null!;

        /// <summary>
        /// Some Services may not have this option
        /// </summary>
        public string ClusterIP { get; set; } = null!;

        /// <summary>
        /// External access IP
        /// </summary>
        public string[]? ExternalAddress { get; set; }

        public IDictionary<string, string>? Labels { get; set; }

        public IDictionary<string, string>? Selector { get; set; }

        /// <summary>
        /// name,port
        /// </summary>
        public List<string>? Ports { get; set; }

        public string[]? Endpoints { get; set; }

        public DateTime? CreationTime { get; set; }

        // Associated Pods and their IPs
    }
Next, specify which namespace's Service and its associated Endpoint information to retrieve.
    static async Task Main()
    {
        var result = await GetServiceAsync("kube-apiserver-master", "kube-system");
        Console.WriteLine(System.Text.Json.JsonSerializer.Serialize(result));
    }
    public static async Task<ServiceInfo> GetServiceAsync(string svcName, string namespaceName)
    {
        var client = GetClient();
        var service = await client.ReadNamespacedServiceAsync(svcName, namespaceName);

        // Get information about the service itself
        ServiceInfo info = new ServiceInfo
        {
            Name = service.Metadata.Name,
            Namespace = service.Metadata.NamespaceProperty,
            ServiceType = service.Spec.Type,
            Labels = service.Metadata.Labels,
            ClusterIP = service.Spec.ClusterIP,
            CreationTime = service.Metadata.CreationTimestamp,
            Selector = service.Spec.Selector.ToDictionary(x => x.Key, x => x.Value),
            ExternalAddress = service.Spec.ExternalIPs?.ToArray(),
        };

        // service -> endpoint information
        var endpoint = await client.ReadNamespacedEndpointsAsync(svcName, namespaceName);
        List<string> address = new List<string>();
        foreach (var sub in endpoint.Subsets)
        {
            foreach (var addr in sub.Addresses)
            {
                foreach (var port in sub.Ports)
                {
                    address.Add($"{addr.Ip}:{port.Port}/{port.Protocol}");
                }
            }

        }
        info.Endpoints = address.ToArray();
        return info;
    }
The output result is as follows:
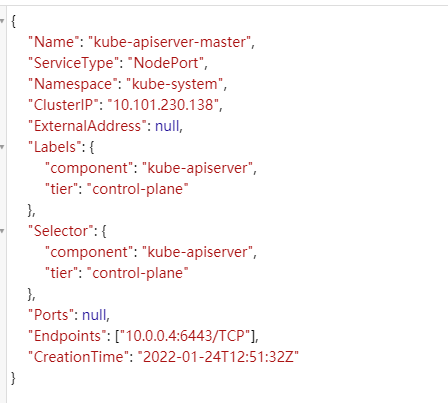
Dear reader, if you are not clear about Kubernetes network knowledge, please open https://k8s.whuanle.cn/4.network/1.network.html to understand more.
Practice 2
We know that a Service can associate multiple Pods, providing load balancing and other functionalities for multiple Pods.
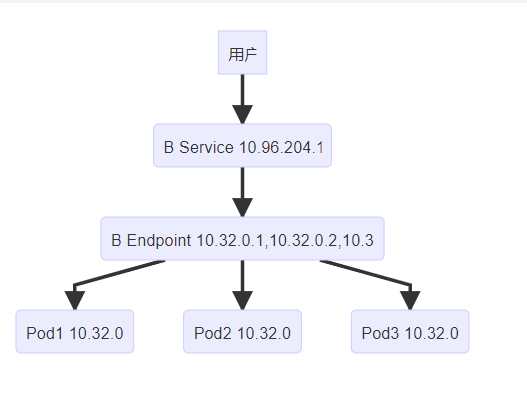
同时 Service 有 externalIP、clusterIP 等属性,要真正解析出一个 Service 是比较困难的。例如 Service 可以只有端口,没有 IP;也可以只使用 DNS 域名访问;也可以不绑定任何 Pod,可以从 Service A DNS -> Service B IP 间接访问 B;
Service 包含的情况比较多,读者可以参考下面这个图,下面我们通过代码,获取一个 Service 的 IP 和端口信息,然后生成对应的 IP+端口结构。
单纯获取 IP 和端口是没用的,因为他们是分开的,你获取到的 IP 可能是 Cluster、Node、LoadBalancer 的,有可能只是 DNS 没有 IP,那么你这个端口怎么访问呢?这个时候必须根据一定的规则,解析信息,筛选无效数据,才能得出有用的访问地址。
首先定义一部分枚举和模型:
    public enum ServiceType
    {
        ClusterIP,
        NodePort,
        LoadBalancer,

        ExternalName
    }

    /// <summary>
    /// Kubernetes Service 和 IP
    /// </summary>
    public class SvcPort
    {

        // LoadBalancer -> NodePort -> Port -> Target-Port

        /// <summary>
        /// 127.0.0.1:8080/tcp、127.0.0.1:8080/http
        /// </summary>
        public string Address { get; set; } = null!;

        /// <summary>
        /// LoadBalancer、NodePort、Cluster
        /// </summary>
        public string Type { get; set; } = null!;

        public string IP { get; set; } = null!;
        public int Port { get; set; }
    }
    public class SvcIpPort
    {
        public List<SvcPort>? LoadBalancers { get; set; }
        public List<SvcPort>? NodePorts { get; set; }
        public List<SvcPort>? Clusters { get; set; }
        public string? ExternalName { get; set; }
    }
编写解析代码:
    static async Task Main()
    {
        var result = await GetSvcIpsAsync("kube-apiserver-master","kube-system");
        Console.WriteLine(System.Text.Json.JsonSerializer.Serialize(result));
    }

    public static async Task<SvcIpPort> GetSvcIpsAsync(string svcName, string namespaceName)
    {
        var client = GetClient();
        var service = await client.ReadNamespacedServiceAsync(svcName, namespaceName);

        SvcIpPort svc = new SvcIpPort();

        // LoadBalancer
        if (service.Spec.Type == nameof(ServiceType.LoadBalancer))
        {
            svc.LoadBalancers = new List<SvcPort>();
            var ips = svc.LoadBalancers;

            // 负载均衡器 IP
            var lbIP = service.Spec.LoadBalancerIP;
            var ports = service.Spec.Ports.Where(x => x.NodePort != null).ToArray();
            foreach (var port in ports)
            {
                ips.Add(new SvcPort
                {
                    Address = $"{lbIP}:{port.NodePort}/{port.Protocol}",
                    IP = lbIP,
                    Port = (int)port.NodePort!,
                    Type = nameof(ServiceType.LoadBalancer)
                });
            }
        }

        if (service.Spec.Type == nameof(ServiceType.LoadBalancer) || service.Spec.Type == nameof(ServiceType.NodePort))
        {
            svc.NodePorts = new List<SvcPort>();
            var ips = svc.NodePorts;

            // 负载均衡器 IP,有些情况可以设置 ClusterIP 为 None;也可以手动设置为 None,只要有公网 IP 就行
            var clusterIP = service.Spec.ClusterIP;
            var ports = service.Spec.Ports.Where(x => x.NodePort != null).ToArray();
            foreach (var port in ports)
            {
                ips.Add(new SvcPort
                {
                    Address = $"{clusterIP}:{port.NodePort}/{port.Protocol}",
                    IP = clusterIP,
                    Port = (int)port.NodePort!,
                    Type = nameof(ServiceType.NodePort)
                });
            }
        }

        // 下面这部分代码是正常的,使用 {} 可以隔离部分代码,避免变量重名
        // if (service.Spec.Type == nameof(ServiceType.ClusterIP))
        // 如果 Service 没有 Cluster IP,可能使用了无头模式,也有可能不想出现 ClusterIP
        //if(service.Spec.ClusterIP == "None")
        {
            svc.Clusters = new List<SvcPort>();
            var ips = svc.Clusters;
            var clusterIP = service.Spec.ClusterIP;

            var ports = service.Spec.Ports.ToArray();
            foreach (var port in ports)
            {
                ips.Add(new SvcPort
                {
                    Address = $"{clusterIP}:{port.Port}/{port.Protocol}",
                    IP = clusterIP,
                    Port = port.Port,
                    Type = nameof(ServiceType.ClusterIP)
                });
            }
        }

        if (!string.IsNullOrEmpty(service.Spec.ExternalName))
        {
            /* NAME            TYPE           CLUSTER-IP       EXTERNAL-IP          PORT(S)     AGE
               myapp-svcname   ExternalName   <none>           myapp.baidu.com      <none>      1m
               myapp-svcname ->  myapp-svc
               访问 myapp-svc.default.svc.cluster.local,变成 myapp.baidu.com
             */
            svc.ExternalName = service.Spec.ExternalName;
        }
        return svc;
    }
规则解析比较复杂,这里就不详细讲解,读者如有疑问,可联系笔者讨论。
主要规则:
LoadBalancer -> NodePort -> Port -> Target-Port。
最终结果如下:
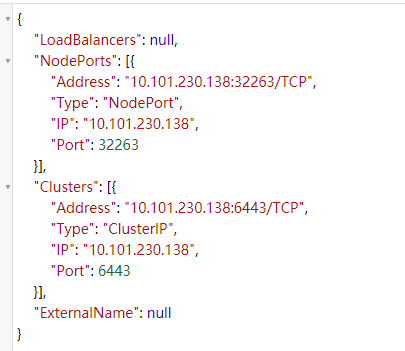
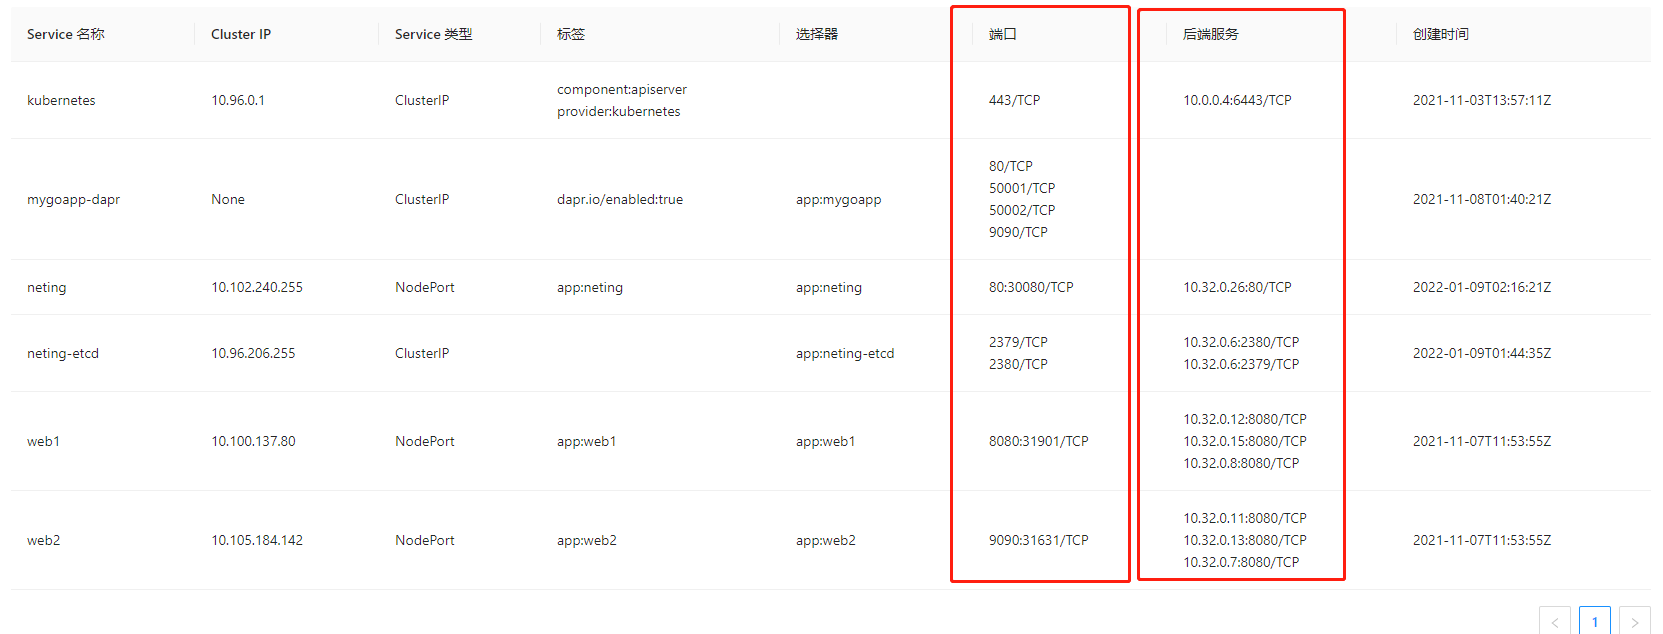
通过这部分代码,可以解析出 Service 在 External Name、LoadBalancer、NodePort、ClusterIP 等情况下可真正访问的地址列表。
实践3 Endpoint 列表
如果对 Endpoint 不太了解,请打开 https://k8s.whuanle.cn/4.network/2.endpoint.html 看一下相关知识。
在 Kubernetes 中,Service 不是直接关联 Pod 的,而是通过 Endpoint 间接代理 Pod。当然除了 Service -> Pod,通过 Endpoint,也可以实现接入集群外的第三方服务。例如数据库集群不在 Kubernetes 集群中,但是想通过 Kubernetes Service 统一访问,则可以利用 Endpoint 进行解耦。这里不多说,读者可以参考 https://k8s.whuanle.cn/4.network/2.endpoint.html 。
这里这小节中,笔者也将会讲解如何在 Kubernetes 中分页获取资源。
首先定义以下模型:
    public class SvcInfoList
    {
        /// <summary>
        /// 分页属性,具有临时有效期,具体由 Kubernetes 确定
        /// </summary>
        public string? ContinueProperty { get; set; }

        /// <summary>
        /// 预计剩余数量
        /// </summary>
        public int RemainingItemCount { get; set; }

        /// <summary>
        /// SVC 列表
        /// </summary>
        public List<SvcInfo> Items { get; set; } = new List<SvcInfo>();
    }

    public class SvcInfo
    {
        /// <summary>
        /// SVC 名称
        /// </summary>
        public string Name { get; set; } = null!;

        /// <summary>
        /// 三种类型之一 <see cref="ServiceType"/>
        /// </summary>
        public string? ServiceType { get; set; }

        /// <summary>
        /// 有些 Service 没有 IP,值为 None
        /// </summary>
        public string ClusterIP { get; set; } = null!;

        public DateTime? CreationTime { get; set; }

        public IDictionary<string, string>? Labels { get; set; }

        public IDictionary<string, string>? Selector { get; set; }

        /// <summary>
        /// name,port
        /// </summary>
        public List<string> Ports { get; set; }

        public string[]? Endpoints { get; set; }
    }
Kubernetes 中的分页,没有 PageNo、PageSize、Skip、Take 、Limit 这些,并且分页可能只是预计,不一定完全准确。
第一次访问获取对象列表时,不能使用 ContinueProperty 属性。
第一次访问 Kubernets 后,获取 10 条数据,那么 Kubernetes 会返回一个 ContinueProperty 令牌,和剩余数量 RemainingItemCount。
那么我们可以通过 RemainingItemCount 计算大概的分页数字。因为 Kubernetes 是不能直接分页的,而是通过类似游标的东西,记录当前访问的位置,然后继续向下获取对象。ContinueProperty 保存了当前查询游标的令牌,但是这个令牌有效期是几分钟
解析方法:
    public static async Task<SvcInfoList> GetServicesAsync(string namespaceName,
                                                           int pageSize = 1,
                                                           string? continueProperty = null)
    {
        var client = GetClient();

        V1ServiceList services;
        if (string.IsNullOrEmpty(continueProperty))
        {
            services = await client.ListNamespacedServiceAsync(namespaceName, limit: pageSize);
        }
        else
        {
            try
            {
                services = await client.ListNamespacedServiceAsync(namespaceName,
                                                                   continueParameter: continueProperty,
                                                                   limit: pageSize);
            }
            catch (Microsoft.Rest.HttpOperationException ex)
            {
                throw ex;
            }
            catch
            {
                throw;
            }
        }

        SvcInfoList svcList = new SvcInfoList
        {
            ContinueProperty = services.Metadata.ContinueProperty,
            RemainingItemCount = (int)services.Metadata.RemainingItemCount.GetValueOrDefault(),
            Items = new List<SvcInfo>()
        };

        List<SvcInfo> svcInfos = svcList.Items;
        foreach (var item in services.Items)
        {
            SvcInfo service = new SvcInfo
            {
                Name = item.Metadata.Name,
                ServiceType = item.Spec.Type,
                ClusterIP = item.Spec.ClusterIP,
                Labels = item.Metadata.Labels,
                Selector = item.Spec.Selector,
                CreationTime = item.Metadata.CreationTimestamp
            };
            // 处理端口
            if (item.Spec.Type == nameof(ServiceType.LoadBalancer) || item.Spec.Type == nameof(ServiceType.NodePort))
            {
                service.Ports = new List<string>();
                foreach (var port in item.Spec.Ports)
                {
                    service.Ports.Add($"{port.Port}:{port.NodePort}/{port.Protocol}");
                }
            }
            else if (item.Spec.Type == nameof(ServiceType.ClusterIP))
            {
                service.Ports = new List<string>();
                foreach (var port in item.Spec.Ports)
                {
                    service.Ports.Add($"{port.Port}/{port.Protocol}");
                }
            }

            var endpoint = await client.ReadNamespacedEndpointsAsync(item.Metadata.Name, namespaceName);
            if (endpoint != null && endpoint.Subsets.Count != 0)
            {
                List<string> address = new List<string>();
                foreach (var sub in endpoint.Subsets)
                {
                    if (sub.Addresses == null) continue;
                    foreach (var addr in sub.Addresses)
                    {
                        foreach (var port in sub.Ports)
                        {
                            address.Add($"{addr.Ip}:{port.Port}/{port.Protocol}");
                        }
                    }

                }
                service.Endpoints = address.ToArray();
            }
            svcInfos.Add(service);
        }

        return svcList;
    }
规则解析比较复杂,这里就不详细讲解,读者如有疑问,可联系笔者讨论。
调用方法:
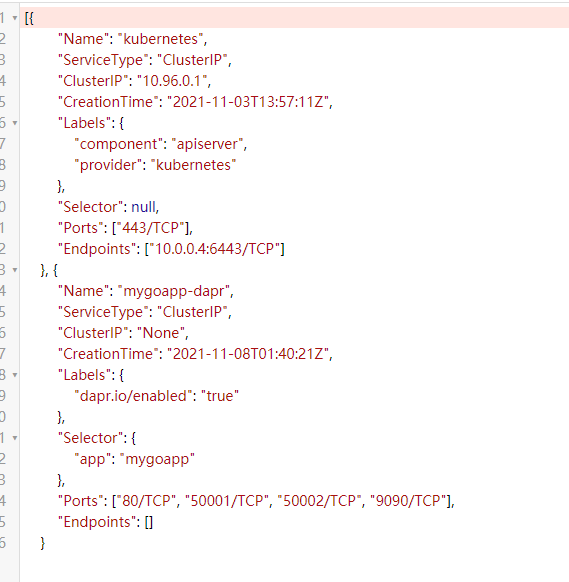
static async Task Main()
{
var result = await GetServicesAsync("default", 2);
Console.WriteLine(System.Text.Json.JsonSerializer.Serialize(result.Items));
if (result.RemainingItemCount != 0)
{
while (result.RemainingItemCount != 0)
{
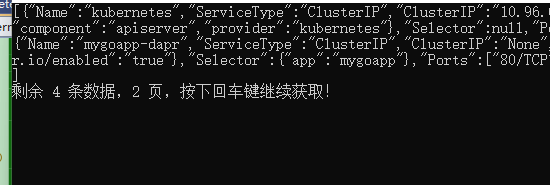
Console.WriteLine($"剩余 {result.RemainingItemCount} 条数据,{result.RemainingItemCount / 3 + (result.RemainingItemCount % 3 == 0 ? 0 : 1)} 页,按下回车键继续获取!");
Console.ReadKey();
result = await GetServicesAsync("default", 2, result.ContinueProperty);
Console.WriteLine(System.Text.Json.JsonSerializer.Serialize(result.Items));
}
}
}
上面的实践中,代码较多,建议读者启动后进行调试,一步步调试下来,慢慢检查数据,对比 Kubernetes 中的各种对象,逐渐加深理解。

文章评论