Database Sharding
Generally speaking, database sharding has the following methods:
-
Hash-based sharding: Calculating the hash value based on the identifier of a data item and allocating it to a specific database engine.
-
Range-based sharding: Allocating a data item to a specific database engine based on its identifier (usually a value).
-
List-based sharding: Allocating to a specific database engine based on certain field identifiers if they meet specific conditions.
There are many ways to implement database sharding, such as writing a code library to support multiple databases in the program, where the program needs to know the address of each database and write code to support it; or using middleware to connect multiple database engines, where the program only needs to know the middleware address.
However, after sharding, since any two tables may be in different database instances, performing join queries between two tables becomes complex, especially when the data volume in the cluster is large, making arbitrary joins infeasible. Other methods may be needed to support aggregate queries.
Database sharding has its advantages and disadvantages, which will not be elaborated here; it's better to learn first and plan later.
MariaDB Server is open-source and one of the most popular relational databases. MariaDB was developed as a fork of MySQL and has maintained compatibility with MySQL. Due to Oracle's acquisition, MySQL belongs to Oracle and is at risk of becoming closed-source and gradually commercialized, which may make it less open-source. Hence, the creator of MySQL founded MariaDB with the aim of being fully compatible with MySQL while being open-source and free.
MariaDB uses the Spider plugin for sharding support. The Spider storage engine is an embedded storage engine with built-in sharding capabilities. It supports partitioning and XA transactions and allows the handling of tables from different MariaDB instances as if they were on the same instance.
Reference: https://mariadb.com/kb/en/spider/
In this article, the author will practice database sharding using MariaDB Spider.

Deploying MariaDB Instances
To better create a sharding practice environment, three "physical" databases and one logical database are needed, totaling four MariaDB instances. The actual memory occupied by MariaDB is not large; the author runs four MariaDB databases on a 4GB RAM server with Kubernetes and Docker, and it runs at normal speeds, proving sufficient for our test exercises.
The relationship between the four databases is shown in the figure:
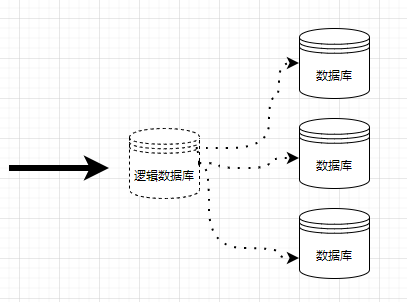
Among them, the logical database instance is referred to as the Spider Proxy Node, while the actual data-storing database instances are referred to as Backend Nodes.
A typical Spider deployment has a non-shared cluster architecture. This system is suitable for any inexpensive hardware and has minimal specific requirements for hardware or software. It consists of a set of computers with one or more MariaDB processes, referred to as nodes.
The nodes that store data are designed as Backend Nodes and can be any MariaDB, MySQL, or Oracle server instance, using any available storage engine.
Docker Deployment
If the machine is insufficient, using virtual machines can become cumbersome, so the author opts for rapid deployment using Docker.
Reference: https://mariadb.com/kb/en/installing-and-using-mariadb-via-docker/
View the list of MariaDB image versions: https://hub.docker.com/_/mariadb/
Directly create four database instances, one of which is a Spider instance, with instances differentiated by ports.
docker run --name mariadbtest1 -e MYSQL_ROOT_PASSWORD=123456 -p 13306:3306 -d docker.io/library/mariadb:10.7

docker run --name mariadbtest2 -e MYSQL_ROOT_PASSWORD=123456 -p 13307:3306 -d docker.io/library/mariadb:10.7

docker run --name mariadbtest3 -e MYSQL_ROOT_PASSWORD=123456 -p 13308:3306 -d docker.io/library/mariadb:10.7

docker run --name mariadbspider -e MYSQL_ROOT_PASSWORD=123456 -p 13309:3306 -d docker.io/library/mariadb:10.7
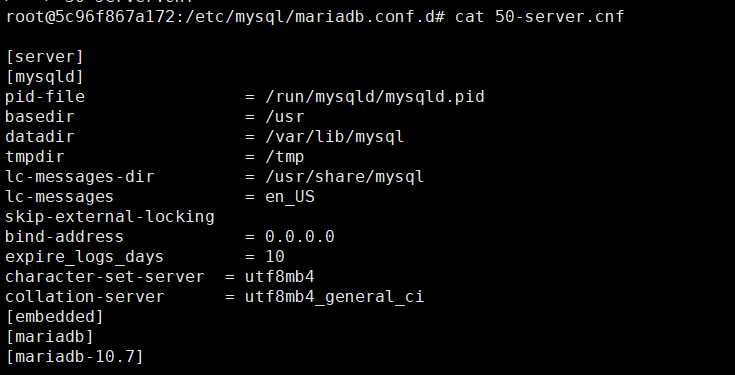
Next, enter each container instance, navigate to the /etc/mysql/mariadb.conf.d directory, and modify the 50-server.cnf file to allow remote access to the database instances. Since there are no nano, vi, or such editing commands in the container, the following command can be used to quickly replace the file contents:
echo '
[server]
[mysqld]
pid-file                = /run/mysqld/mysqld.pid
basedir                 = /usr
datadir                 = /var/lib/mysql
tmpdir                  = /tmp
lc-messages-dir         = /usr/share/mysql
lc-messages             = en_US
skip-external-locking
bind-address            = 0.0.0.0
expire_logs_days        = 10
character-set-server  = utf8mb4
collation-server      = utf8mb4_general_ci
[embedded]
[mariadb]
[mariadb-10.7]
' > 50-server.cnf
Then check the host IP of each container:
docker inspect --format='{{.NetworkSettings.IPAddress}}' mariadbtest1 mariadbtest2 mariadbtest3 mariadbspider
172.17.0.2
172.17.0.3
172.17.0.4
172.17.0.5
Next, open the container named mariadbspider and install the Spider plugin:
apt update
apt install mariadb-plugin-spider
Virtual Machine Deployment
This requires four virtual machines, each needing to install the MariaDB database engine and some tools first.
Refer to: https://mariadb.com/kb/en/spider-installation/
First, install the MariaDB Community Server, i.e., the database engine on each virtual machine.
When deploying with virtual machines, if using domestic mirrors, it is advisable to change to faster mirror sources. For CentOS servers, the following command quickly updates the mirror source, while Debian-based systems can find corresponding mirror sources themselves.
wget -O /etc/yum.repos.d/CentOS-Base.repo http://mirrors.aliyun.com/repo/Centos-7.repo
# Clear cache
yum clean all
# Generate new cache
yum makecache
Next, configure the official MariaDB software repository:
sudo yum install wget
wget https://downloads.mariadb.com/MariaDB/mariadb_repo_setup
echo "fd3f41eefff54ce144c932100f9e0f9b1d181e0edd86a6f6b8f2a0212100c32c mariadb_repo_setup" | sha256sum -c -
chmod +x mariadb_repo_setup
sudo ./mariadb_repo_setup --mariadb-server-version="mariadb-10.7"
Again update the mirror cache:
# Clear cache
yum clean all
# Generate new cache
yum makecache
Install MariaDB Community Server and package dependencies:
sudo yum install MariaDB-server MariaDB-backup
Next, configure to allow remote access to the database.
MariaDB's configuration files are located in /etc/my.cnf. After opening the /etc/my.cnf.d/ directory, modify the server.cnf file to allow remote access. Find the bind-address property and remove the #.
#bind-address=0.0.0.0
↓
bind-address=0.0.0.0
To understand the function of each configuration, please refer to: https://mariadb.com/docs/deploy/community-spider/#configuration
Change the password. Since the database deployed on bare metal does not have a password by default, it needs to be configured manually.
Open the terminal and execute the following command:
mysql -u root -p
set password for root@localhost = password('123456');
Then execute quit; to exit the database operation terminal.
If prompted that root does not exist, use
mysql -u mysql -p, with an empty password, simply press Enter. If it does not work, refer to: https://www.whuanle.cn/archives/1385
Then restart the database instance:
systemctl restart mariadb
systemctl status mariadb
Next, check the firewall settings or execute
sudo iptables -Fto clear the firewall configuration.
MariaDB Configuration
The MariaDB configuration file includes some key property descriptions as follows:
| Field | Description |
| ---------------- | -------------------------------------------- |
| bind_address | The address to bind for access |
| max_connections | The maximum number of connections |
| thread_handling | Defines how the MariaDB community server manages client connection threads |
| log_error | The output file for error logs |
MariaDB basic maintenance commands:
| Description | Command |
| ------------------- | --------------------------------- |
| Start | sudo systemctl start mariadb |
| Stop | sudo systemctl stop mariadb |
| Restart | sudo systemctl restart mariadb |
| Enable on Boot | sudo systemctl enable mariadb |
| Disable on Boot | sudo systemctl disable mariadb |
| Status | sudo systemctl status mariadb |
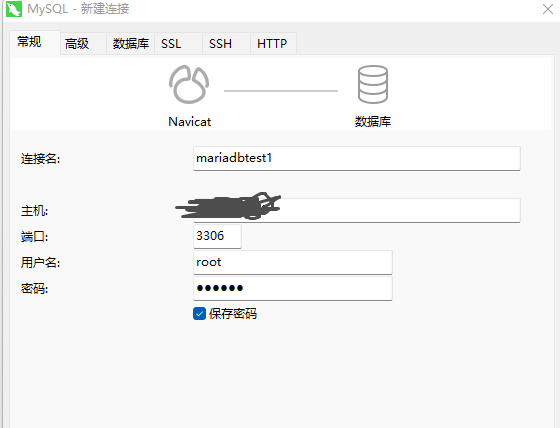
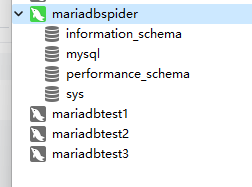
Checking Each Instance
After deploying the databases, it is necessary to connect to each database to test and check if they are operating normally.
Configuring Spider
Open the mariadbspider database instance and execute the following command to load the Spider plugin and set it as the Spider database instance.
INSTALL SONAME 'ha_spider';
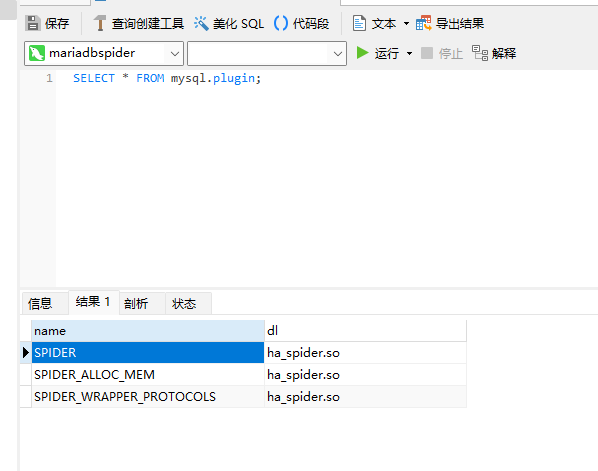
Execute the command to check if the Spider plugin has been activated:
SELECT * FROM mysql.plugin;
Remote Tables
The MariaDB Spider mode has now been set up, and we will begin the practical implementation.
In this mode, a table in Spider corresponds to a table with the same name in a database instance of the same name, meaning the database names and table names must match across the system.
First, create a test database named test1 in all three database instances, and execute the command to create the table:
CREATE TABLE s(
  id INT NOT NULL AUTO_INCREMENT,
  code VARCHAR(10),
  PRIMARY KEY(id));
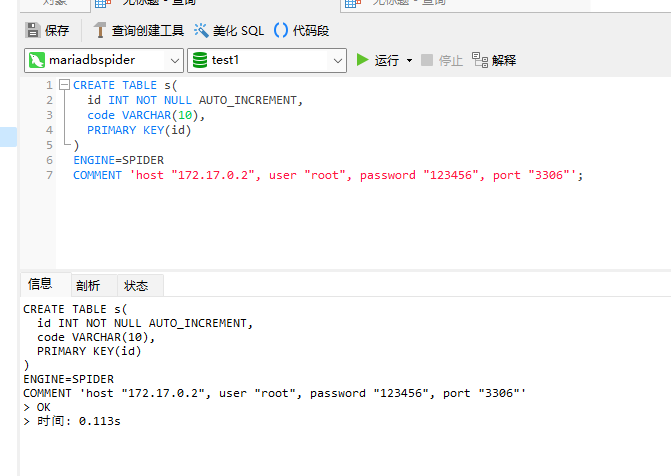
Then, in the mariadbspider instance, execute the command to create a logical table and bind this table to the mariadbtest1 instance.
CREATE TABLE s(
  id INT NOT NULL AUTO_INCREMENT,
  code VARCHAR(10),
  PRIMARY KEY(id)
)
ENGINE=SPIDER
COMMENT 'host "172.17.0.2", user "root", password "123456", port "3306"';
Note to replace your IP address and ensure the port is correct. If the container accesses the container, use 3306 directly.
If the configuration is incorrect, such as the database not matching, you may encounter:
> 1046 - No database selected
> Time: 0.062s
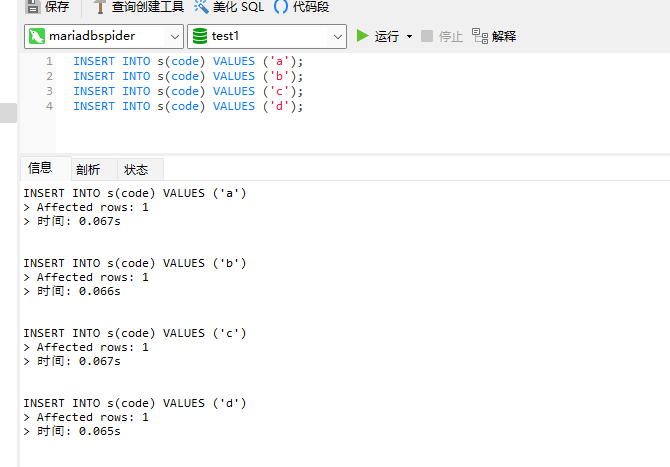
Then, in the mariadbspider, insert four rows of data:
INSERT INTO s(code) VALUES ('a');
INSERT INTO s(code) VALUES ('b');
INSERT INTO s(code) VALUES ('c');
INSERT INTO s(code) VALUES ('d');
If you open the three instances separately, you will find that the inserted data only appears in mariadbtest1 because this table is only bound to it. You can also perform CRUD operations on this table in mariadbspider, and all operations will synchronize to the corresponding database instance.
Benchmark Performance Testing
SysBench is a modular, cross-platform, and multi-threaded benchmarking tool that supports both Windows and Linux, and is used to evaluate significant operating system parameters vital for running databases under high loads. The idea of this benchmarking suite is to quickly obtain an impression of system performance without setting up complex database benchmarks or even installing a database at all. It can test:
- File I/O performance
- Scheduler performance
- Memory allocation and transfer speed
- POSIX thread implementation performance
- Database server performance (OLTP benchmark)
Project address: https://github.com/akopytov/sysbench
Linux can install the binary package directly.
-
Debian/Ubuntu
curl -s https://packagecloud.io/install/repositories/akopytov/sysbench/script.deb.sh | sudo bash sudo apt -y install sysbench -
RHEL/CentOS:
curl -s https://packagecloud.io/install/repositories/akopytov/sysbench/script.rpm.sh | sudo bash sudo yum -y install sysbench -
Fedora:
curl -s https://packagecloud.io/install/repositories/akopytov/sysbench/script.rpm.sh | sudo bash sudo dnf -y install sysbench -
Arch Linux:
sudo pacman -Suy sysbench
sysbench command format:
sysbench <TYPE> --threads=2 --report-interval=3 --histogram --time=50 --db-driver=mysql --mysql-host=<HOST> --mysql-db=<SCHEMA> --mysql-user=<USER> --mysql-password=<PASSWORD> run
First, create simulated data in the current specific database:
sysbench oltp_read_write --db-driver=mysql --mysql-user=root --mysql-password=123456 --mysql-host=123.123.123.123 --mysql-port=13309 --mysql-db=test1 prepare
sysbench 1.0.18 (using system LuaJIT 2.1.0-beta3)

Creating table 'sbtest1'...
Inserting 10000 records into 'sbtest1'
Creating a secondary index on 'sbtest1'...
Next, run the test:
sysbench oltp_read_write --db-driver=mysql --mysql-user=root --mysql-password=123456 --mysql-host=123.123.123.123 --mysql-port=13309 --mysql-db=test1 run
SQL statistics:
    queries performed:
        read:                            112
        write:                           32
        other:                           16
        total:                           160
    transactions:                        8      (0.80 per sec.)
    queries:                             160    (15.96 per sec.)
    ignored errors:                      0      (0.00 per sec.)
    reconnects:                          0      (0.00 per sec.)

General statistics:
    total time:                          10.0273s
    total number of events:              8

Latency (ms):
         min:                                 1244.02
         avg:                                 1253.36
         max:                                 1267.87
         95th percentile:                     1258.08
         sum:                                10026.85

Threads fairness:
    events (avg/stddev):           8.0000/0.00
    execution time (avg/stddev):   10.0269/0.00
Or generate a histogram every 3 seconds:
sysbench oltp_read_write --threads=2 --report-interval=3 --histogram --time=50 --table-size=1000000 --db-driver=mysql --mysql-user=root --mysql-password=123456 --mysql-host=123.123.123.123 --mysql-port=13309 --mysql-db=test1 run
Clean up the simulated data generated:
sysbench oltp_read_write --db-driver=mysql --mysql-user=root --mysql-password=123456 --mysql-host=123.123.123.123 --mysql-port=13309 --mysql-db=test1 cleanup
Optional parameters when running tests with sysbench:
- Use
–time=<SECONDS>to run for a fixed time - Use
–events=0to set no limit on executed queries - Use
–db-ps-mode=disableto disable prepared statements - Use
–report-interval=<SECONDS>to get data points for plotting - Use
--histogramto get a histogram output
Sysbench has three processes or execution modes:
-
prepare: Prepares operations needed for tests, such as creating necessary files on disk forfileiotests or filling test databases for database benchmarking. -
run: Runs the actual test specified by the testname parameter. This command is provided by all tests. -
cleanup: Deletes temporary data after tests run that create a test.
You can also reference another article by the author that uses different methods for benchmarking: https://www.whuanle.cn/archives/1388
Adding Backend Databases
In the remote tables section, we bind a database instance when creating the table. However, we can also pre-configure multiple database instances in Spider, as shown in the following configuration commands executed in Spider:
CREATE SERVER mariadbtest1
  FOREIGN DATA WRAPPER mysql
OPTIONS(
  HOST '172.17.0.2',
  DATABASE 'test1',
  USER 'root',
  PASSWORD '123456',
  PORT 3306
);

CREATE SERVER mariadbtest2
  FOREIGN DATA WRAPPER mysql
OPTIONS(
  HOST '172.17.0.3',
  DATABASE 'test1',
  USER 'root',
  PASSWORD '123456',
  PORT 3306
);

CREATE SERVER mariadbtest3
  FOREIGN DATA WRAPPER mysql
OPTIONS(
  HOST '172.17.0.4',
  DATABASE 'test1',
  USER 'root',
  PASSWORD '123456',
  PORT 3306
);
Hash Sharding
In this section, we will shard a table, automatically distributing the data across three database instances during data insertion.
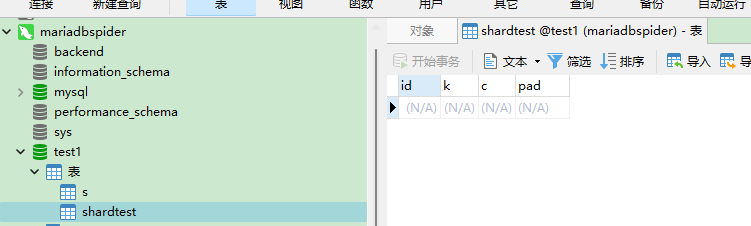
In the three data node databases, under the test1 database, execute the command to create the table:
CREATE TABLE shardtest
(
  id int(10) unsigned NOT NULL AUTO_INCREMENT,
  k int(10) unsigned NOT NULL DEFAULT '0',
  c char(120) NOT NULL DEFAULT '',
  pad char(60) NOT NULL DEFAULT '',
  PRIMARY KEY (id),
  KEY k (k)
)
At this point, all three database instances have the same table.
Then, execute the command in the mariadbspider instance to create a logical table and connect this table to the three database instances using the sharding mode.
CREATE TABLE test1.shardtest
(
  id int(10) unsigned NOT NULL AUTO_INCREMENT,
  k int(10) unsigned NOT NULL DEFAULT '0',
  c char(120) NOT NULL DEFAULT '',
  pad char(60) NOT NULL DEFAULT '',
  PRIMARY KEY (id),
  KEY k (k)
) ENGINE=spider COMMENT='wrapper "mysql", table "shardtest"'
 PARTITION BY KEY (id)
(
 PARTITION pt1 COMMENT = 'srv "mariadbtest1"',
 PARTITION pt2 COMMENT = 'srv "mariadbtest2"',
 PARTITION pt3 COMMENT = 'srv "mariadbtest3"'
) ;
Then open https://github.com/whuanle/write_share_database, find the file 分片测试数据.sql, which contains a lot of simulated data.
You can observe that the data in the three database instances is different.
Range-Based Sharding
The choice of sharding method is determined by the PARTITION BY property. For example, hash sharding is calculated based on a key, with the configuration command being PARTITION BY KEY (id). If sharding by value range, it would be PARTITION BY range columns (<field_name>).
) ENGINE=spider COMMENT='wrapper "mysql", table "shardtest"'
 PARTITION BY range columns (k)
(
 PARTITION pt1 values less than (5000) COMMENT = 'srv "mariadbtest1"',
 PARTITION pt2 values less than (5100) COMMENT = 'srv "mariadbtest2"',
 PARTITION pt3 values less than (5200) COMMENT = 'srv "mariadbtest3"'
) ;
List-Based Sharding
List-based sharding typically divides data based on a certain field, categorizing it into different types, allowing data to be grouped based on the content of this field.
) ENGINE=spider COMMENT='wrapper "mysql", table "shardtest"'
 PARTITION BY list columns (k)
(
 PARTITION pt1 values in ('4900', '4901', '4902') COMMENT = 'srv "mariadbtest1"',
 PARTITION pt2 values in ('5000', '5100') COMMENT = 'srv "mariadbtest2"',
 PARTITION pt3 values in ('5200', '5300') COMMENT = 'srv "mariadbtest3"'
) ;
When the value of the k field in the data is 4900, 4901, or 4902, it will be sharded to the mariadbtest1 instance.

文章评论