本教程已加入 Istio 系列:https://istio.whuanle.cn
3, Quick Start
In this chapter, we officially take the first step into learning Istio. Since the knowledge system of Istio is quite extensive, we will first quickly understand how to deploy a set of microservices using Istio through the introductory tutorial in this chapter, as well as how to use the core features of Istio, and learn what problems Istio can solve for microservices.
In this chapter, we will learn how to deploy a set of microservices, how to use Istio to expose services to the outside of the cluster, and how to use observability components to monitor traffic and system metrics.
In the upcoming chapters, the author will explain each Istio component individually, but in this chapter, we only need to have a general understanding of how to use them.
Bookstore Microservices
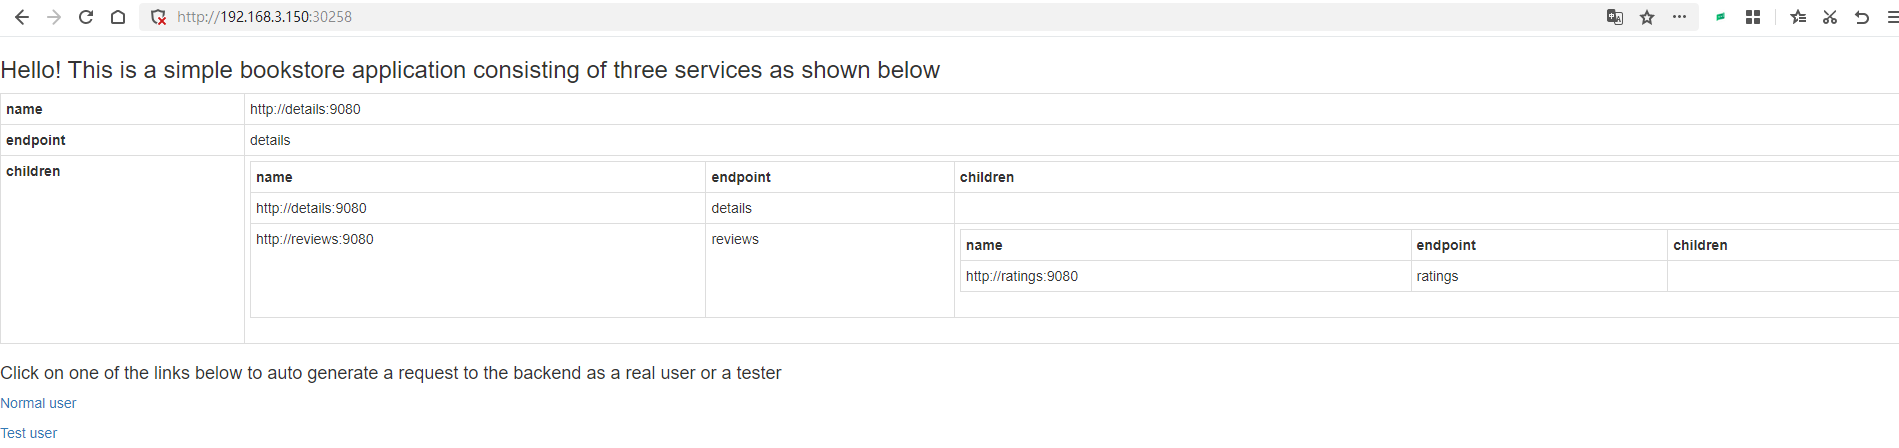
The tutorial example in this chapter uses a set of microservices from Istio's official documentation. This set of microservices is an online bookstore. When the page is opened, it displays categories, book information, and book reviews, with the content of the page provided by different sub-services.
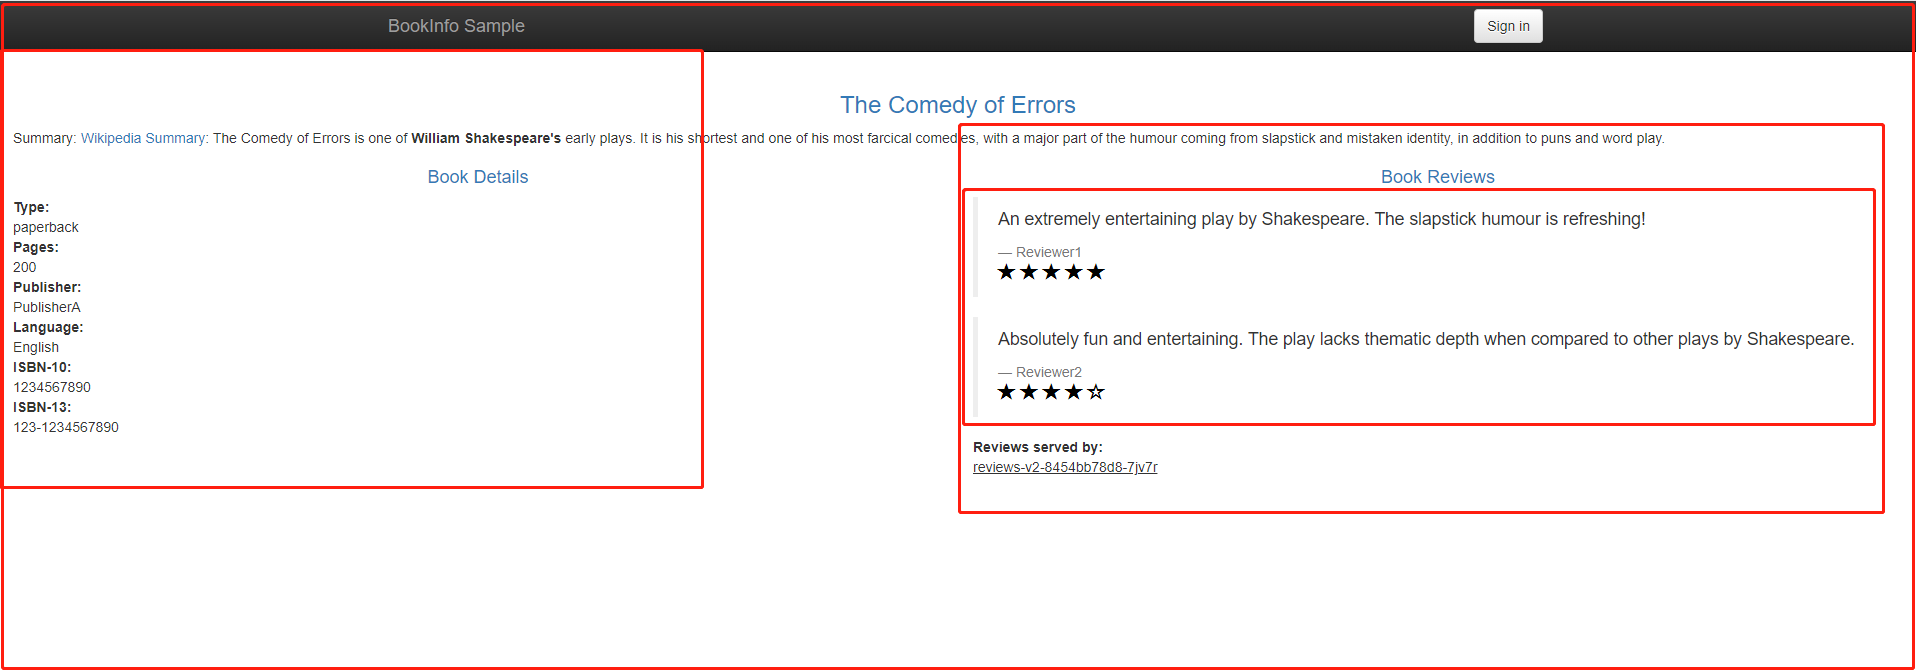
The bookstore microservice is divided into four separate microservices, which are already outlined in red boxes in the image above. These four microservices are:
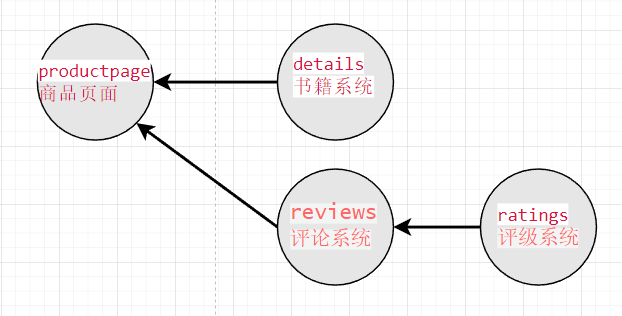
productpage: Aggregates data from all services to generate the browsing page.details: Stores information about the books, such as descriptions, authors, publishers, etc.reviews: Stores comments related to the books, but does not include star ratings.ratings: Stores the star ratings from comments.
In this microservice architecture, the Productpage service provides web access to users, while the other three services can only be accessed internally within the cluster. The four services are developed in different programming languages, where the Productpage aggregates information from the other three services to generate a page.
In microservice design, we should not expose each sub-service's port to the outside of the cluster; instead, we should consolidate data from some applications for external display. We can use an API gateway to proxy part of the interfaces of the sub-services and implement authentication based on client or third-party calls within the API gateway.
The productpage, details, and ratings services all have only one version (v1), while the reviews service has three versions.
The ratings service is responsible for providing user rating data, such as one star or two stars. The three versions of the reviews handle the ratings data as follows:
- reviews v1: Hides the star rating and does not display scores;
- reviews v2: Displays the star rating using gray stars, ★★★★☆;
- reviews v3: Displays the star rating using red stars, ★★★★☆.
The service dependency graph is shown below:
Next, we will use Kubernetes Deployment to deploy these services, which is no different from conventional Kubernetes deployments.
Preparations
Create a namespace for these example services.
kubectl create namespace bookinfo
Add Istio labels to the namespace, indicating that Istio should automatically inject the Envoy Sidecar Proxy container when deploying applications in this namespace (this only takes effect for Pods):
kubectl label namespace bookinfo istio-injection=enabled
There are various ways to enable Istio to inject Sidecars, one of which is to set a label on the namespace. Pods deployed in this namespace will have the Sidecar automatically injected.
You can find these examples in the Git repository of this tutorial series, located at: https://github.com/whuanle/istio_book/tree/main/3.
Once the repository is cloned, navigate to the 3 directory and execute the following commands to perform the deployment:
kubectl -n bookinfo apply -f details_deploy.yaml
kubectl -n bookinfo apply -f details_svc.yaml
kubectl -n bookinfo apply -f details_sa.yaml
kubectl -n bookinfo apply -f ratings_deploy.yaml
kubectl -n bookinfo apply -f ratings_svc.yaml
kubectl -n bookinfo apply -f ratings_sa.yaml
kubectl -n bookinfo apply -f reviews_v1_deploy.yaml
kubectl -n bookinfo apply -f reviews_v2_deploy.yaml
kubectl -n bookinfo apply -f reviews_v3_deploy.yaml
kubectl -n bookinfo apply -f reviews_svc.yaml
kubectl -n bookinfo apply -f reviews_sa.yaml
kubectl -n bookinfo apply -f productpage_deploy.yaml
kubectl -n bookinfo apply -f productpage_svc.yaml
kubectl -n bookinfo apply -f productpage_sa.yaml
Alternatively, you can deploy applications manually by referring to the following four sections, to understand how each application is defined.
Details Application
Stores information about books.
Deployment command:
kubectl -n bookinfo apply -f details_deploy.yaml
kubectl -n bookinfo apply -f details_svc.yaml
kubectl -n bookinfo apply -f details_sa.yaml
Using Deployment to deploy the details application.
details_deploy.yaml
apiVersion: apps/v1
kind: Deployment
metadata:
  name: details-v1
  labels:
    app: details
    version: v1
spec:
  replicas: 1
  selector:
    matchLabels:
      app: details
      version: v1
  template:
    metadata:
      labels:
        app: details
        version: v1
    spec:
      serviceAccountName: bookinfo-details
      containers:
      - name: details
        image: docker.io/istio/examples-bookinfo-details-v1:1.17.0
        imagePullPolicy: IfNotPresent
        ports:
        - containerPort: 9080
        securityContext:
          runAsUser: 1000
Deploy details.
kubectl -n bookinfo apply -f details_deploy.yaml
Configure a Kubernetes Service for the details service.
details_svc.yaml
apiVersion: v1
kind: Service
metadata:
  name: details
  labels:
    app: details
    service: details
spec:
  ports:
  - port: 9080
    name: http
  selector:
    app: details
kubectl -n bookinfo apply -f details_svc.yaml
Next, create a ServiceAccount for the details service.
Istio provides mutual TLS-based authentication for communication between services. This is achieved by creating a certificate for each ServiceAccount, allowing the ServiceAccount to verify the identity of the other. Different applications can share the same ServiceAccount, but using separate ServiceAccounts for each Deployment allows for better organization and management of security configurations.
details_sa.yaml
apiVersion: v1
kind: ServiceAccount
metadata:
  name: bookinfo-details
  labels:
    account: details
kubectl -n bookinfo apply -f details_sa.yaml
Ratings Application
Provides star rating data for each review.
Deployment command:
kubectl -n bookinfo apply -f ratings_deploy.yaml
kubectl -n bookinfo apply -f ratings_svc.yaml
kubectl -n bookinfo apply -f ratings_sa.yaml
ratings_deploy.yaml
apiVersion: apps/v1
kind: Deployment
metadata:
  name: ratings-v1
  labels:
    app: ratings
    version: v1
spec:
  replicas: 1
  selector:
    matchLabels:
      app: ratings
      version: v1
  template:
    metadata:
      labels:
        app: ratings
        version: v1
    spec:
      serviceAccountName: bookinfo-ratings
      containers:
      - name: ratings
        image: docker.io/istio/examples-bookinfo-ratings-v1:1.17.0
        imagePullPolicy: IfNotPresent
        ports:
        - containerPort: 9080
        securityContext:
          runAsUser: 1000
ratings_svc.yaml
apiVersion: v1
kind: Service
metadata:
  name: ratings
  labels:
    app: ratings
    service: ratings
spec:
  ports:
  - port: 9080
    name: http
  selector:
    app: ratings
ratings_sa.yaml
apiVersion: v1
kind: ServiceAccount
metadata:
  name: bookinfo-ratings
  labels:
    account: ratings
Reviews v1/v2/v3 Applications
Provides review information for the books.
Deployment command:
kubectl -n bookinfo apply -f reviews_v1_deploy.yaml
kubectl -n bookinfo apply -f reviews_v2_deploy.yaml
kubectl -n bookinfo apply -f reviews_v3_deploy.yaml
kubectl -n bookinfo apply -f reviews_svc.yaml
kubectl -n bookinfo apply -f reviews_sa.yaml
Create three Deployments for the three versions of reviews.
reviews_v1_deploy.yaml
apiVersion: apps/v1
kind: Deployment
metadata:
  name: reviews-v1
  labels:
    app: reviews
    version: v1
spec:
  replicas: 1
  selector:
    matchLabels:
      app: reviews
      version: v1
  template:
    metadata:
      labels:
        app: reviews
        version: v1
    spec:
      serviceAccountName: bookinfo-reviews
      containers:
      - name: reviews
        image: docker.io/istio/examples-bookinfo-reviews-v1:1.17.0
        imagePullPolicy: IfNotPresent
        env:
        - name: LOG_DIR
          value: "/tmp/logs"
        ports:
        - containerPort: 9080
        volumeMounts:
        - name: tmp
          mountPath: /tmp
        - name: wlp-output
          mountPath: /opt/ibm/wlp/output
        securityContext:
          runAsUser: 1000
      volumes:
      - name: wlp-output
        emptyDir: {}
      - name: tmp
        emptyDir: {}
reviews_v2_deploy.yaml
apiVersion: apps/v1
kind: Deployment
metadata:
  name: reviews-v2
  labels:
    app: reviews
    version: v2
spec:
  replicas: 1
  selector:
    matchLabels:
      app: reviews
      version: v2
  template:
    metadata:
      labels:
        app: reviews
        version: v2
    spec:
      serviceAccountName: bookinfo-reviews
      containers:
      - name: reviews
        image: docker.io/istio/examples-bookinfo-reviews-v2:1.17.0
        imagePullPolicy: IfNotPresent
        env:
        - name: LOG_DIR
          value: "/tmp/logs"
        ports:
        - containerPort: 9080
        volumeMounts:
        - name: tmp
          mountPath: /tmp
        - name: wlp-output
          mountPath: /opt/ibm/wlp/output
        securityContext:
          runAsUser: 1000
      volumes:
      - name: wlp-output
        emptyDir: {}
      - name: tmp
        emptyDir: {}
reviews_v3_deploy.yaml
apiVersion: apps/v1
kind: Deployment
metadata:
  name: reviews-v3
  labels:
    app: reviews
    version: v3
spec:
  replicas: 1
  selector:
    matchLabels:
      app: reviews
      version: v3
  template:
    metadata:
      labels:
        app: reviews
        version: v3
    spec:
      serviceAccountName: bookinfo-reviews
      containers:
      - name: reviews
        image: docker.io/istio/examples-bookinfo-reviews-v3:1.17.0
        imagePullPolicy: IfNotPresent
        env:
        - name: LOG_DIR
          value: "/tmp/logs"
        ports:
        - containerPort: 9080
        volumeMounts:
        - name: tmp
          mountPath: /tmp
        - name: wlp-output
          mountPath: /opt/ibm/wlp/output
        securityContext:
          runAsUser: 1000
      volumes:
      - name: wlp-output
        emptyDir: {}
      - name: tmp
        emptyDir: {}
Create a Service for the three Deployments. The three different versions of the same application share the same Service.
reviews_svc.yaml
apiVersion: v1
kind: Service
metadata:
  name: reviews
  labels:
    app: reviews
    service: reviews
spec:
  ports:
  - port: 9080
    name: http
  selector:
    app: reviews
reviews_sa.yaml
apiVersion: v1
kind: ServiceAccount
metadata:
  name: bookinfo-reviews
  labels:
    account: reviews
Productpage Application
This is the aggregating service for the page, providing users with browsing information about books.
。
Deployment Commands:
kubectl -n bookinfo apply -f productpage_deploy.yaml
kubectl -n bookinfo apply -f productpage_svc.yaml
kubectl -n bookinfo apply -f productpage_sa.yaml
productpage_deploy.yaml
apiVersion: apps/v1
kind: Deployment
metadata:
  name: productpage-v1
  labels:
    app: productpage
    version: v1
spec:
  replicas: 1
  selector:
    matchLabels:
      app: productpage
      version: v1
  template:
    metadata:
      labels:
        app: productpage
        version: v1
    spec:
      serviceAccountName: bookinfo-productpage
      containers:
      - name: productpage
        image: docker.io/istio/examples-bookinfo-productpage-v1:1.17.0
        imagePullPolicy: IfNotPresent
        ports:
        - containerPort: 9080
        volumeMounts:
        - name: tmp
          mountPath: /tmp
        securityContext:
          runAsUser: 1000
      volumes:
      - name: tmp
        emptyDir: {}
productpage_svc.yaml
apiVersion: v1
kind: Service
metadata:
  name: productpage
  labels:
    app: productpage
    service: productpage
spec:
  ports:
  - port: 9080
    name: http
  selector:
    app: productpage
productpage_sa.yaml
apiVersion: v1
kind: ServiceAccount
metadata:
  name: bookinfo-productpage
  labels:
    account: productpage
Check
After executing the commands, check the Pods in the bookinfo namespace.
kubectl get pods -n bookinfo
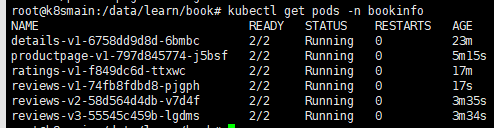
You can see that the READY status of each Pod is 2/2, indicating that there are two containers in this Pod, and both are currently ready.
If we check the composition of one of the Pods, we will find that it contains an istio-proxy container.
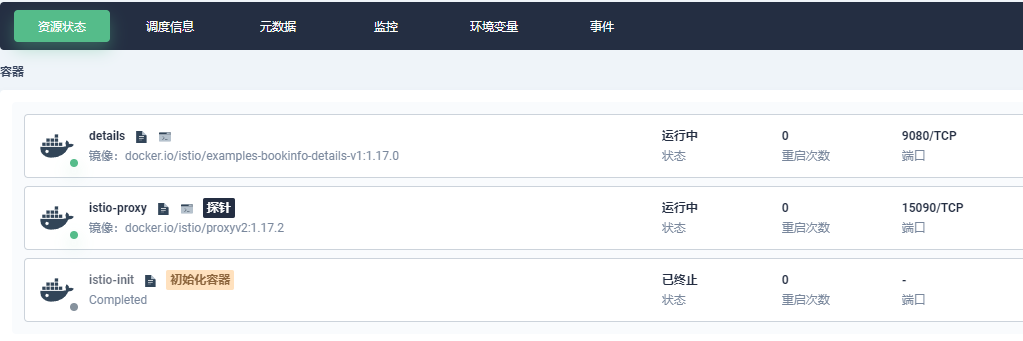
If the Kubernetes Dashboard is not installed, you can use
kubectl -n bookinfo describe pod {Pod ID}to check the composition.
Next, use kubectl -n bookinfo get svc to view the Services, and all four microservices have been registered.

Then we access the CLUSTER-IP corresponding to productpage:
curl 10.233.37.130:9080
By default, Istio does not enable mutual TLS (mTLS) mode, so the application can be accessed from within the cluster. If mTLS is enabled, the application can only be accessed from within the Pods.
The response returns a bunch of HTML, indicating that our deployment is normal.
Temporary Access
Next, to see the page effect, we temporarily create a Service to expose the productpage before using Istio-ingressgateway.
productpage_tmpsvc.yaml
apiVersion: v1
kind: Service
metadata:
  name: productpagetmp
  labels:
    app: productpage
    service: productpage
spec:
  ports:
  - port: 9080
    name: http
  selector:
    app: productpage
  type: NodePort
kubectl -n bookinfo apply -f productpage_tmpsvc.yaml
View all Services:
root@k8smain:/data/learn/book# kubectl -n bookinfo get svc
NAME             TYPE        CLUSTER-IP      EXTERNAL-IP   PORT(S)          AGE
details          ClusterIP   10.233.63.247   <none>        9080/TCP         40m
productpage      ClusterIP   10.233.37.130   <none>        9080/TCP         23m
productpagetmp   NodePort    10.233.47.14    <none>        9080:30258/TCP   77s
ratings          ClusterIP   10.233.7.6      <none>        9080/TCP         36m
reviews          ClusterIP   10.233.58.219   <none>        9080/TCP         23m
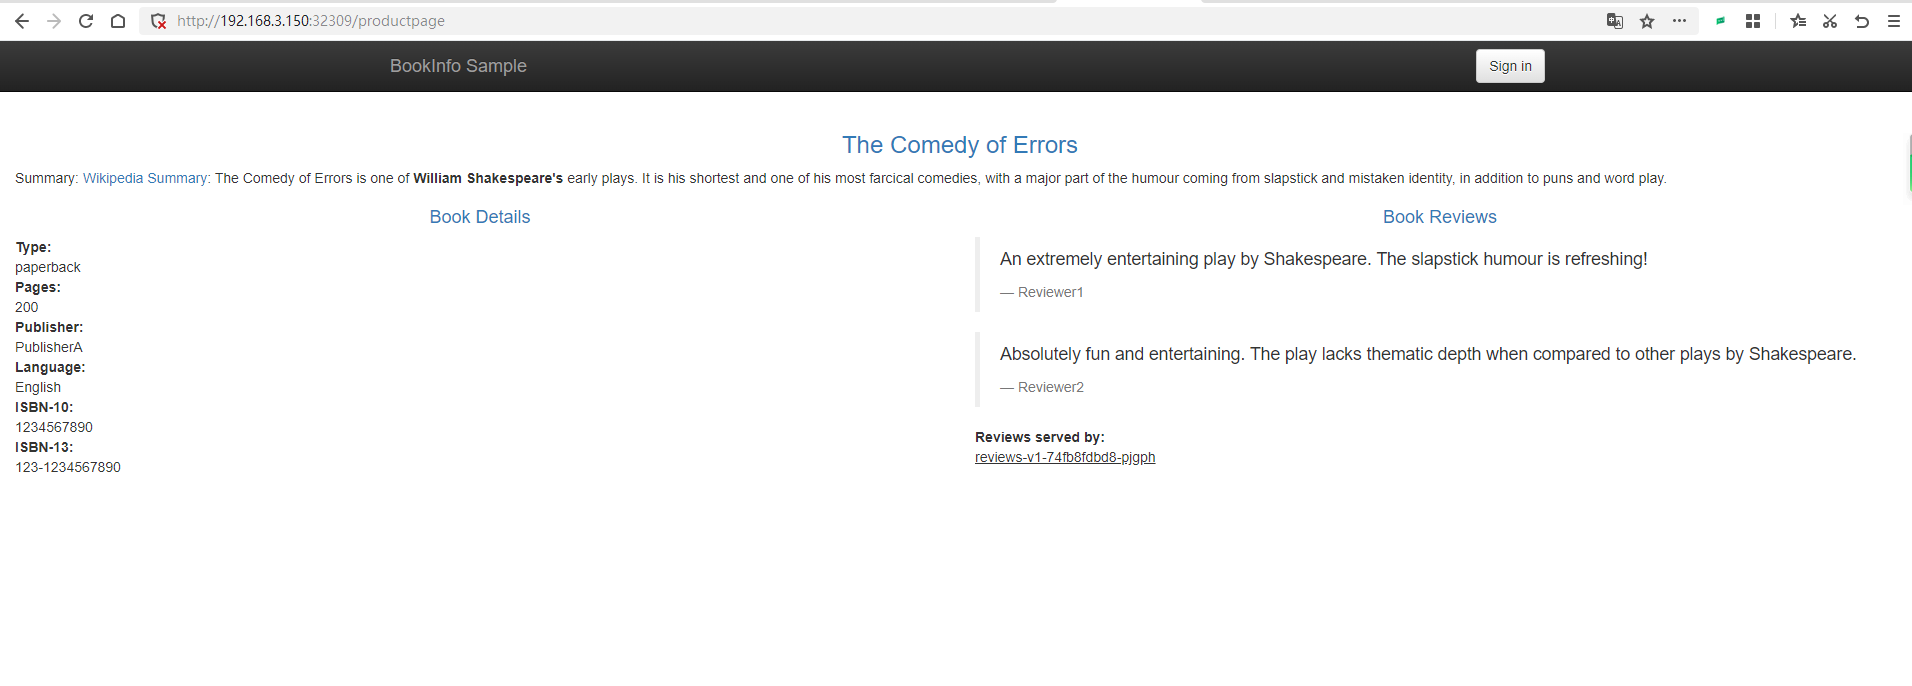
Then access port 30258 on the page (the port may vary for everyone, use your own).
Next, open http://192.168.3.150:30258/productpage?u=normal.
Since we are currently using the Service to bind the Pod, it will use polling for load balancing. You can refresh http://192.168.3.150:30258/productpage?u=normal multiple times, and you will notice changes in the rating stars on the right.
Istio uses polling as the default load balancing method.
The comment display rule on the right side of the page is No stars => Black stars => Red stars.

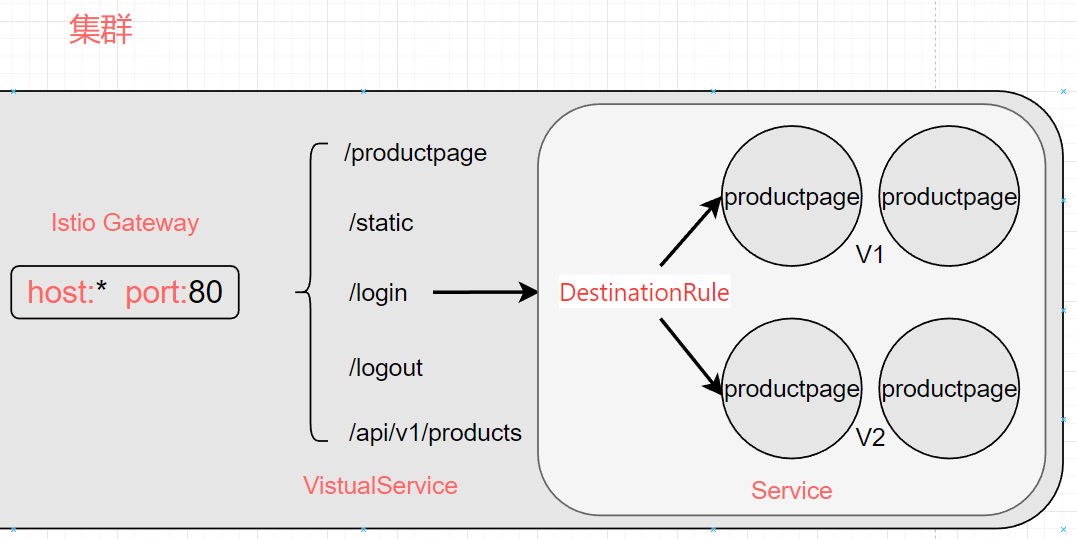
Deploy Gateway
What is Gateway
Finally, it’s time to experience Istio. In this section, we will create an Istio Gateway for the productpage to provide web access externally.
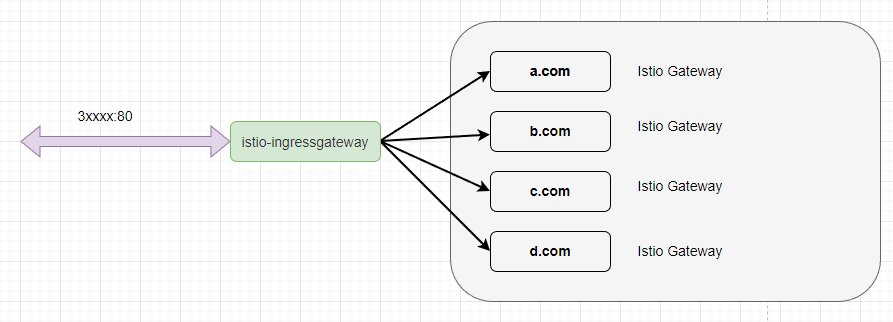
In Chapter 2, we have already deployed istio-ingressgateway, which acts similarly to nginx or apisix, providing port access externally and forwarding traffic to internal services.
However, istio-ingressgateway cannot directly forward traffic to Pods; it requires some configuration. We need to create a site for the productpage and bind the corresponding domain name so that when external traffic accesses the port on istio-ingressgateway, it knows where to forward the traffic. In Istio, the resource that defines this binding relationship is called Gateway.
The following chapters will explain this clearly, for now, just have a general understanding.
Gateway is similar to the domain name configuration needed when creating a reverse proxy in Nginx.
Deploy Gateway
Create a Gateway and bind the domain name entry.
ingress_gateway.yaml
apiVersion: networking.istio.io/v1alpha3
kind: Gateway
metadata:
  name: bookinfo-gateway
spec:
  selector:
    istio: ingressgateway
  servers:
  - port:
      number: 80
      name: http
      protocol: HTTP
    hosts:
    - "*"
The
hostsfield indicates the open access paths. You can bind domain names, IPs, etc. Here, using*means that all access can enter this gateway.
kubectl -n bookinfo apply -f ingress_gateway.yaml
This step is like the listening configuration in nginx:
server {
    listen      80;
    server_name example.org www.example.org;
    #...
}
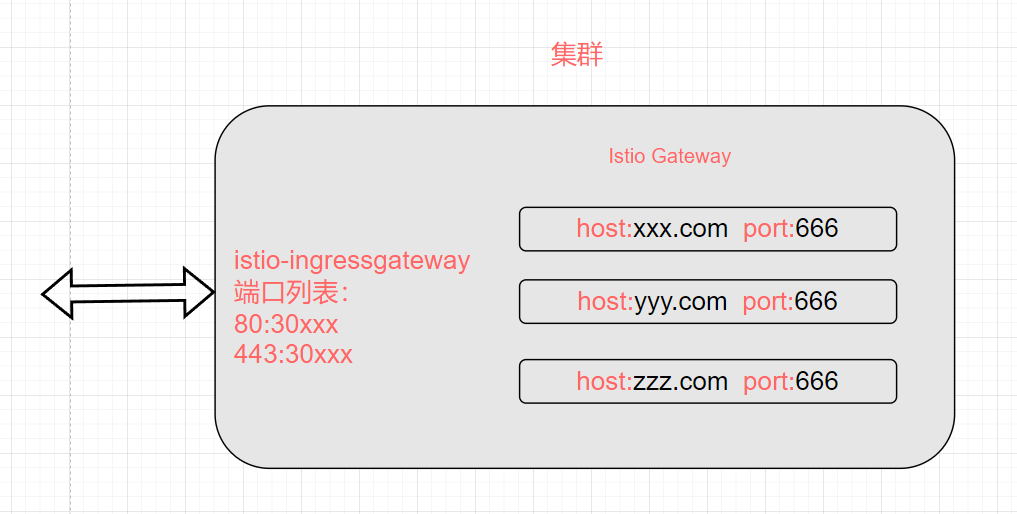
Once we create the Istio Gateway, istio-ingressgateway will monitor traffic and detect which domain names or ports belong to which Istio Gateway.
Deploy VirtualService
What is VirtualService
Although we have created an Istio Gateway, we still cannot directly access the previously deployed microservice through the gateway. We need to create an Istio VirtualService that binds the Istio Gateway to the corresponding Kubernetes Service so that the traffic can officially flow to the Pods.
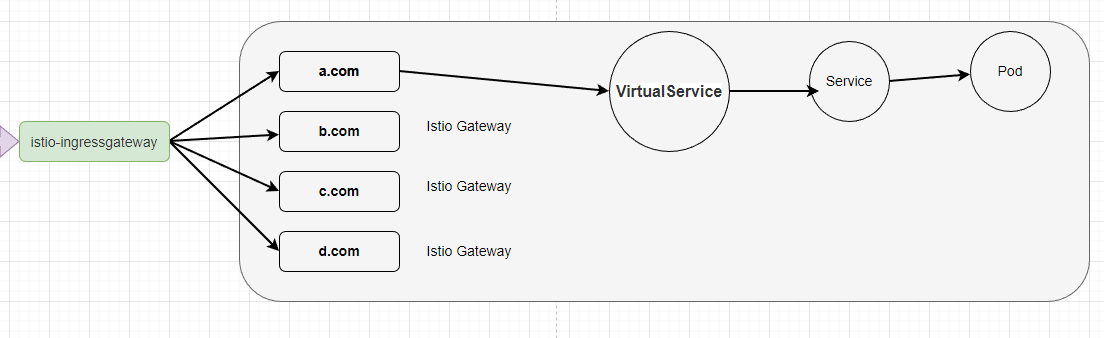
Please pay attention here, the traffic does not actually go through the Service, but VirtualService needs to discover the Pods through the Service.
This is similar to configuring a reverse proxy in nginx, after configuring the listener, you need to specify which address the requests should map to.
server {
    listen      80;
    server_name example.org www.example.org;
    #...
}

location /some/path/ {
    proxy_pass http://A:9080;
}
Why not directly bind the Gateway to the Service, but instead add a VirtualService in between? There is a saying that in computer science, problems can always be solved by adding another layer.
The main goal of VirtualService is to provide a stable entry point for services and to control traffic behavior within the mesh through a series of routing rules.
Kubernetes Services do not support routing rules for the simplest routing scenarios, whereas Istio can specify routing suffixes; Services do not support traffic analysis, and load balancing is only polling. Istio utilizes the Service to discover Pods and then directly forwards traffic to the Pods, enabling various functions.
VirtualService can be used for the following functionalities:
Request Routing: Route requests to specific services or versions, e.g., distributing requests to different versions of services for canary deployments.
Request Retries: Configure retry policies for failed requests to improve service availability.
Request Timeouts: Set request timeout durations to interrupt requests if no response is received within a certain time.
Request Mirroring: Send a copy of the requests to another service for testing new versions without affecting actual production traffic.
Traffic Splitting: Distribute traffic among different services or versions according to specific proportions for traffic control.
Deploy VirtualService
productpage_vs.yaml
apiVersion: networking.istio.io/v1alpha3
kind: VirtualService
metadata:
name: bookinfo
spec:
hosts:
- "*"
gateways:
- bookinfo-gateway
http:
- match:
- uri:
exact: /productpage
- uri:
prefix: /static
- uri:
exact: /login
- uri:
exact: /logout
- uri:
prefix: /api/v1/products
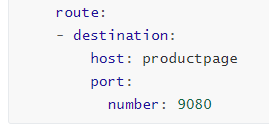
route:
- destination:
host: productpage
port:
number: 9080
kubectl -n bookinfo apply -f productpage_vs.yaml
The purpose of the various configurations in VirtualService will be explained in Chapter 4.1.
The YAML here consists of two main parts. The first part is http.match, which specifies which API addresses are exposed and which can only be accessed externally.

You can limit the URLs that can be accessed externally through http.match.
Then, through http.route, bind the Kubernetes Service, utilizing the Service’s service discovery to forward traffic to the corresponding Pods.
Here, the
hostonly needs to specify the Service name since VirtualService is in the same namespace as Service/Pod. If access is required across namespaces, the full namespace name should be specified.
What is DestinationRule
In this chapter, we will provide a preview of DestinationRule, which will be used in the next chapter; for now, we only need to be aware of its existence.
The Istio VirtualService can limit the external routable addresses, while DestinationRule can configure access policies for the Pods. An Istio DestinationRule can be bound to an Istio VirtualService, allowing us to define subsets of versions and forward traffic with richer policies.
Since only five addresses are exposed, accessing
/directly from the outside will not open the page.
Check
To ensure the gateway is functioning correctly, we need to run the Istio command to check the logs:
istioctl analyze
Next, check the created gateway for productpage.
root@k8smain:/data/learn/book# kubectl get gw -A
NAMESPACE   NAME               AGE
bookinfo    bookinfo-gateway   26m
Kubernetes itself has a Gateway, so
kubectl get gatewaycannot be used to retrieve Istio's Gateway; instead, use the shorthandgw.
Then check the VirtualService.
root@k8smain:/data/learn/book# kubectl get vs -A
NAMESPACE   NAME       GATEWAYS               HOSTS   AGE
bookinfo    bookinfo   ["bookinfo-gateway"]   ["*"]   79m
In Chapter 2, we deployed istio-ingressgateway through Helm, and its access port is as follows:

In this section, when deploying bookinfo-gateway, we used port 80, so it can be accessed directly via port 32309 of istio-ingressgateway.
Accessing
/productpageis required since we have not opened/.
Attempt to Change the Gateway Port
If you need to change the port, you can modify the istio-ingressgateway Service to add a new port mapping.
kubectl edit svc istio-ingressgateway -n istio-system
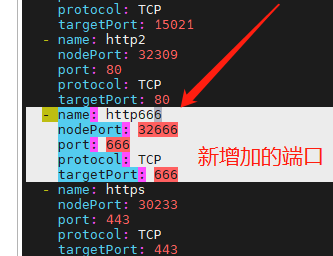
Then modify the previous ingress_gateway.yaml, changing the port from 80 to 666.
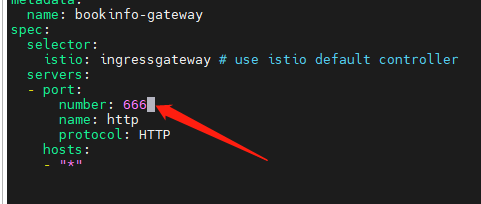
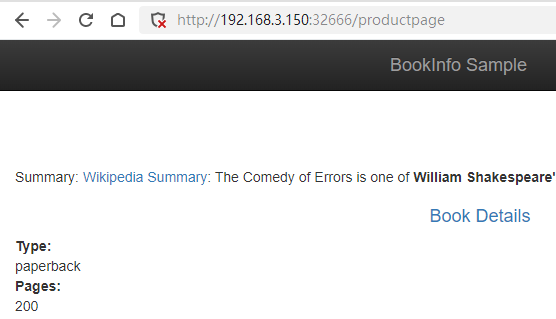
You will then be able to access this microservice through port 32666.
Example: http://192.168.3.150:30666/productpage

文章评论