Isito Introduction (Part 4): Observability
4. Traffic Management
This section primarily demonstrates how to expose service access addresses using Istio Gateway and VirtualService, as well as the observability Kiali component implemented with Istio. Let's revisit what we learned from the bookinfo example deployed in the previous chapter:
-
Create a “site” using Istio Gateway.
-
Expose Kubernetes Service using Istio VirtualService and specify the exposed route suffix.
-
Use Kiali to collect metrics between services.
Through quick practice, we have learned how to expose services in Istio and only expose certain APIs. However, simply exposing services is not very useful because various gateways in the market can achieve this and offer richer functionalities.
In microservice systems, we encounter many service governance issues. Below are some common questions about service governance obtained from ChatGPT:
- Service Discovery: How to dynamically discover and register new service instances in a dynamic microservice environment?
- Load Balancing: How to effectively distribute request traffic among service instances for high performance and availability?
- Fault Tolerance: How to handle failures between services, such as service instance failures, network failures, etc.?
- Traffic Management: How to control request traffic between services, such as request routing, traffic splitting, and canary releases?
- Service Monitoring: How to monitor the performance and health of services in real-time?
- Distributed Tracing: How to track and analyze the request call chain in distributed systems?
- Security: How to ensure secure communication between services, such as authentication, authorization, and encryption?
- Policy Enforcement: How to implement and manage governing policies, such as rate limiting, circuit breaking, access control, etc.?
- Configuration Management: How to uniformly and dynamically manage configuration information among services?
- Service Orchestration: How to coordinate interactions between services to achieve complex business processes?
As mentioned in previous chapters, Istio is a tool for service governance. Therefore, this chapter will introduce Istio's traffic management capabilities to solve some issues related to service governance in microservices.
The traffic management model of Istio originates from Envoy deployed alongside the service; all traffic (data plane traffic) sent and received by applications in the pods within the mesh goes through Envoy, and the applications themselves do not require any changes to the services. This non-intrusive approach for the business can achieve powerful traffic management.
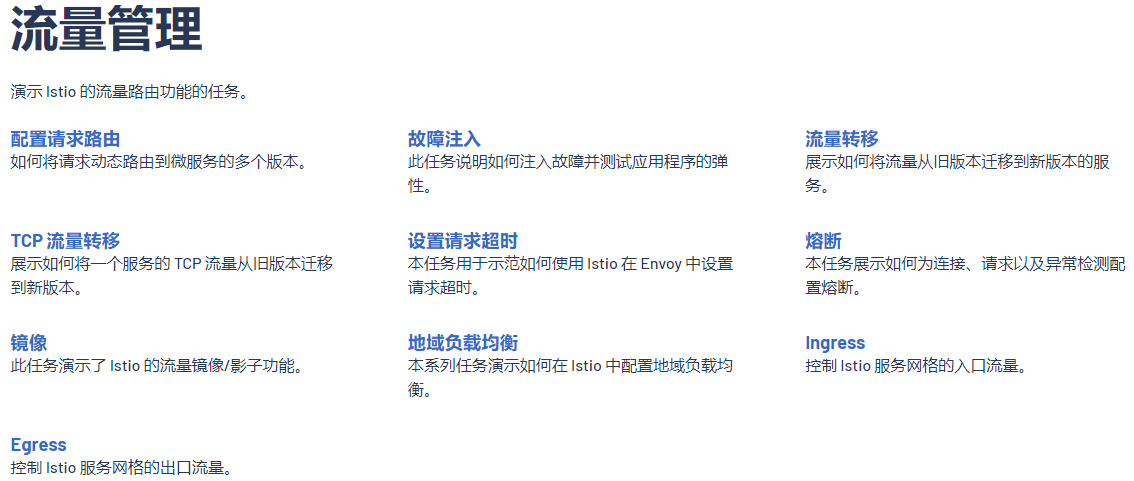
Version-Based Routing Configuration
At the URL http://192.168.3.150:30666/productpage?u=normal accessed in Chapter 3, we see different results each time we refresh.
This is because the Kubernetes Service binds the corresponding pods based on the app: reviews label, and under normal circumstances, Kubernetes forwards the client requests to the pods in the Deployment in a round-robin fashion, as does VirtualService.
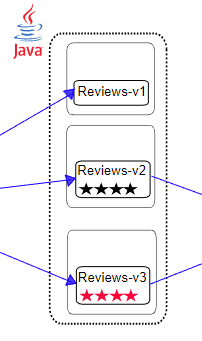
  selector:
    app: reviews
The three different Reviews Deployments all carry the same app: reviews label, so the Service puts their pods together, and VirtualService distributes traffic among each version via round-robin.
  labels:
    app: reviews
    version: v1

  labels:
    app: reviews
    version: v2

  labels:
    app: reviews
    version: v3
Thus, after traffic enters the Reviews VirtualService, it will be evenly distributed to each pod by Kubernetes. Next, we will use the version-based method to allocate traffic to different versions of the service.
Istio defines application versions through DestinationRule, and the definition of reviews v1/v2/v3 is shown as follows:
apiVersion: networking.istio.io/v1alpha3
kind: DestinationRule
metadata:
  name: reviews
spec:
  host: reviews
  subsets:
  - name: v1
    labels:
      version: v1
  - name: v2
    labels:
      version: v2
  - name: v3
    labels:
      version: v3
This is for reference only; do not execute the commands.
This seems straightforward; DestinationRule has no special configuration. The version is defined by name: v1, and labels specify which pods meet the conditions to be categorized into this version.
Next, we will create a YAML file to create a DestinationRule for the four applications of the bookstore microservices.
service_version.yaml
apiVersion: networking.istio.io/v1alpha3
kind: DestinationRule
metadata:
  name: productpage
spec:
  host: productpage
  subsets:
  - name: v1
    labels:
      version: v1
---
apiVersion: networking.istio.io/v1alpha3
kind: DestinationRule
metadata:
  name: reviews
spec:
  host: reviews
  subsets:
  - name: v1
    labels:
      version: v1
  - name: v2
    labels:
      version: v2
  - name: v3
    labels:
      version: v3
---
apiVersion: networking.istio.io/v1alpha3
kind: DestinationRule
metadata:
  name: ratings
spec:
  host: ratings
  subsets:
  - name: v1
    labels:
      version: v1
  - name: v2
    labels:
      version: v2
  - name: v2-mysql
    labels:
      version: v2-mysql
  - name: v2-mysql-vm
    labels:
      version: v2-mysql-vm
---
apiVersion: networking.istio.io/v1alpha3
kind: DestinationRule
metadata:
  name: details
spec:
  host: details
  subsets:
  - name: v1
    labels:
      version: v1
  - name: v2
    labels:
      version: v2
---
kubectl -n bookinfo apply -f service_version.yaml
Execute the command to query more information:
$ kubectl get destinationrules -o wide -n bookinfo
NAME          HOST          AGE
details       details       59s
productpage   productpage   60s
ratings       ratings       59s
reviews       reviews       59s
Next, we define Istio VirtualService for the three microservices: productpage, ratings, and details, as they all only have the v1 version. Therefore, in the VirtualService, we directly forward the traffic to the v1 version.
3vs.yaml
apiVersion: networking.istio.io/v1alpha3
kind: VirtualService
metadata:
  name: productpage
spec:
  hosts:
  - productpage
  http:
  - route:
    - destination:
        host: productpage
        subset: v1
---
apiVersion: networking.istio.io/v1alpha3
kind: VirtualService
metadata:
  name: ratings
spec:
  hosts:
  - ratings
  http:
  - route:
    - destination:
        host: ratings
        subset: v1
---
apiVersion: networking.istio.io/v1alpha3
kind: VirtualService
metadata:
  name: details
spec:
  hosts:
  - details
  http:
  - route:
    - destination:
        host: details
        subset: v1
---
kubectl -n bookinfo apply -f 3vs.yaml
The host: reviews uses the name of the Service. If this is specified, the rule will only apply to services in the current namespace. If traffic needs to be directed to services in other namespaces, the full DNS path like reviews.bookinfo.svc.cluster.local must be used.
For the reviews service, we will only forward traffic to the v1 version in the VirtualService, ignoring v2 and v3.
reviews_v1_vs.yaml
apiVersion: networking.istio.io/v1alpha3
kind: VirtualService
metadata:
  name: reviews
spec:
  hosts:
  - reviews
  http:
  - route:
    - destination:
        host: reviews
        subset: v1
kubectl -n bookinfo apply -f reviews_v1_vs.yaml
Then, let's review all the VirtualServices.
$ kubectl get vs -n bookinfo
NAME          GATEWAYS               HOSTS                                AGE
bookinfo      ["bookinfo-gateway"]   ["*"]                                76m
details                              ["details.bookinfo.svc.local"]       103m
productpage                          ["productpage.bookinfo.svc.local"]   103m
ratings                              ["ratings.bookinfo.svc.local"]       103m
reviews                              ["reviews"]                          103m

Now, no matter how many times you refresh http://192.168.3.150:32666/productpage, the Book Reviews on the right will not display stars, as all traffic is forwarded to the v1 version, which does not have stars.

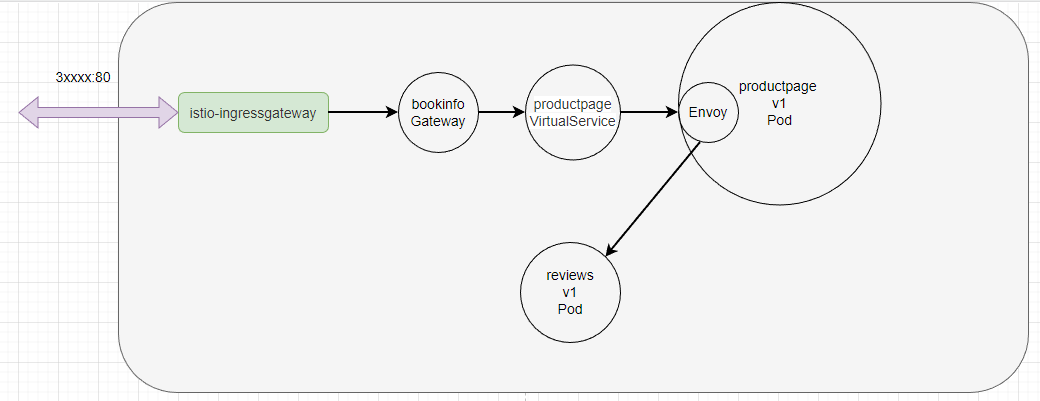
The working principle of Istio is as follows: first, the istio-ingressgateway forwards traffic to the bookinfo gateway. Then, the productpage VirtualService determines whether to allow traffic based on the corresponding routing rules and finally forwards it to the corresponding productpage application. After that, productpage needs to access other services like reviews, and the requests will go through Envoy. Envoy will forward traffic directly to the corresponding Pod based on the configured VirtualService rules.
Header-Based Routing Configuration
Header-based forwarding directs traffic to the corresponding pod based on header values in HTTP requests.
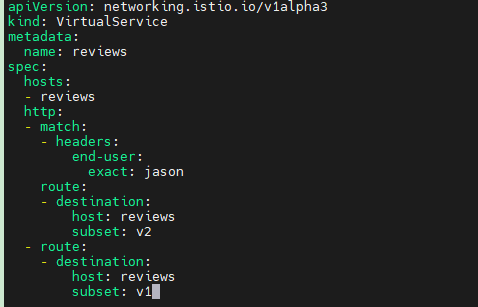
In this section, we will modify the DestinationRule configuration to forward traffic with the header end-user: jason to v2, while all other cases will continue to be routed to v1.
Change the content of the reviews DestinationRule description file to:
  http:
  - match:
    - headers:
        end-user:
          exact: jason
    route:
    - destination:
        host: reviews
        subset: v2
  - route:
    - destination:
        host: reviews
        subset: v1
The complete YAML is as follows:
apiVersion: networking.istio.io/v1alpha3
kind: VirtualService
metadata:
  name: reviews
spec:
  hosts:
  - reviews
  http:
  - match:
    - headers:
        end-user:
          exact: jason
    route:
    - destination:
        host: reviews
        subset: v2
  - route:
    - destination:
        host: reviews
        subset: v1
kubectl -n bookinfo apply -f reviews_v2_vs.yaml
Then, click Sign in in the upper right corner of the page, with both the username and password as jason.

At this point, the Book Reviews will continuously display stars.

If we check the logs for productpage:
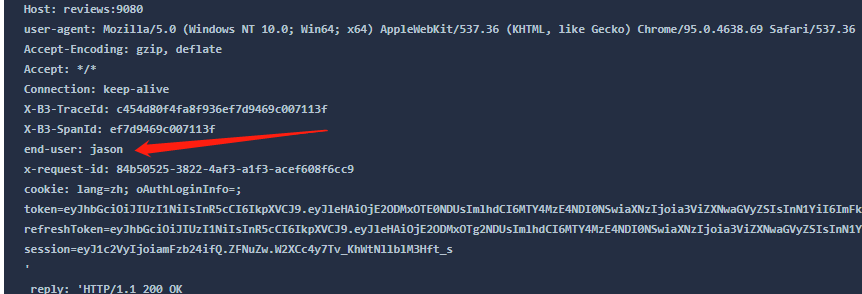
Productpage forwards this header to http://reviews:9080/, and when the traffic comes through Envoy, Envoy detects that the Http header contains end-user and decides to forward the traffic to reviews v2. The Service does not need to participate in this process.
- Through the above configuration, the request flow is as follows:
productpage→reviews:v2→ratings(forjasonuser)productpage→reviews:v1(for other users)
Of course, we can also segment traffic via URL, such as /v1/productpage, /v2/productpage, etc., which will not be elaborated in this chapter; readers can learn more from the official documentation.
Fault Injection
Fault injection is a method in Istio to simulate faults; through fault injection, we can simulate a situation where a service fails, and then observe whether the entire microservice system breaks down when a fault occurs. By intentionally introducing errors into service-to-service communication, such as delays, interruptions, or incorrect return values, we can test system performance under less than ideal operational conditions. This helps identify potential issues and improve system robustness and reliability.
Let’s modify the VirtualService of the previously deployed ratings service.
ratings_delay.yaml
apiVersion: networking.istio.io/v1alpha3
kind: VirtualService
metadata:
  name: ratings
spec:
  hosts:
  - ratings
  http:
  - match:
    - headers:
        end-user:
          exact: jason
    fault:
      delay:
        percentage:
          value: 100.0
        fixedDelay: 7s
    route:
    - destination:
        host: ratings
        subset: v1
  - route:
    - destination:
        host: ratings
        subset: v1
kubectl -n bookinfo apply -f ratings_delay.yaml
Access the web page again, and you will find that the comments section fails to load due to a timeout.
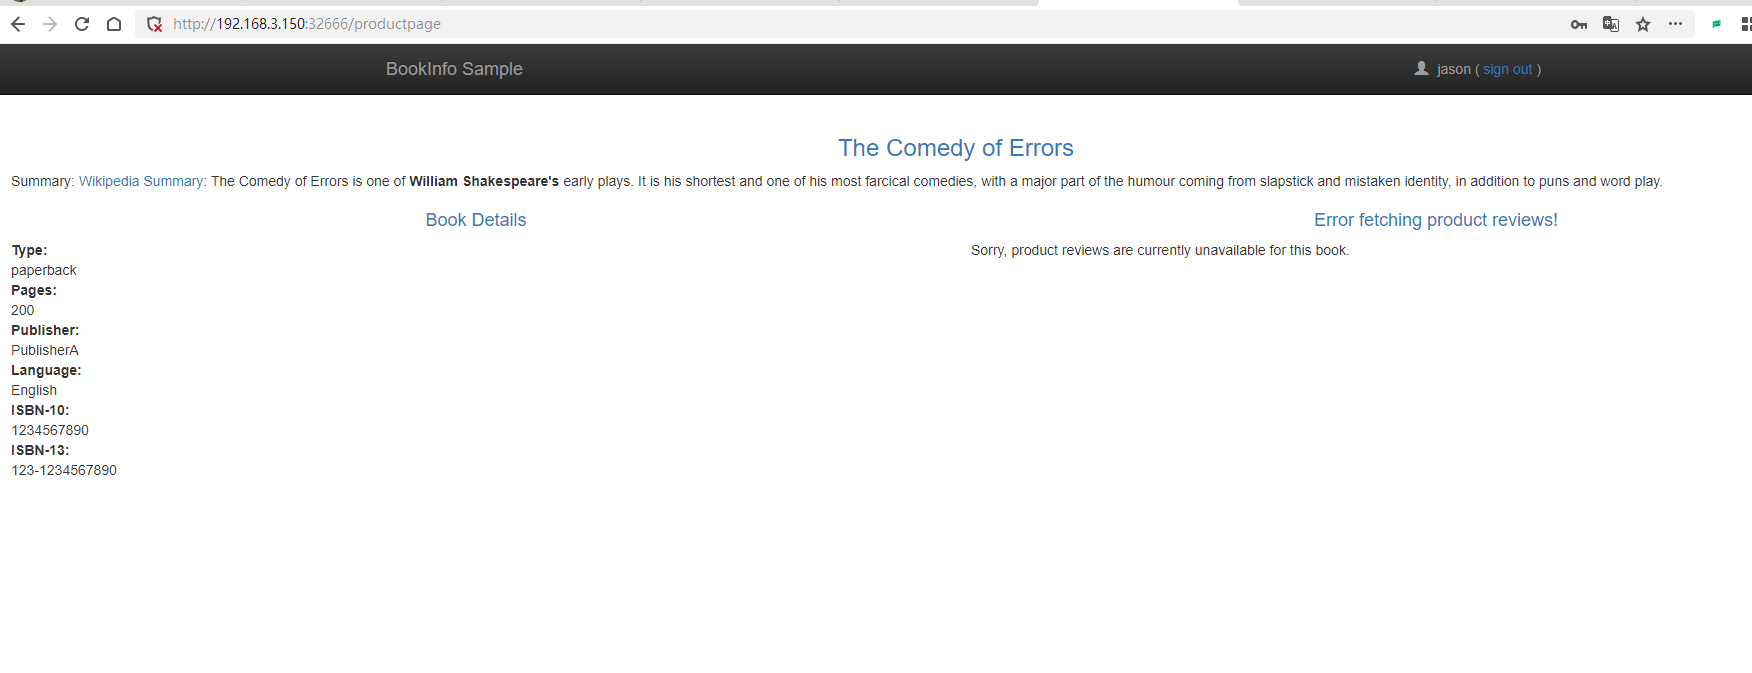
Two Types of Fault Injection
In Istio's VirtualService, the fault configuration is used to inject faults to simulate and test how applications behave when problems occur. The main types of fault injection are delay (delay) and abort (abortion).
Delay Fault Injection
Delay fault injection adds a specified delay to the request before the response. This can test the application’s behavior under network latency or slow service response. Below is an example of how to add a delay fault injection in VirtualService:
  http:
  - fault:
      delay:
        percentage:
          value: 100.0
        fixedDelay: 5s
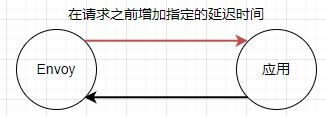
Delay (delay) fault injection has two main attributes.
percentage: Indicates the probability of injecting a delay, ranging from 0.0 to 100.0. For example, 50.0 means there is a 50% chance of injecting a delay.fixedDelay: Indicates the fixed delay time, usually measured in seconds (s) or milliseconds (ms). For example,5smeans a delay of 5 seconds.
延迟故障注入的示例:
fault:
  delay:
    percentage:
      value: 50.0
    fixedDelay: 5s
在这个示例中,delay 配置了一个 50% 概率发生的 5 秒固定延迟。
异常故障注入
异常故障注入用于模拟请求失败的情况,例如 HTTP 错误状态码或 gRPC 状态码。这可以帮助测试应用程序在遇到故障时的恢复能力。以下是一个示例,演示了如何在 VirtualService 中添加一个异常故障注入:
  http:
  - fault:
      abort:
        percentage:
          value: 100.0
        httpStatus: 503
也可以将延迟故障注入和异常故障注入两者放在一起同时使用。
  http:
  - fault:
      delay:
        percentage:
          value: 50.0
        fixedDelay: 5s
      abort:
        percentage:
          value: 50.0
        httpStatus: 503
虽然放在一起使用,但是并不会两种情况同时发生,而是通过 percentage 来配置出现的概率。
异常(abort)故障注入有四个主要属性。
percentage: 表示注入异常的概率,取值范围为 0.0 到 100.0。例如,50.0 表示有 50% 的概率注入异常。httpStatus: 表示要注入的 HTTP 错误状态码。例如,503表示 HTTP 503 错误。grpcStatus: 表示要注入的 gRPC 错误状态码。例如,UNAVAILABLE表示 gRPC 服务不可用错误。http2Error: 表示要注入的 HTTP/2 错误。例如,CANCEL表示 HTTP/2 流被取消。
异常故障注入的示例:
fault:
  abort:
    percentage:
      value: 50.0
    httpStatus: 503
实验完成后,别忘了将 ratings 服务恢复正常。
kubectl -n bookinfo apply -f 3vs.yaml
比例分配流量
使用下面的配置,可以把 50% 的流量分配给 reviews:v1 和 reviews:v3:
apiVersion: networking.istio.io/v1alpha3
kind: VirtualService
metadata:
  name: reviews
spec:
  hosts:
    - reviews
  http:
  - route:
    - destination:
        host: reviews
        subset: v1
      weight: 50
    - destination:
        host: reviews
        subset: v3
      weight: 50
刷新浏览器中的 /productpage 页面,大约有 50% 的几率会看到页面中带 红色 星级的评价内容。这是因为 reviews 的 v3 版本可以访问带星级评价,但 v1 版本不能。
请求超时
不同编程语言都会提供 http client 类库,程序发起 http 请求时,程序本身一般都会有超时时间,超过这个时间,代码会抛出异常。例如网关如 nginx、apisix 等,也有 http 连接超时的功能。
在 Istio 中,服务间的调用由 Istio 进行管理,可以设置超时断开。
我们可以为 reviews 服务设置 http 入口超时时间,当其它服务请求 reviews 服务时,如果 http 请求超过 0.5s,那么 Istio 立即断开 http 请求。
reviews_timeout.yaml
apiVersion: networking.istio.io/v1alpha3
kind: VirtualService
metadata:
  name: reviews
spec:
  hosts:
  - reviews
  http:
  - route:
    - destination:
        host: reviews
        subset: v2
    timeout: 0.5s
kubectl -n bookinfo apply -f reviews_timeout.yaml
因为 reviews 依赖于 ratings 服务,为了模拟这种超时情况,我们可以给 ratings 注入延迟故障。这样 ratings 会给所有请求都延迟 2s 才会返回响应,但是 reviews 要求所有请求 reviews 的流量在 0.5s 内响应。
给 ratings 设置延迟故障:
kubectl -n bookinfo apply -f - <<EOF
apiVersion: networking.istio.io/v1alpha3
kind: VirtualService
metadata:
  name: ratings
spec:
  hosts:
  - ratings
  http:
  - fault:
      delay:
        percent: 100
        fixedDelay: 2s
    route:
    - destination:
        host: ratings
        subset: v1
EOF
我们再次刷新页面。

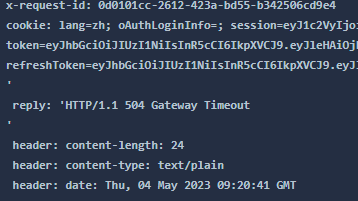
注:因为 productpage 是 Python 编写的,其代码中设置了请求失败后自动重试一次,因此页面刷新后 1 s 后才会完成,而不是 0.5s。
还有一点关于 Istio 中超时控制方面的补充说明,除了像本文一样在路由规则中进行超时设置之外,还可以进行请求一级的设置,只需在应用的对外请求中加入 x-envoy-upstream-rq-timeout-ms 请求头即可。在这个请求头中的超时设置单位是毫秒而不是秒。
现在让我们将本小节的故障清理掉,恢复正常的微服务。
kubectl -n bookinfo apply -f - <<EOF
apiVersion: networking.istio.io/v1alpha3
kind: VirtualService
metadata:
  name: reviews
spec:
  hosts:
    - reviews
  http:
  - route:
    - destination:
        host: reviews
        subset: v1
      weight: 50
    - destination:
        host: reviews
        subset: v3
      weight: 50
EOF
kubectl -n bookinfo apply -f - <<EOF
apiVersion: networking.istio.io/v1alpha3
kind: VirtualService
metadata:
  name: ratings
spec:
  hosts:
  - ratings
  http:
  - route:
    - destination:
        host: ratings
        subset: v1
EOF
熔断
什么是熔断
熔断(Circuit Breaking)是微服务架构中的一种重要的弹性设计模式,在微服务环境中,不同的服务存在依赖关系,当其中一个依赖的服务出现问题时,可能导致请求积压,从而影响到其他服务和整个系统的稳定性。比如说,B 服务来了 100 个请求,B 需要请求 100 次 A 服务,但是 A 服务故障了,那么每次失败时都会重试一次,那么整体上就一共请求了 200 次。这样就会造成很大的浪费。而熔断器可以检测到这种情况,当检测到 A 服务故障之后,一段时间内所有对 A 的请求都会直接返回错误。
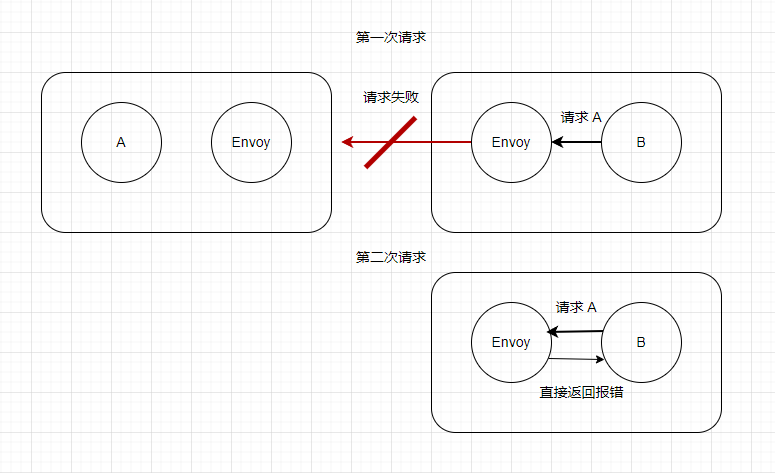
熔断器模式的工作原理如下:
-
正常状态:熔断器处于关闭状态,允许请求通过(熔断器会监控请求的成功和失败率)。
-
故障检测:当失败率达到预先定义的阈值时,熔断器就会启动。
-
熔断状态:熔断器处于打开状态时,将拒绝所有新的请求,并返回错误响应。这可以防止故障级联和给故障服务带来更多的压力。
-
恢复状态:在一段时间后,熔断器会进入半打开状态,允许一部分请求通过。如果这些请求成功,则熔断器将返回到关闭状态;如果仍然存在失败请求,则熔断器继续保持打开状态。
使用熔断器模式可以提高微服务系统的弹性和稳定性。这些工具提供了熔断器模式的实现,以及其他弹性设计模式,如负载均衡、重试和超时等。
创建 httpbin 服务
接下来本节将会使用一个 httpbin 服务,这个服务代码可以在 istio 官方仓库中找到: https://github.com/istio/istio/tree/release-1.17/samples/httpbin
创建一个 httpbin 服务。
httpbin.yaml
apiVersion: v1
kind: ServiceAccount
metadata:
  name: httpbin
---
apiVersion: v1
kind: Service
metadata:
  name: httpbin
  labels:
    app: httpbin
    service: httpbin
spec:
  ports:
  - name: http
    port: 8000
    targetPort: 80
  selector:
    app: httpbin
  type: NodePort
---
apiVersion: apps/v1
kind: Deployment
metadata:
  name: httpbin
spec:
  replicas: 1
  selector:
    matchLabels:
      app: httpbin
      version: v1
  template:
    metadata:
      labels:
        app: httpbin
        version: v1
    spec:
      serviceAccountName: httpbin
      containers:
      - image: docker.io/kennethreitz/httpbin
        imagePullPolicy: IfNotPresent
        name: httpbin
        ports:
        - containerPort: 80
kubectl -n bookinfo apply -f httpbin.yaml
这里使用的 NodePort 只是为了分别预览访问,后续还需要通过 Gateway 来实验熔断。
然后查看 Service 列表。

通过浏览器打开对应的服务。
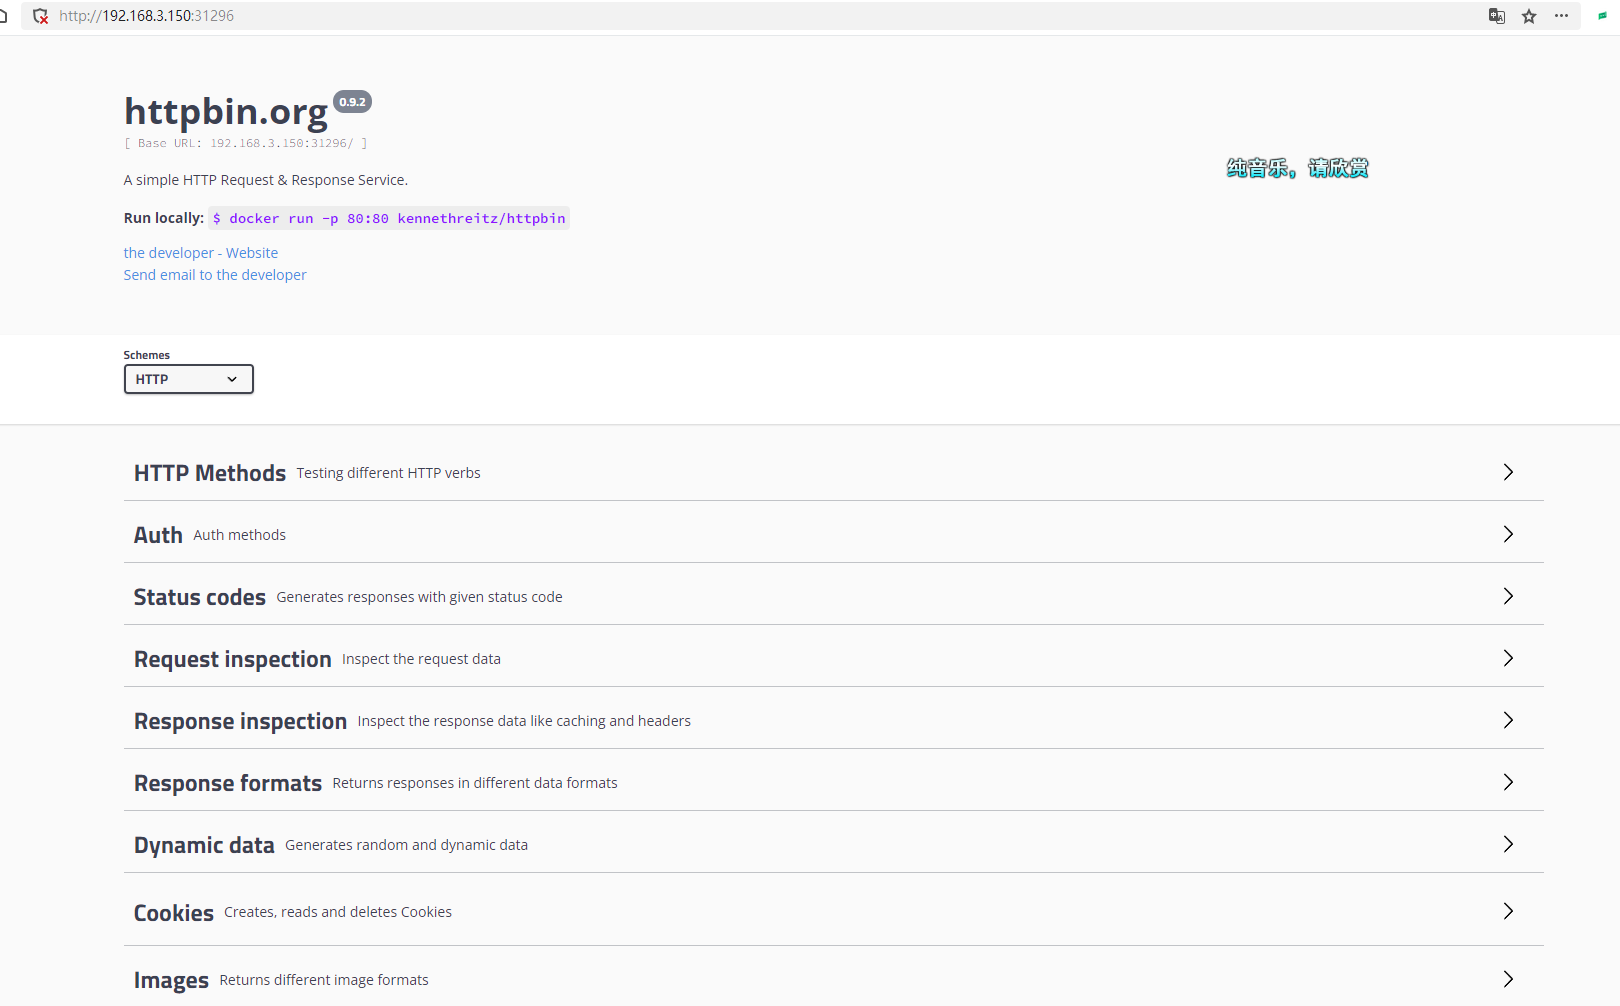
接着给 httpbin 创建一个 DestinationRule ,里面配置了熔断规则。
httpbin_circuit.yaml
apiVersion: networking.istio.io/v1alpha3
kind: DestinationRule
metadata:
  name: httpbin
spec:
  host: httpbin
  trafficPolicy:
    connectionPool:
      tcp:
        maxConnections: 1
      http:
        http1MaxPendingRequests: 1
        maxRequestsPerConnection: 1
    outlierDetection:
      consecutive5xxErrors: 1
      interval: 1s
      baseEjectionTime: 3m
      maxEjectionPercent: 100
kubectl -n bookinfo apply -f httpbin_circuit.yaml
DestinationRule(目标规则)用于定义访问特定服务的流量策略。DestinationRule 配置中的 trafficPolicy 属性允许为服务指定全局的流量策略,这些策略包括负载均衡设置、连接池设置、异常检测等。
另外,我们在创建熔断时也可以设置重试次数。
    retries:
      attempts: 3
      perTryTimeout: 1s
      retryOn: 5xx
创建访问者服务
在 Istio 服务网格环境下,流量进入网格后会被 Envoy 拦截,接着根据相应的配置实现路由,熔断也是在 Envoy 之间实现的,只有流量经过 Envoy ,才会触发 Istio 的熔断机制。
上一小节中我们部署了 httpbin 应用,但是熔断是服务之间通讯出现的,所以我们还需要部署一个服务请求 httpbin,才能观察到熔断过程。Istio 官方推荐使用 fortio。
部署 fortio 的 YAML 如下:
fortio_deploy.yaml
apiVersion: v1
kind: Service
metadata:
  name: fortio
  labels:
    app: fortio
    service: fortio
spec:
  ports:
  - port: 8080
    name: http
  selector:
    app: fortio
---
apiVersion: apps/v1
kind: Deployment
metadata:
  name: fortio-deploy
spec:
  replicas: 1
  selector:
    matchLabels:
      app: fortio
  template:
    metadata:
      annotations:
        # This annotation causes Envoy to serve cluster.outbound statistics via 15000/stats
        # in addition to the stats normally served by Istio. The Circuit Breaking example task
        # gives an example of inspecting Envoy stats via proxy config.
        proxy.istio.io/config: |-
          proxyStatsMatcher:
            inclusionPrefixes:
            - "cluster.outbound"
            - "cluster_manager"
            - "listener_manager"
            - "server"
            - "cluster.xds-grpc"
      labels:
        app: fortio
    spec:
      containers:
      - name: fortio
        image: fortio/fortio:latest_release
        imagePullPolicy: Always
        ports:
        - containerPort: 8080
          name: http-fortio
        - containerPort: 8079
          name: grpc-ping
kubectl -n bookinfo apply -f fortio_deploy.yaml
部署 fortio 之后,我们进入到 fortio 容器中,执行命令请求 httpbin。
执行命令获取 fortio 的 Pod 名称:
export FORTIO_POD=$(kubectl get pods -n bookinfo -l app=fortio -o 'jsonpath={.items[0].metadata.name}')
然后让 Pod 容器执行命令:
kubectl -n bookinfo exec "$FORTIO_POD" -c fortio -- /usr/bin/fortio curl -quiet http://httpbin:8000/get
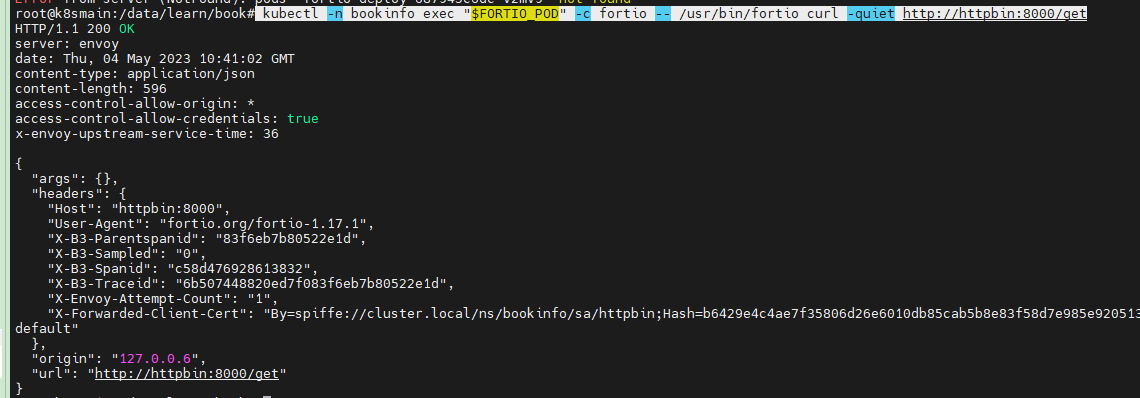
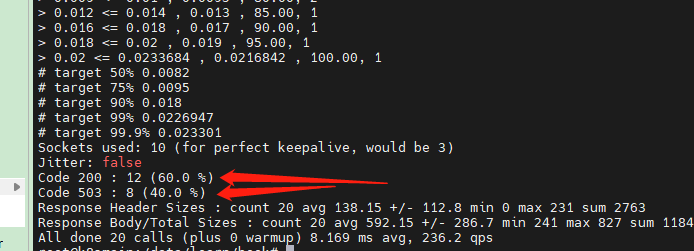
如果上面的命令执行没问题的话,我们可以通过下面的命令对 httpbin 服务进行大量请求,并且分析请求统计结果。
kubectl -n bookinfo exec "$FORTIO_POD" -c fortio -- /usr/bin/fortio load -c 3 -qps 0 -n 20 -loglevel Warning http://httpbin:8000/get
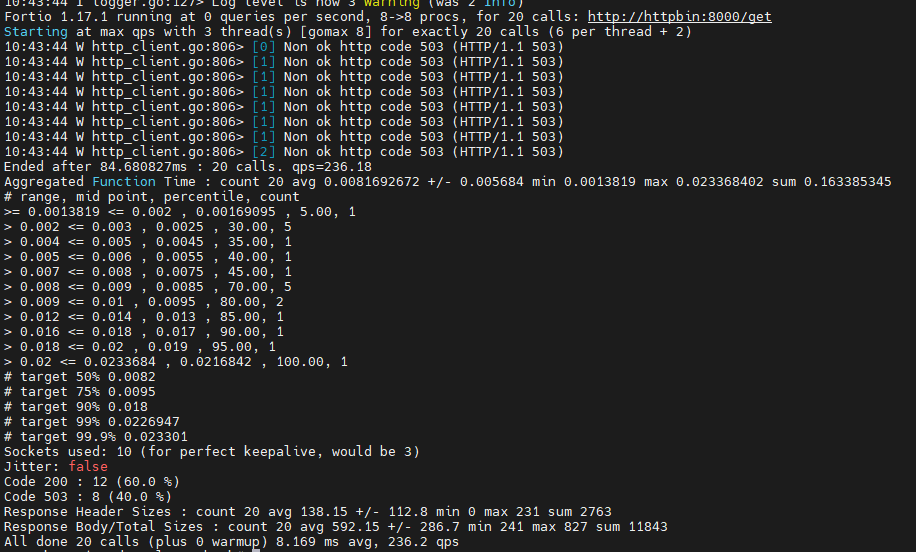
在控制台中可以看到请求返回 200 和 503 的比例。
创建 productpage 熔断
在前面的小节中,我们使用了 httpbin 进行熔断实验,当然我们也可以给那些暴露到集群外的应用创建熔断。这里我们继续使用之前的 bookinfo 微服务的 productpage 应用。
创建一个熔断规则用于 productpage:
productpage_circuit.yaml
apiVersion: networking.istio.io/v1alpha3
kind: DestinationRule
metadata:
  name: productpage
spec:
  host: productpage
  subsets:
  - name: v1
    labels:
      version: v1
  trafficPolicy:
    connectionPool:
      tcp:
        maxConnections: 1
      http:
        http1MaxPendingRequests: 1
        maxRequestsPerConnection: 1
    outlierDetection:
      consecutive5xxErrors: 1
      interval: 1s
      baseEjectionTime: 3m
      maxEjectionPercent: 100
kubectl -n bookinfo apply -f productpage_circuit.yaml
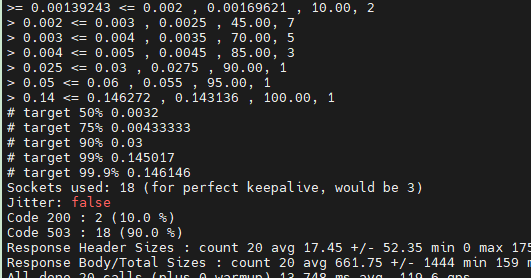
然后我们使用 fortio 测试 productpage 应用,从 istio gateway 入口进行访问。
kubectl -n bookinfo exec "$FORTIO_POD" -c fortio -- /usr/bin/fortio load -c 3 -qps 0 -n 20 -loglevel Warning http://192.168.3.150:32666/productpage

然后删除 productpage 的熔断配置,重新恢复成一个正常的应用。
kubectl -n bookinfo apply -f - <<EOF
apiVersion: networking.istio.io/v1alpha3
kind: DestinationRule
metadata:
  name: productpage
spec:
  host: productpage
  subsets:
  - name: v1DestinationRule
    labels:
      version: v1
EOF
重新执行命令:
kubectl -n bookinfo exec "$FORTIO_POD" -c fortio -- /usr/bin/fortio load -c 3 -qps 0 -n 20 -loglevel Warning http://192.168.3.150:32666/productpage
通过打印的日志可以看出,不会再有 503 错误。

此时访问 http://192.168.3.150:32666/productpage,页面也应恢复正常。
清理
本文明实验之后,可以执行命令清理以下服务:
然后我们清理 fortio:
kubectl -n bookinfo delete svc fortio
kubectl -n bookinfo delete deployment fortio-deploy
清理示例程序:
kubectl -n bookinfo delete destinationrule httpbin
kubectl -n bookinfo delete sa httpbin
kubectl -n bookinfo delete svc httpbin
kubectl -n bookinfo delete deployment httpbin

文章评论