RabbitMQ Tutorial
[TOC]
Introduction to RabbitMQ
RabbitMQ is a message queue that implements the AMQP protocol, defined as an open standard application layer protocol for message-oriented middleware. It represents the Advanced Message Queuing Protocol, characterized by features such as message addressing, routing, queues, security, and reliability.
Currently popular message queues in the community include Kafka, ActiveMQ, Pulsar, RabbitMQ, and others.
The author has also written a series of Kafka tutorials, welcome to read: https://kafka.whuanle.cn/
The advantages and uses of RabbitMQ include high reliability, flexible routing rule configurations, support for distributed deployments, and compliance with the AMQP protocol. It can be used for asynchronous communication, log collection (Kafka is generally better for log collection), event-driven architecture systems, application communication decoupling, and more.
The features of the RabbitMQ community version are as follows:
-
Supports multiple messaging protocols, message queues, acknowledgment of messages, flexible queue routing, and various exchange types.
-
Supports distributed deployment such as Kubernetes, and provides SDKs for multiple languages, including Java, Go, and C#.
-
Pluggable authentication and authorization, supporting TLS and LDAP.
-
Supports continuous integration, operational metrics, and various tools and plugins for integration with other enterprise systems.
-
Provides a set of HTTP-API, command-line tools, and UI for managing and monitoring RabbitMQ.
RabbitMQ has basic objects that include the following points, but readers do not need to memorize them now; they will be introduced one by one in the subsequent chapters.
- Producer: A program that pushes messages to RabbitMQ.
- Consumer: A program that consumes messages from RabbitMQ.
- Queue: The place where RabbitMQ stores messages, and consumers can fetch messages from the queue.
- Exchange: Receives messages from producers and routes them to one or more queues.
- Binding: Associates queues and exchanges; when producers push messages, the exchange routes them to the queue.
- Routing Key: The matching rule used by the exchange to route messages to specific queues.
The technical knowledge points of RabbitMQ are roughly divided into:
- Users and permissions: Configure users, roles, and their corresponding permissions.
- Virtual Hosts: Configure virtual hosts to isolate different message queue environments.
- Exchange and Queue properties: Configure the properties of exchanges and queues, such as persistence, automatic deletion, etc.
- Policies: Define policies to automatically set parameters for queues, exchanges, and links.
- Connections and Channels: Configure properties for connections and channels, such as heartbeat intervals and maximum frame sizes.
- Plugins: Enable and configure various plugins, such as management plugins, STOMP plugins, etc.
- Clusters and High Availability: Configure clusters and mirrored queues to provide high availability.
- Logging and Monitoring: Configure log levels, targets, and monitoring plugins.
- Security: Configure SSL/TLS options, authentication backends, and other security-related settings.
Due to the author's technical limitations and space constraints, this article will only explain the technical details related to C# programming, through which readers can understand the coding techniques and operational mechanisms of RabbitMQ.
Installation and Configuration
Installing RabbitMQ
Readers can find the complete installation tutorial in the official RabbitMQ documentation: https://www.rabbitmq.com/download.html
This article uses Docker for deployment.
RabbitMQ community image list: https://hub.docker.com/_/rabbitmq
Create a directory for mapping the storage volume:
mkdir -p /opt/lib/rabbitmq
Deploy the container:
docker run -itd --name rabbitmq -p 5672:5672 -p 15672:15672 \
-v /opt/lib/rabbitmq:/var/lib/rabbitmq \
rabbitmq:3.12.8-management
This deployment uses two ports. 5672 is the MQ communication port, and 15672 is the Management UI tool port.
Opening port 15672 will bring up the web login page, where the default username and password are both guest.
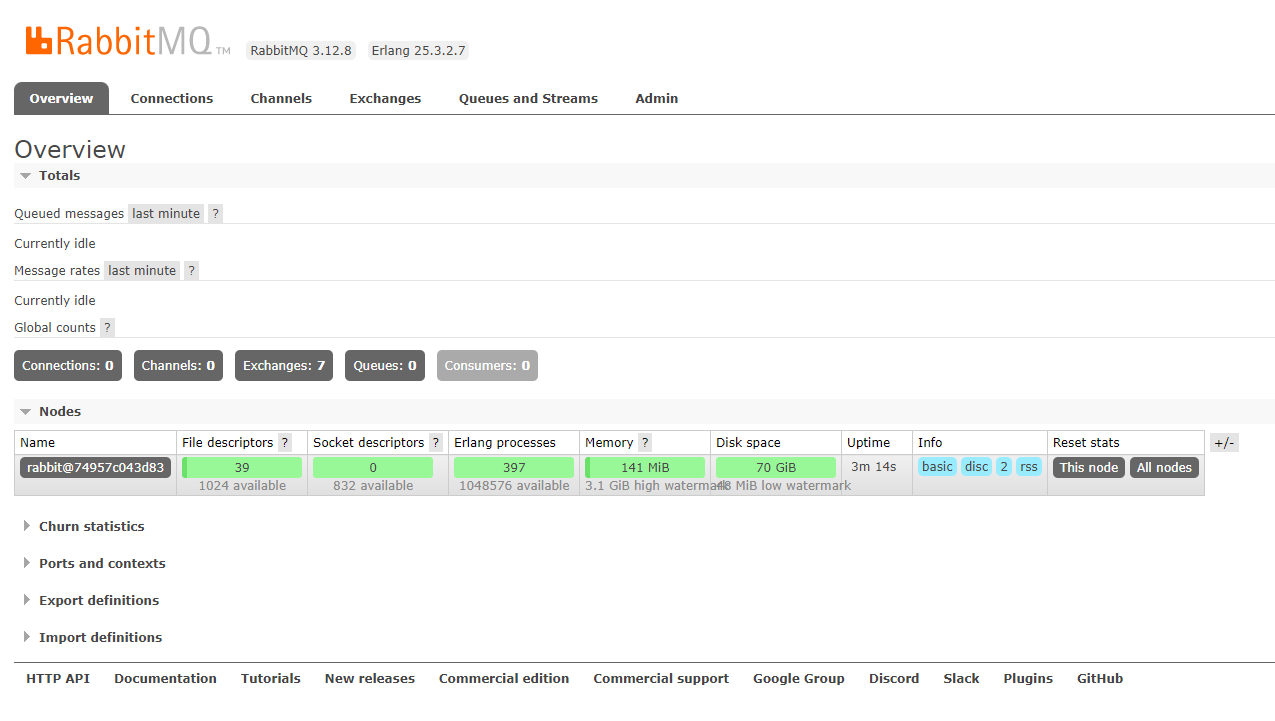
The usage of RabbitMQ Management UI will be introduced later.
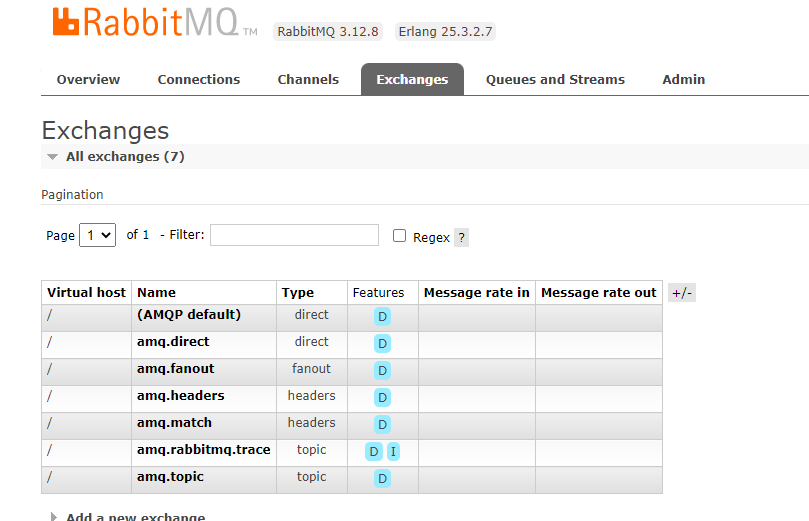
After opening the management interface, in the Exchanges menu, you can see the following table. These are the default exchanges. You do not need to understand these for now; they will be introduced later.
| Virtual host | Name | Type | Features |
| :----------- | :----------------- | :------ | :------- |
| / | (AMQP default) | direct | D |
| / | amq.direct | direct | D |
| / | amq.fanout | fanout | D |
| / | amq.headers | headers | D |
| / | amq.match | headers | D |
| / | amq.rabbitmq.trace | topic | D I |
| / | amq.topic | topic | D |
Publish and Subscribe Model
To develop RabbitMQ with C#, you need to add RabbitMQ.Client via nuget, the official documentation link: .NET/C# RabbitMQ Client Library — RabbitMQ
Before continuing to read the article, please create a console program.
Producer, Consumer, Exchange, Queue
To facilitate understanding, this article has produced dozens of images to denote the meanings of various graphical representations:
To represent the producer, the following image is used:
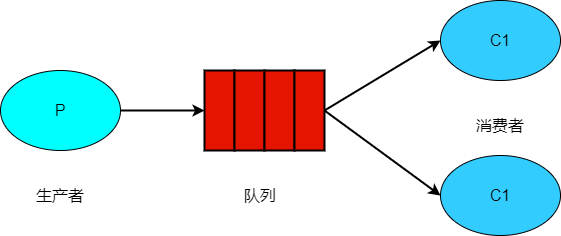
To represent the consumer, the following image is used:
To represent the message queue, the following image is used:

To represent the exchange, the following image is used:

In RabbitMQ, messages published by producers do not directly enter the queue but are routed through exchanges to various queues. As mentioned earlier, after deploying RabbitMQ, there are seven default exchanges, such as (AMQP default) and amq.direct, etc.
However, for now, we do not need to understand the exchanges, so in this tutorial, we will use the default exchange to complete the experiments.
By ignoring the existence of the exchange, we can simplify the production and consumption process as depicted in the following image:

Please note that the existence of exchanges is omitted in the image since we are using the default exchange. However, messages pushed by producers must be pushed to the exchange, not directly to the queue; this point must be clearly understood.
For consumers, to use the queue, it must ensure that the queue already exists.
The C# code and parameters to declare (create) a queue are as follows:
// Declare a queue
channel.QueueDeclare(
// Queue name
queue: "myqueue",
// Persistence configuration, whether the queue can survive broker restarts
durable: false,
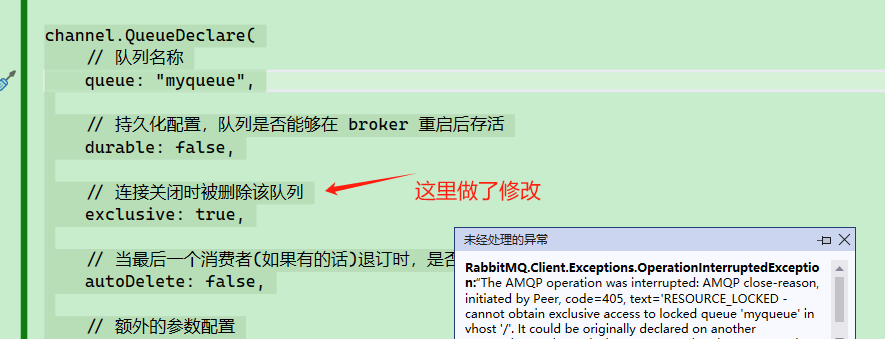
// Delete the queue when the connection closes
exclusive: false,
// Should this queue be automatically deleted when the last consumer (if any) unsubscribes
autoDelete: false,
// Extra parameters configuration
arguments: null
);
Complete code example:
ConnectionFactory factory = new ConnectionFactory
{
	HostName = "localhost"
};

// Connection
using IConnection connection = factory.CreateConnection();

// Channel
using IModel channel = connection.CreateModel();

channel.QueueDeclare(
	// Queue name
	queue: "myqueue",

	// Persistence configuration, whether the queue can survive broker restarts
	durable: false,

	// Delete the queue when the connection closes
	exclusive: false,

	// Should this queue be automatically deleted when the last consumer (if any) unsubscribes
	autoDelete: false,

	// Extra parameters configuration
	arguments: null
	);
-
queue: The name of the queue. -
durable: Indicates whether persistence is set. Durable queues are stored on disk and ensure that related information is not lost when the server is restarted. -
exclusive: Sets whether it is exclusive. If a queue is declared as exclusive, the queue is only visible to the first connection that declares it and is automatically deleted when that connection closes. -
This configuration is based on IConnection; different channels (IModel) created from the same IConnection will also abide by this rule.
-
autoDelete: Sets whether to delete automatically. Auto-deletion occurs only if at least one consumer is connected to this queue; the queue will be automatically deleted when all consumers connected to this queue disconnect. -
arguments: Sets some additional parameters of the queue, such as message expiration time, etc.
If the queue already exists, there is no need to execute QueueDeclare() again. Repeated calls to QueueDeclare() with the same parameters will have no side effects, and messages that have already been pushed will not encounter issues.
However, if the parameters of QueueDeclare() differ from those of an existing queue, an error may occur.
Generally, for rational architecture and reliability, an architect or similar roles will create exchanges and queues in advance in the message queue, allowing the client to use them directly. It is typically not allowed for the program to set these at startup, as it can introduce significant uncertainty and side effects.
The code for the producer sending messages is also quite simple; specify which exchange or routing to send to.
Please note, RabbitMQ producers send messages to exchanges, not directly to queues!
channel.BasicPublish(

	// Use the default exchange
	exchange: string.Empty,

	// Push to which queue
	routingKey: "myqueue",

	// Queue properties
	basicProperties: null,

	// The message to be sent must first be converted to byte[]
	body: Encoding.UTF8.GetBytes("Test")
	);
BasicPublish has three overloads:
BasicPublish(
    PublicationAddress addr,
    IBasicProperties basicProperties,
    ReadOnlyMemory<byte> body)
BasicPublish(string exchange,
             string routingKey,
             IBasicProperties basicProperties,
             ReadOnlyMemory<byte> body)
BasicPublish(string exchange,
             string routingKey,
             bool mandatory = false,
             IBasicProperties basicProperties = null,
             ReadOnlyMemory<byte> body = default)
exchange: The name of the exchange; if left empty, it will push to the default exchange.routingKey: The routing key, which the exchange uses to store messages in the corresponding queue.basicProperties: Message properties, such as expiration time, etc.mandatory: If false, and if the exchange does not have a suitable queue bound, the message will be lost. If true, if the exchange does not have a suitable queue bound, theIModel.BasicReturnevent will be triggered.
The IBasicProperties basicProperties parameter is an interface, and we can use IModel.CreateBasicProperties() to create an interface object.
The IBasicProperties interface encapsulates many properties, allowing us not to have to express configuration via strings explicitly.
The complete properties of IBasicProperties are as follows:
// Identifies the ID of the application
public String AppId { set; get; }

// Identifies the ID of the cluster
public String ClusterId { set; get; }

// Specifies the encoding of the message content, e.g., "utf-8"
public String ContentEncoding { set; get; }

// Specifies the MIME type of the message content, e.g., "application/json"
public String ContentType { set; get; }

// Used to correlate messages, typically used in RPC (Remote Procedure Call) scenarios
public String CorrelationId { set; get; }

// Specifies the persistence mode of the message, value 1: non-persistent, value 2: persistent
public Byte DeliveryMode { set; get; }

// In milliseconds, specifies the expiration time of the message
public String Expiration { set; get; }

// Custom message header information
public IDictionary<string, object> Headers { set; get; }

// Specifies the unique identifier for the message
public String MessageId { set; get; }

// Whether it is persistent
public Boolean Persistent { set; get; }

// Specifies the priority of the message, ranging from 0 to 9
public Byte Priority { set; get; }

// Specifies the name of the queue for replying to the message
public String ReplyTo { set; get; }

// Specifies address information for replying to the message
public PublicationAddress ReplyToAddress { set; get; }

// Specifies the timestamp of the message
public AmqpTimestamp Timestamp { set; get; }

// The type of the message
public String Type { set; get; }

// Identifies the ID of the user
public String UserId { set; get; }
When pushing messages, we can set IBasicProperties with fine granularity for individual messages:
using IConnection connection = factory.CreateConnection();
using IModel channel = connection.CreateModel();

// Create two queues
channel.QueueDeclare(queue: "q1", durable: false, exclusive: false, autoDelete: false);

var properties = channel.CreateBasicProperties();
// Example 1:
properties.Persistent = true;
properties.ContentType = "application/json";
properties.ContentEncoding = "UTF-8";

// Example 2:
//properties.Persistent = true;
//properties.ContentEncoding = "gzip";
//properties.Headers = new Dictionary<string, object>();

channel.BasicPublish(
	exchange: string.Empty,
	routingKey: "q1",
	basicProperties: properties,
	body: Encoding.UTF8.GetBytes($"Test{i}")
);
Further details about the use of IBasicProperties will be introduced later in the article.
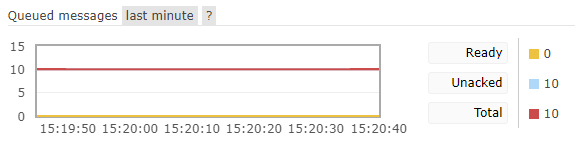
Now, we have pushed 10 messages to the queue and will observe them in the Management UI.
int i = 0;
while (i < 10)
{
	channel.BasicPublish(
	exchange: string.Empty,
	routingKey: "myqueue",
	basicProperties: null,
	body: Encoding.UTF8.GetBytes($"Test{i}")
	);
	i++;
}
We can see all current queues in the UI under Queues and Streams.
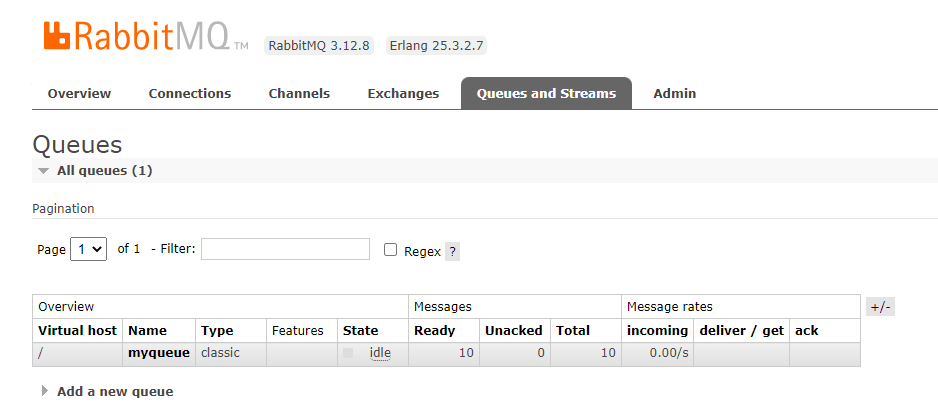
You can see the current number of messages in
Readystate andUnackedstate in the queue, which correspond to the number of messages waiting to be delivered to consumers and those already delivered to consumers but not acknowledged.
Clicking on that queue will open the following interface.
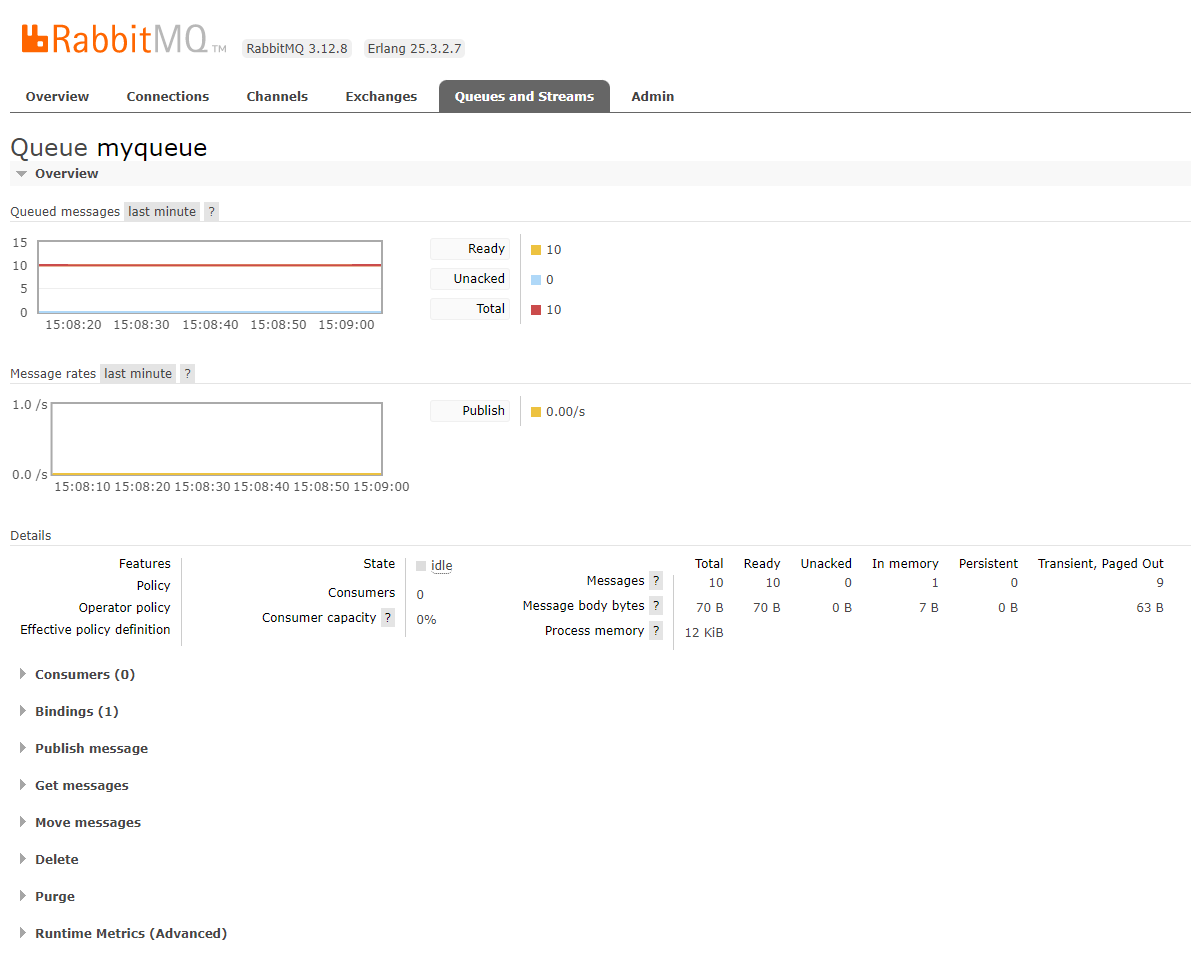
First, look at the Overview.
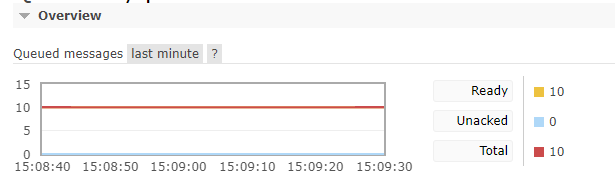
Ready indicates the number of messages that have not yet been consumed.
Unacked indicates the number of messages that have been consumed but have not received an acknowledgment.
The other Message rates chart refers to the speed of publishing and consuming messages, which is not important and will not be explained here.

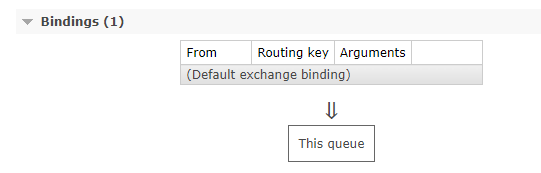
In Bindings, you can see that the queue is bound to the default exchange.
。
Then, write a consumer to consume messages from the queue. The complete code is as follows:
using RabbitMQ.Client;
using RabbitMQ.Client.Events;
using System.Text;

ConnectionFactory factory = new ConnectionFactory
{
	HostName = "localhost"
};

using IConnection connection = factory.CreateConnection();
using IModel channel = connection.CreateModel();

channel.QueueDeclare(
	// Queue name
	queue: "myqueue",

	// Durability configuration, whether the queue can survive after the broker restarts
	durable: false,

	// The queue will be deleted when the connection is closed
	exclusive: false,

	// Whether the queue should be automatically deleted when the last consumer (if any) unsubscribes
	autoDelete: false,

	// Additional parameter configuration
	arguments: null
	);

// Define the consumer
var consumer = new EventingBasicConsumer(channel);
consumer.Received += (model, ea) =>
{
	var message = Encoding.UTF8.GetString(ea.Body.Span);
	Console.WriteLine($" [x] Received {message}");
};

// Start consuming
channel.BasicConsume(queue: "myqueue",
					 autoAck: true,
					 consumer: consumer);

Console.ReadLine();
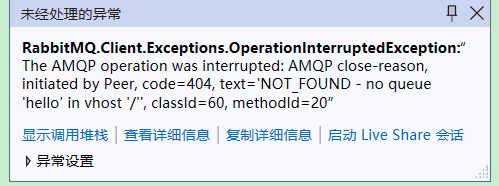
Note: If a nonexistent queue is specified, the program will throw an exception.
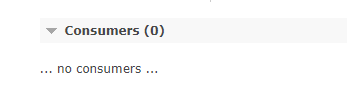
Before the consumer program exits, that is, before Dispose() is called on IConnection, the consumer client program information can be seen in the Consumers.

So, what if we consume without setting automatic ack?
Change the consumer code to:
channel.BasicConsume(queue: "myqueue",
					 autoAck: false,
					 consumer: consumer);
The complete code is as follows:
using RabbitMQ.Client;
using RabbitMQ.Client.Events;
using System.Text;

ConnectionFactory factory = new ConnectionFactory
{
	HostName = "localhost"
};

using IConnection connection = factory.CreateConnection();
using IModel channel = connection.CreateModel();

channel.QueueDeclare(
	queue: "myqueue",
	durable: false,
	exclusive: false,
	autoDelete: false,
	arguments: null
	);

int i = 0;
while (i < 10)
{
	channel.BasicPublish(
	exchange: string.Empty,
	routingKey: "myqueue",
	basicProperties: null,
	body: Encoding.UTF8.GetBytes($"测试{i}")
	);
	i++;
}

// Define the consumer
var consumer = new EventingBasicConsumer(channel);
consumer.Received += (model, ea) =>
{
	var message = Encoding.UTF8.GetString(ea.Body.Span);
	Console.WriteLine($" [x] Received {message}");
};

// Start consuming
channel.BasicConsume(queue: "myqueue",
					 autoAck: false,
					 consumer: consumer);

Console.ReadLine();
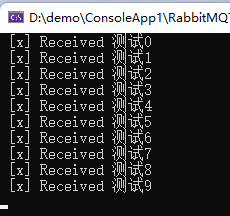
At this point, you will find that all messages have been read, but Unacked is 10.
As shown in the figure below, after setting autoAck: false, if the program is restarted (only consuming, not pushing messages), the program will continue to consume the messages again.
For the unacknowledged messages, RabbitMQ will push them again after the consumer reconnects.
Unlike Kafka, in Kafka, if the current message is not acknowledged, the server will automatically resend that message to the consumer. If that message is not completed, it will be blocked here indefinitely. In contrast, for RabbitMQ, unacknowledged messages will be temporarily ignored, and the next message will be consumed automatically. Based on this, by default, RabbitMQ cannot guarantee message order.
Of course, RabbitMQ is very flexible. We can selectively consume parts of the messages, avoiding blocking the current message from preventing the program from consuming further:
	// Define the consumer
	int i = 0;
	var consumer = new EventingBasicConsumer(channel);
	consumer.Received += (model, ea) =>
	{
		var message = Encoding.UTF8.GetString(ea.Body.Span);
		Console.WriteLine($" [x] Received {message}");
		i++;
        // Acknowledge that this message has been successfully consumed
		if (i % 2 == 0)
			channel.BasicAck(deliveryTag: ea.DeliveryTag, multiple: false);
	};

	// Start consuming
	channel.BasicConsume(queue: "myqueue",
						 autoAck: false,
						 consumer: consumer);
In some scenarios, this feature is very useful; we can set aside messages that have failed multiple executions and turn to consume the next message, thus avoiding message accumulation.
Multiple Worker Queues
What happens if different clients bind to the same queue on an exchange and multiple consumers work together?
In the first case, RabbitMQ will evenly distribute messages to each client.
This condition holds if the two consumers are different consumers. If different instances in the same program participate in consumption but are recognized as the same consumer, the rule does not apply.
However, RabbitMQ does not consider the quantity of unacknowledged messages; it blindly sends the nth message to the nth consumer.
Also, when specifying an exchange name, we can set the routing key to be empty, so that the published messages will be forwarded by the exchange to the corresponding queue.
	channel.BasicPublish(
	exchange: "logs",
	routingKey: string.Empty,
	basicProperties: null,
	body: Encoding.UTF8.GetBytes($"测试{i}")
	);
The scenario where multiple queues correspond to one exchange is more complex and will be mentioned in later chapters.
Both producers and consumers can use QueueDeclare() to declare a queue. The so-called declaration is essentially a request to the RabbitMQ Broker to create a queue, so it doesn't matter who creates it.
There are two functions related to declaring a queue:
// Regardless of whether the creation fails or not, ignore it
channel.QueueDeclareNoWait();
// Check if the queue exists; if not, an exception will be thrown; if it exists, nothing will happen
channel.QueueDeclarePassive();
In addition, we can delete a queue:
// ifUnused: Only delete if the queue is not being used
// ifEmpty: Only delete if there are no accumulated messages in the queue
channel.QueueDelete(queue: "aaa", ifUnused: true, ifEmpty: true);
Exchange Types
Producers can only push messages to exchanges, not directly to queues.
When pushing a message, you can specify the exchange name and the routing key.
As shown in the following code:
	channel.BasicPublish(
	exchange: string.Empty,
	routingKey: "myqueue",
	basicProperties: null,
	body: Encoding.UTF8.GetBytes($"测试{i}")
	);
The ExchangeType defines several exchange type names.
    public static class ExchangeType
    {
        public const string Direct = "direct";
        public const string Fanout = "fanout";
        public const string Headers = "headers";
        public const string Topic = "topic";
        private static readonly string[] s_all = {Fanout, Direct, Topic, Headers};
    }
Before using an exchange, it needs to be declared first:
channel.ExchangeDeclare("logs", ExchangeType.Fanout);
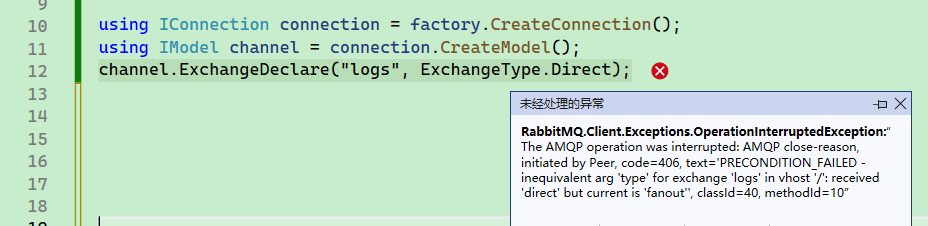
If the exchange already exists, re-executing the declaration code will not have any effect as long as the configuration matches the existing exchange's configuration.
However, the configuration cannot be different, for example, if the existing exchange is of type Fanout, re-declaring it as Direct type will cause an error.
The definition of the ExchangeDeclare function is as follows:
ExchangeDeclare(string exchange,
                string type,
                bool durable = false,
                bool autoDelete = false,
                IDictionary<string, object> arguments = null)
exchange: The name of the exchange.type: The type of the exchange, such as fanout, direct, topic.durable: Determines whether the exchange is durable; if true, it will not be lost after the server restarts.autoDelete: Determines whether to delete automatically.argument: Other structured parameters.
Of course, exchanges can also be deleted.
// ifUnused: Only delete if the exchange is not being used
channel.ExchangeDelete(exchange: "log", ifUnused: true);
There is also a NotWait method.
channel.ExchangeDeclareNoWait("logs", ExchangeType.Direct);
//channel.ExchangeDeclareNoWait(...);
Even if there are issues with re-declaring or deleting exchanges, returning void means that operation failures won't throw an exception.
There is also a method to check if an exchange exists. If the exchange does not exist, it will throw an exception; if it exists, nothing will happen.
channel.ExchangeDeclarePassive("logs")
After creating multiple queues, we still need to bind the queues to the exchanges.
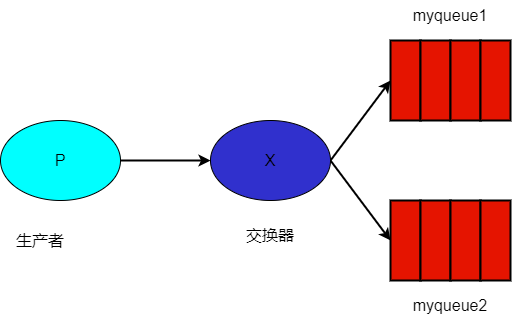
As shown in the following code, the exchange binds two queues, so when the producer pushes messages to the exchange, both queues will receive the same messages.
ConnectionFactory factory = new ConnectionFactory
{
	HostName = "localhost"
};

using IConnection connection = factory.CreateConnection();
using IModel channel = connection.CreateModel();

// Create the exchange
channel.ExchangeDeclare("logs", ExchangeType.Fanout);

// Create two queues
channel.QueueDeclare(
	queue: "myqueue1",
	durable: false,
	exclusive: false,
	autoDelete: false,
	arguments: null
	);
channel.QueueDeclare(
	queue: "myqueue2",
	durable: false,
	exclusive: false,
	autoDelete: false,
	arguments: null
	);

channel.QueueBind(queue: "myqueue1", exchange: "logs", routingKey: string.Empty);
channel.QueueBind(queue: "myqueue2", exchange: "logs", routingKey: string.Empty);

int i = 0;
while (i < 10)
{
	channel.BasicPublish(
	exchange: "logs",
	routingKey: string.Empty,
	basicProperties: null,
	body: Encoding.UTF8.GetBytes($"测试{i}")
	);
	i++;
}
After pushing messages, each queue bound to the logs exchange will receive the same messages.

Note: Since exchanges do not store messages, when a new message queue
myqueue3is created to bind to thelogsexchange,myqueue3will only receive messages pushed after binding and cannot receive earlier messages.
There are the following types of exchanges:
- direct: Pass messages to queues based on the routing key.
- topic: More complex. Routes messages to one or more queues based on matching between message routing keys and the patterns used to bind queues to the exchange.
- headers: This article does not cover, so no explanation is given.
- fanout: Just binding is sufficient; routing does not need to be considered.
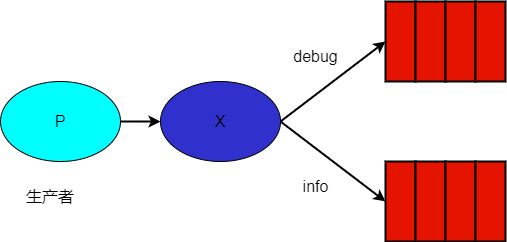
Direct
The direct exchange routes messages to different queues based on the routing key.
First, create multiple queues.
// Create two queues
channel.QueueDeclare(queue: "direct1");
channel.QueueDeclare(queue: "direct2");
Then, when binding the queues to the exchange, you need to set the routing key for the binding relationship.
// Bind the exchange using the routingKey
channel.QueueBind(exchange: "logs", queue: "direct1", routingKey: "debug");
channel.QueueBind(exchange: "logs", queue: "direct2", routingKey: "info");
Finally, when pushing messages, you need to specify the exchange name as well as the routing key.
// Specify the routingKey when sending a message
channel.BasicPublish(
exchange: "logs",
routingKey: "debug",
basicProperties: null,
body: Encoding.UTF8.GetBytes($"测试")
);
When messages are pushed to the logs exchange, the exchange routes the messages to the corresponding queues based on the routing key.
Here is the complete code example:
// Create the exchange
channel.ExchangeDeclare("logs", ExchangeType.Direct);

// Create two queues
channel.QueueDeclare(queue: "direct1");
channel.QueueDeclare(queue: "direct2");

// Bind the exchange using the routingKey
channel.QueueBind(exchange: "logs", queue: "direct1", routingKey: "debug");
channel.QueueBind(exchange: "logs", queue: "direct2", routingKey: "info");

// Specify the routingKey when sending a message
channel.BasicPublish(
exchange: "logs",
routingKey: "debug",
basicProperties: null,
body: Encoding.UTF8.GetBytes($"测试")
);
After starting, you will find that only the direct1 queue can receive messages because this is determined by the binding using routingKey=debug.
。

Fanout
As long as a queue is bound to an exchange, every exchange will receive the same message. Fanout will ignore the routingKey.
As shown in the code below:
// Create exchange
channel.ExchangeDeclare("logs1", ExchangeType.Fanout);

// Create two queues
channel.QueueDeclare(queue: "fanout1");
channel.QueueDeclare(queue: "fanout2");

// Bind exchange with routingKey
channel.QueueBind(exchange: "logs1", queue: "fanout1", routingKey: "debug");
channel.QueueBind(exchange: "logs1", queue: "fanout2", routingKey: "info");

// Send message, specify routingKey
channel.BasicPublish(
    exchange: "logs1",
    routingKey: "debug",
    basicProperties: null,
    body: Encoding.UTF8.GetBytes($"Test")
);

Topic
The Topic will look for queues that match the conditions based on the routingKey. The queue can use the . (dot), # (hash), and * (star) symbols for matching. The matching rules of Topic are quite flexible.
When binding the exchange after creating the queue, the routingKey uses expressions.
// Bind exchange using routingKey
channel.QueueBind(exchange: "logs3", queue: "topic1", routingKey: "red.#");
channel.QueueBind(exchange: "logs3", queue: "topic2", routingKey: "red.yellow.#");
When pushing messages, the routingKey needs to be set to the complete name.
// Send messages
channel.BasicPublish(
    exchange: "logs3",
    routingKey: "red.green",
    basicProperties: null,
    body: Encoding.UTF8.GetBytes($"Test")
);
First, the routingKey will be split by the . symbol.
For example, red.yellow.green will be split into three parts: [red, yellow, green].
If you want to match ambiguously on one part, you can use *. For example, red.*.green can match red.aaa.green, red.666.green.
The * can be used in any part, such as *.yellow.*, *.*.green.
The # can match multiple parts, for example, red.# can match red.a, red.a.a, red.a.a.a.
The complete code example is as follows:
// Create exchange
channel.ExchangeDeclare("logs3", ExchangeType.Topic);

// Create two queues
channel.QueueDeclare(queue: "topic1");
channel.QueueDeclare(queue: "topic2");

// Bind exchange using routingKey
channel.QueueBind(exchange: "logs3", queue: "topic1", routingKey: "red.#");
channel.QueueBind(exchange: "logs3", queue: "topic2", routingKey: "red.yellow.#");

// Send messages
channel.BasicPublish(
    exchange: "logs3",
    routingKey: "red.green",
    basicProperties: null,
    body: Encoding.UTF8.GetBytes($"Test")
);

channel.BasicPublish(
    exchange: "logs3",
    routingKey: "red.yellow.green",
    basicProperties: null,
    body: Encoding.UTF8.GetBytes($"Test")
);
Two messages were sent to the logs exchange, where the message with routingKey=red.green is matched by red.#, and thus forwarded to the topic1 queue.
Meanwhile, the message with routingKey=red.yellow.green can be matched by both queues, so both topic1 and topic2 can receive it.

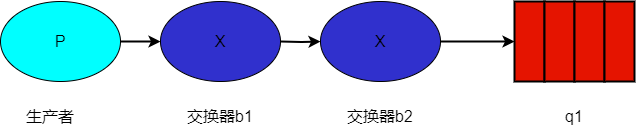
Exchange binding
An exchange can be bound to another exchange as well as to queues.
Example:
Binding b2 to b1 will allow b2 to receive messages from b1.
channel.ExchangeBind(destination: "b2", source: "b1", routingKey: string.Empty);
After binding, messages published to exchange b1 will be forwarded to exchange b2.
The complete example code is as follows:
ConnectionFactory factory = new ConnectionFactory
{
    HostName = "localhost"
};

using IConnection connection = factory.CreateConnection();
using IModel channel = connection.CreateModel();
channel.ExchangeDeclare(exchange: "b1", ExchangeType.Fanout);
channel.ExchangeDeclare(exchange: "b2", ExchangeType.Fanout);

// Since both are ExchangeType.Fanout,
// routingKey uses string.Empty.
channel.ExchangeBind(destination: "b2", source: "b1", routingKey: string.Empty);


// Create queue
channel.QueueDeclare(queue: "q1", durable: false, exclusive: false, autoDelete: false);
channel.QueueBind(queue: "q1", exchange: "b2", routingKey: string.Empty);

int i = 0;
while (i < 10)
{
    channel.BasicPublish(
        exchange: "b1",
        routingKey: string.Empty,
        basicProperties: null,
        body: Encoding.UTF8.GetBytes($"Test{i}")
    );
    i++;
}
Of course, both exchanges and queues can be bound to exchange b1.
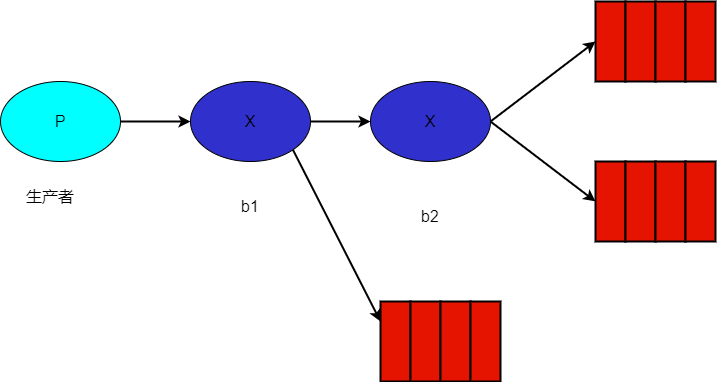
Moreover, two exchanges can be of different types. However, this can complicate the matching rules.
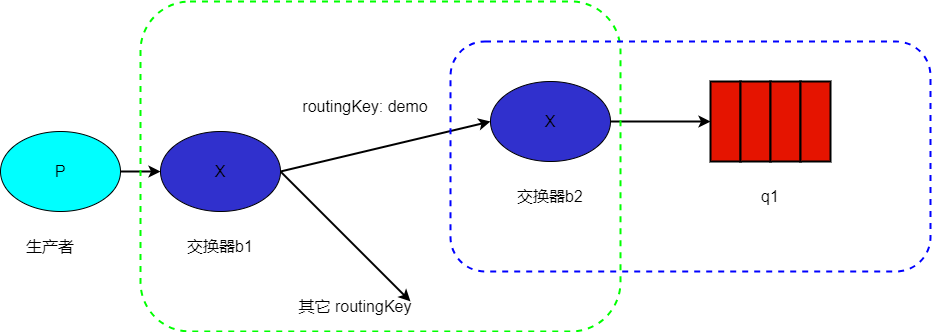
channel.ExchangeDeclare(exchange: "b1", ExchangeType.Direct);
channel.ExchangeDeclare(exchange: "b2", ExchangeType.Fanout);
We can understand that during the exchange binding, b2 is considered as a queue. When b1 is set to a Direct exchange, the routingKey must also be specified while binding the exchange.
channel.ExchangeBind(destination: "b2", source: "b1", routingKey: "demo");
The b2 exchange and queue q2 still remain in a Fanout relationship and are unaffected.
This means that b1 and b2 are related, and their mapping relationship does not affect others nor the next level.
The complete code example is as follows:
using RabbitMQ.Client;
using System.Text;

ConnectionFactory factory = new ConnectionFactory
{
    HostName = "localhost"
};

using IConnection connection = factory.CreateConnection();
using IModel channel = connection.CreateModel();
channel.ExchangeDeclare(exchange: "b1", ExchangeType.Direct);
channel.ExchangeDeclare(exchange: "b2", ExchangeType.Fanout);

// Since they are ExchangeType.Fanout,
// routingKey uses "demo".
channel.ExchangeBind(destination: "b2", source: "b1", routingKey: "demo");


// Create two queues
channel.QueueDeclare(queue: "q1", durable: false, exclusive: false, autoDelete: false);
channel.QueueBind(queue: "q1", exchange: "b2", routingKey: string.Empty);

int i = 0;
while (i < 10)
{
    channel.BasicPublish(
        exchange: "b1",
        routingKey: "demo",
        basicProperties: null,
        body: Encoding.UTF8.GetBytes($"Test{i}")
    );
    i++;
}
Consumer and Message Attributes
The consumer BasicConsume function is defined as follows:
BasicConsume(string queue,
            bool autoAck,
            string consumerTag,
            IDictionary<string, object> arguments,
            IBasicConsumer consumer)
Different subscription types use different consumer tags (consumerTag) to differentiate themselves. Consumers in the same channel (IModel) need to be distinguished by consumer tags, and by default, this does not need to be set.
queue: The name of the queue.autoAck: Specifies whether to automatically acknowledge.consumerTag: The consumer tag used to distinguish multiple consumers.arguments: Sets other parameters for the consumer.
Previously, we used EventingBasicConsumer to create a consumer program for the IBasicConsumer interface, which includes the following events:
public event EventHandler<BasicDeliverEventArgs> Received;
public event EventHandler<ConsumerEventArgs> Registered;
public event EventHandler<ShutdownEventArgs> Shutdown;
public event EventHandler<ConsumerEventArgs> Unregistered;
These events will be triggered during different stages of message processing.
Consumer programs can operate in two modes: push and pull. The code mentioned earlier is in push mode, where RabbitMQ automatically pushes new messages to the consumer program.
var consumer = new EventingBasicConsumer(channel);
consumer.Received += (model, ea) =>
{
    var message = Encoding.UTF8.GetString(ea.Body.Span);
    Console.WriteLine($" [x] Received {message}");
    channel.BasicAck(deliveryTag: ea.DeliveryTag, multiple: false);
};

// Start consuming
channel.BasicConsume(queue: "myqueue5",
                     autoAck: false,
                     consumer: consumer,
                     consumerTag: "demo");
If using the pull mode (the BasicGet() function), it will return null when there are no messages in the RabbitMQ Broker's queue.
// Start consuming
while (true)
{
    var result = channel.BasicGet(queue: "q1", autoAck: false);

    // If no message is pulled
    if (result == null)
    {
        // Avoid infinite pulling when there is no message
        Thread.Sleep(100);
        continue;
    }

    Console.WriteLine(Encoding.UTF8.GetString(result.Body.Span));
    channel.BasicAck(deliveryTag: result.DeliveryTag, multiple: false);
}
When using BasicGet() to manually pull messages, this program does not exist as a consumer program, meaning it will not be visible in RabbitMQ's Consumer.
Under both push and pull modes, when acknowledging messages, there is a multiple parameter.
- If
multipleis set tofalse, only the message with the specifieddeliveryTagwill be acknowledged. - If
multipleis set totrue, all messages withdeliveryTagsmaller than the specified one and not yet acknowledged will be acknowledged.
The message's deliveryTag property is of type ulong and indicates the message's offset, starting from
1.....
When receiving messages in bulk and processing them, you can use multiple to acknowledge a group of messages instead of acknowledging them one by one, which can improve efficiency.
Qos, Reject Reception
The consumer program can set QoS.
channel.BasicQos(prefetchSize: 10, prefetchCount: 10, global: false);
prefetchSize: This parameter indicates the upper limit of the total size of unacknowledged messages that the consumer can receive; setting it to 0 means there is no limit.
prefetchCount: This method sets the maximum number of unacknowledged messages that the consumer client can receive. This configuration is similar to the concept of a sliding window.
The global parameter is special.
When global is false, only the new consumers need to comply with the rules.
If global is true, all consumers in the same IConnection will change the configuration.
// Not affected
// var result = channel.BasicConsume(queue: "q1", autoAck: false,... ...);

channel.BasicQos(prefetchSize: 0, prefetchCount: 10, global: false);

// New consumers are affected
// var result = channel.BasicConsume(queue: "q1", autoAck: false,... ...);
When a message is received, if you need to explicitly reject it, you can use BasicReject, which will remove the message from the queue.
BasicReject()will trigger the dead letter message.
while (true)
{
    var result = channel.BasicGet(queue: "q1", autoAck: false);
    if (result == null) continue;

    Console.WriteLine(Encoding.UTF8.GetString(result.Body.Span));
    channel.BasicReject(deliveryTag: result.DeliveryTag, requeue: true);
}
If the requeue parameter is set to true, RabbitMQ will put this message back into the queue so that it can be sent to the next subscribing consumer, or so that this program can receive it again after restart.
If requeue is set to false, RabbitMQ will immediately remove the message from the queue without sending it to any new consumers.
To reject messages in bulk.
channel.BasicNack(deliveryTag: result.DeliveryTag, multiple: true, requeue: true);
When multiple is true, it means rejecting all unacknowledged messages with deliveryTag numbers less than the current one for the current consumer.
The BasicRecover() method is used to retrieve unacknowledged messages from RabbitMQ.
When requeue=true, unacknowledged messages will be re-added to the queue, and for the same message, it will be given to other consumers.
When requeue=false, the same message will go to the same consumer as before.
channel.BasicRecover(requeue: true);
// Asynchronous
channel.BasicRecoverAsync(requeue: true);
Message Acknowledgment Mode
As mentioned earlier, when autoAck=false, although the message has not been acknowledged, RabbitMQ will still move on to the next message.
In order to ensure the order of messages, automatic consumption of the next message is not allowed until the current message has been fully processed.
This can be configured using BasicQos:
channel.BasicQos(prefetchSize: 0, prefetchCount: 1, global: false);
ConnectionFactory factory = new ConnectionFactory
{
	HostName = "localhost"
};

using IConnection connection = factory.CreateConnection();
using IModel channel = connection.CreateModel();

// Create an exchange
channel.ExchangeDeclare("acktest", ExchangeType.Fanout);

// Create two queues
channel.QueueDeclare(queue: "myqueue5");

// Bind the queue to the exchange using routingKey
channel.QueueBind(exchange: "acktest", queue: "myqueue5", routingKey: string.Empty);

int i = 0;
while (i < 10)
{
	// Send messages
	channel.BasicPublish(
	exchange: "acktest",
	routingKey: string.Empty,
	basicProperties: null,
	body: Encoding.UTF8.GetBytes($"Test")
	);
	i++;
}

// Cannot consume the next message until the current one is acknowledged
channel.BasicQos(prefetchSize: 0, prefetchCount: 1, global: false);

var consumer = new EventingBasicConsumer(channel);
consumer.Received += (model, ea) =>
{
	var message = Encoding.UTF8.GetString(ea.Body.Span);
	Console.WriteLine($" [x] Received {message}");
	// channel.BasicAck(deliveryTag: ea.DeliveryTag, multiple: false);
};

// Start consuming
channel.BasicConsume(queue: "myqueue5",
					 autoAck: false,
					 consumer: consumer);
After executing the code above, you will find that when the first message is not acknowledged, the program will not automatically read the next message, nor will it re-fetch the unacknowledged message.
If we want to re-read the unacknowledged message, we can restart the program or use BasicRecover() to let the server re-push it.
Message Persistence
The definition of the BasicPublish function has been mentioned earlier:
BasicPublish(string exchange,
             string routingKey,
             bool mandatory = false,
             IBasicProperties basicProperties = null,
             ReadOnlyMemory<byte> body = default)
When mandatory = true is set, if the exchange cannot find a conforming queue based on its type and routing key, RabbitMQ triggers the client’s IModel.BasicReturn event to return the message to the producer.
From a design perspective, although an IConnection can create multiple IModel (channels), it is only recommended to write one consumer or producer program and not mix them.
This is because various events and queue configurations are set for a single IModel (channel).
using IConnection connection = factory.CreateConnection();
using IModel channel = connection.CreateModel();
channel.BasicReturn += (object sender, BasicReturnEventArgs e) =>
{

};
When mandatory = true is set, if the message cannot find a queue to store it, the client’s BasicReturn event will be triggered to receive the message that failed BasicPublish.
The complete example code is as follows:
using RabbitMQ.Client;
using RabbitMQ.Client.Events;
using System.Runtime;
using System.Text;

ConnectionFactory factory = new ConnectionFactory
{
	HostName = "localhost"
};

using IConnection connection = factory.CreateConnection();
using IModel channel = connection.CreateModel();

channel.ExchangeDeclare(exchange: "e2", type: ExchangeType.Fanout, durable: false, autoDelete: false);

channel.BasicReturn += (object? s, BasicReturnEventArgs e) =>
{
	Console.WriteLine($"Invalid message: {Encoding.UTF8.GetString(e.Body.Span)}");
};

int i = 0;
while (i < 10)
{
	channel.BasicPublish(
	exchange: "e2",
	routingKey: string.Empty,

	// mandatory=true, triggers BasicReturn event when no queue receives the message
	mandatory: true,
	basicProperties: null,
	body: Encoding.UTF8.GetBytes($"Test{i}")
	);
	i++;
}

Console.ReadLine();
In actual development, when mandatory=false, if a message is pushed to an exchange but no queue is bound, that message will be lost, which can lead to serious consequences.
In RabbitMQ, there is a solution called alternate exchanges, which is implemented by adding the alternate-exchange parameter when defining the exchange. Its function is to forward messages to queue B when exchange A cannot find a queue to forward messages to.
The complete code example is as follows:
First, create the e3_bak queue, then create the e3 exchange setting its alternate exchange to e3_bak.
Then, e3_bak must bind to a queue to consume messages.
ConnectionFactory factory = new ConnectionFactory
{
	HostName = "localhost"
};

using IConnection connection = factory.CreateConnection();
using IModel channel = connection.CreateModel();

channel.ExchangeDeclare(
	exchange: "e3_bak",
	type: ExchangeType.Fanout,
	durable: false,
	autoDelete: false
	);

// Declare e3 exchange; when e3 does not have a bound queue, messages will be forwarded to e3_bak
channel.ExchangeDeclare(
	exchange: "e3",
	type: ExchangeType.Fanout,
	durable: false,
	autoDelete: false,
	arguments: new Dictionary<string, object> {
		{ "alternate-exchange", "e3_bak" }
	}
	);

channel.QueueDeclare(queue: "q3", durable: false, exclusive: false, autoDelete: false);
channel.QueueBind(queue: "q3", "e3_bak", routingKey: string.Empty);

// Since e3 already has a backup exchange set, BasicReturn will not be triggered
channel.BasicReturn += (object? s, BasicReturnEventArgs e) =>
{
	Console.WriteLine($"Invalid message: {Encoding.UTF8.GetString(e.Body.Span)}");
};

int i = 0;
while (i < 10)
{
	channel.BasicPublish(
	exchange: "e3",
	routingKey: string.Empty,
	// With e3 backup exchange set, this will not trigger BasicReturn
	mandatory: true,
	basicProperties: null,
	body: Encoding.UTF8.GetBytes($"Test{i}")
	);
	i++;
}

Console.ReadLine();
Note that if the backup exchange does not have any bound queue, then the message will be lost.
If e3 is Direct and e3_bak is also Direct, both must have the same routingKey. If e3 has a routingKey of cat but e3_bak does not have a corresponding routingKey, then the message will still be lost. There are other situations that will not be elaborated here.
When pushing messages, there is an IBasicProperties basicProperties property. As mentioned in the previous section, when IBasicProperties.DeliveryMode=2, the message will be marked as persistent, meaning that even if the RabbitMQ server restarts, the message will not be lost.
Relatively speaking, through previous experiments, you can observe that after the client has consumed all messages in the queue, those messages disappear from the queue. Whereas in Kafka, messages in a topic are retained even after consumption. This is an important point; when using RabbitMQ, you need to set up message persistence in advance to avoid message loss during consumption or failed consumption.
When a producer pushes a message, it can set the message as persistent using IBasicProperties.DeliveryMode=2.
	var ps = channel.CreateBasicProperties();
	ps.DeliveryMode = 2;

	channel.BasicPublish(
	exchange: "e3",
	routingKey: string.Empty,
	mandatory: false,
	basicProperties: ps,
	body: Encoding.UTF8.GetBytes($"Test{i}")
	);
Message TTL Time
After setting the message TTL time, if the message is not consumed within a certain time, it becomes a dead-letter message. There are generally two handling scenarios for such messages.
First, if the queue is set with "x-dead-letter-exchange", then the message will be forwarded to another exchange. This method will be introduced in the dead letter exchange section.
Second, the message will be discarded.
Currently, there are two methods to set the message TTL.
The first method is to set through queue attributes, so that all messages in the queue have the same expiration time.
The second method is to set for individual messages, allowing different TTLs for each message.
If both settings are used together, the TTL of the message is based on the smaller of the two values. Once the lifetime of a message in the queue exceeds the set TTL value, the consumer will no longer receive that message, so it is best to set a dead-letter exchange.
For the first method, setting the queue:
channel.QueueDeclare(queue: "q4",
	durable: false,
	exclusive: false,
	autoDelete: false,
	arguments: new Dictionary<string, object>() { { "x-message-ttl", 6000 } });
The second method sets the expiration time for the message through properties.
var ps = channel.CreateBasicProperties();
// Unit in milliseconds
ps.Expiration = "6000";
For the first method of setting queue attributes, once the message expires, it will be removed from the queue (if a dead-letter exchange is set, it will be forwarded to the dead-letter exchange). In the second method, even if the message expires, it will not be immediately removed from the queue, because the expiration check will only occur just before the message is delivered to the consumer. For this second case, the message will only be truly removed when any polling operation occurs on the queue.
In the second case, although the message is removed only during polling when it has expired, once it expires, it will be forwarded to the dead-letter queue but will not be immediately removed.
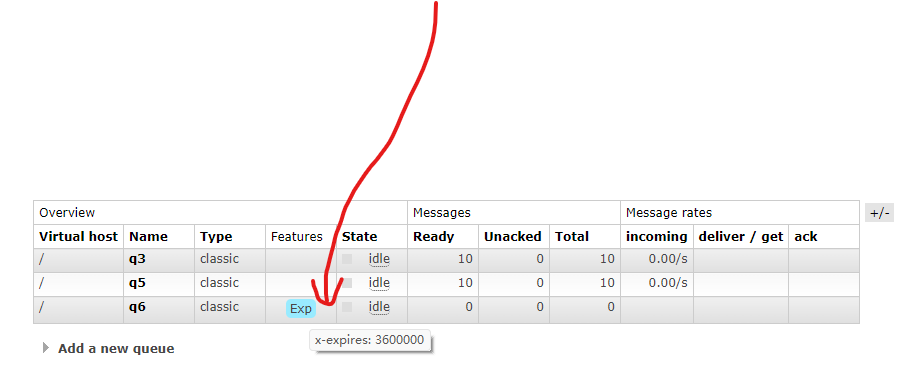
Queue TTL Time
When a TTL is set on a queue, if the queue has not been used within the specified time, it will be deleted. This constraint includes a period during which no messages were consumed (including consumed via BasicGet()), no re-declaration occurred, and there were no consumer connections; otherwise, the countdown will be reset.
channel.QueueDeclare(queue: "q6",
	durable: false,
	exclusive: false,
	autoDelete: false,
	arguments: new Dictionary<string, object>
	{
		// Unit is milliseconds, setting queue expiration time to 1 hour
		{"x-expires",1*3600*1000}
	});
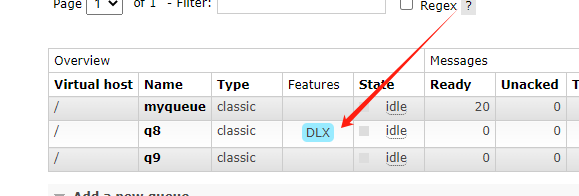
DLX Dead-Letter Exchange
DLX (Dead-Letter-Exchange) allows messages that become dead letters in queue A to be sent to another exchange B. Queue A is bound to the dead-letter exchange, so you will see the DLX tag in the Management UI, while exchange B can be a normal exchange without special configuration.
Messages generally become dead letters due to the following situations:
- The message is rejected by the consumer through
BasicReject()orBasicNack(). - The message has expired.
- The queue has reached its maximum length.
When there are dead-letter messages in queue A, RabbitMQ will automatically re-publish that message to the configured exchange B. Typically, a dedicated dead-letter exchange B is set for important queues, and exchange B must also bind a queue C; otherwise, the message will still be lost.
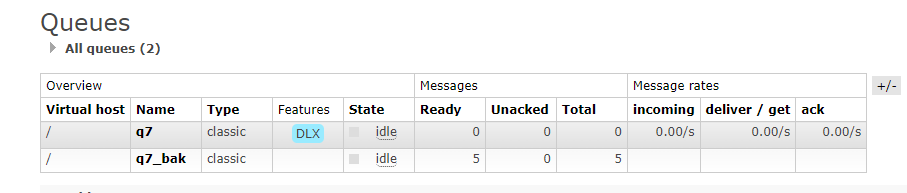
To set which exchange to forward messages to when there are dead-letter messages in the queue:
channel.QueueDeclare(queue: "q7", durable: false, exclusive: false, autoDelete: false,
		arguments: new Dictionary<string, object> {
		{ "x-dead-letter-exchange", "e7_bak" } });
The complete sample code is as follows:
using RabbitMQ.Client;
using RabbitMQ.Client.Events;
using System.Text;

ConnectionFactory factory = new ConnectionFactory
{
	HostName = "localhost"
};

using IConnection connection = factory.CreateConnection();
using IModel channel = connection.CreateModel();

channel.ExchangeDeclare(
	exchange: "e7_bak",
	type: ExchangeType.Fanout,
	durable: false,
	autoDelete: false
	);

channel.QueueDeclare(queue: "q7_bak", durable: false, exclusive: false, autoDelete: false);
channel.QueueBind(queue: "q7_bak", "e7_bak", routingKey: string.Empty);

channel.ExchangeDeclare(
	exchange: "e7",
	type: ExchangeType.Fanout,
	durable: false,
	autoDelete: false
	);

channel.QueueDeclare(queue: "q7", durable: false, exclusive: false, autoDelete: false,
		arguments: new Dictionary<string, object> {
		{ "x-dead-letter-exchange", "e7_bak" } });

channel.QueueBind(queue: "q7", "e7", routingKey: string.Empty);

int i = 0;
while (i < 10)
{
	channel.BasicPublish(
	exchange: "e7",
	routingKey: string.Empty,
	mandatory: false,
	basicProperties: null,
	body: Encoding.UTF8.GetBytes($"Test{i}"));
	i++;
}

Thread.Sleep(1000);

int y = 0;
// Define consumer
channel.BasicQos(0, prefetchCount: 1, true);
var consumer = new EventingBasicConsumer(channel);
consumer.Received += (model, ea) =>
{
	var message = Encoding.UTF8.GetString(ea.Body.Span);
	Console.WriteLine($" [x] Received {message}");

	if (y % 2 == 0)
		channel.BasicAck(deliveryTag: ea.DeliveryTag, multiple: false);

	// requeue must be set to false,
	// otherwise, this message will be put back in the queue again after rejection
	else
		channel.BasicReject(deliveryTag: ea.DeliveryTag, requeue: false);
	Interlocked.Add(ref y, 1);
};

// Start consuming
channel.BasicConsume(queue: "q7",
					 autoAck: false,
					 consumer: consumer);

Console.ReadLine();
Delay Queue
RabbitMQ does not directly support delay queue functionality.
So why does a delay queue exist?
The main reason is that after a message is pushed, it should not be consumed immediately. For example, if a user places an order and does not pay within 10 minutes, the order will be automatically canceled. Therefore, a delayed consumption feature for messages is needed.
In other words, the actual requirement is that the message can only be consumed by the consumer after a certain time.
To implement this functionality in RabbitMQ, two exchanges and at least two queues are needed.
The idea is to define two exchanges e8 and e9, and two queues q8 and q9, binding exchange e8 to queue q8, and exchange e9 to q9.
The most important point is that q9 is set up as a dead-letter queue. When the TTL of the message expires, it is forwarded to exchange e9. Therefore, the messages received by the e9 exchange - q9 queue are those that have expired.
When sending messages to the e8 exchange, set the TTL. When the messages in the q8 queue expire, they will be forwarded to the e9 exchange and stored in the q9 queue.
The consumer only needs to subscribe to the q9 queue to consume the expired messages.
Here is a complete example of the code:
using RabbitMQ.Client;
using RabbitMQ.Client.Events;
using System.Text;

ConnectionFactory factory = new ConnectionFactory
{
	HostName = "localhost"
};

using IConnection connection = factory.CreateConnection();
using IModel channel = connection.CreateModel();

channel.ExchangeDeclare(
	exchange: "e8",
	type: ExchangeType.Fanout,
	durable: false,
	autoDelete: false
	);

channel.ExchangeDeclare(
	exchange: "e9",
	type: ExchangeType.Fanout,
	durable: false,
	autoDelete: false
	);

channel.QueueDeclare(queue: "q9", durable: false, exclusive: false, autoDelete: false);
channel.QueueBind(queue: "q9", "e9", routingKey: string.Empty);

channel.QueueDeclare(queue: "q8", durable: false, exclusive: false, autoDelete: false,
		arguments: new Dictionary<string, object> {
		{ "x-dead-letter-exchange", "e9" } });

channel.QueueBind(queue: "q8", "e8", routingKey: string.Empty);

int i = 0;
while (i < 10)
{
	var ps = channel.CreateBasicProperties();
	ps.Expiration = "6000";

	channel.BasicPublish(
	exchange: "e8",
	routingKey: string.Empty,
	mandatory: false,
	basicProperties: ps,
	body: Encoding.UTF8.GetBytes($"Test{i}")
	);
	i++;
}


var consumer = new EventingBasicConsumer(channel);
consumer.Received += (model, ea) =>
{
	var message = Encoding.UTF8.GetString(ea.Body.Span);
	Console.WriteLine($" [x] Expired message {message}");
};

// Start consuming
channel.BasicConsume(queue: "q9",
					 autoAck: true,
					 consumer: consumer);

Console.ReadLine();
Message Priority
Higher priority messages will be consumed faster by consumers.
Here is an example code:
var ps = channel.CreateBasicProperties();
// Priority 0-9
ps.Priority = 9;

	channel.BasicPublish(
	exchange: "e8",
	routingKey: string.Empty,
	mandatory: false,
	basicProperties: ps,
	body: Encoding.UTF8.GetBytes($"Test{i}")
	);
Thus, RabbitMQ does not guarantee message order, which is different from Kafka.
Transaction Mechanism
The transaction mechanism ensures that publishers confirm that messages will be pushed to the RabbitMQ Broker and is often used together with business code.
For example, after a user successfully pays, a notification will be pushed to the RabbitMQ queue.
The database must also handle transactions so that any modifications made in case of payment failure will be rolled back. However, the problem arises if the message has already been pushed, but the database rolls back.
This situation introduces consistency issues, which can be managed using RabbitMQ’s transaction mechanism, similar to database transaction processes, including commit and rollback operations.
The goal is to ensure that messages are successfully pushed to the RabbitMQ Broker and maintain data consistency with other client code, where message pushing and code operations succeed or fail simultaneously.
Here is the complete example code:
ConnectionFactory factory = new ConnectionFactory
{
	HostName = "localhost"
};

using IConnection connection = factory.CreateConnection();
using IModel channel = connection.CreateModel();

// Client sends Tx.Select to set the channel to transaction mode;
channel.TxSelect();

try
{
	// Send message
	channel.QueueDeclare(queue: "transaction_queue",
						 durable: false,
						 exclusive: false,
						 autoDelete: false,
						 arguments: null);

	string message = "Hello, RabbitMQ!";
	var body = Encoding.UTF8.GetBytes(message);

	channel.BasicPublish(exchange: "",
						 routingKey: "transaction_queue",
						 basicProperties: null,
						 body: body);


	// Execute a series of operations

	// Commit transaction
	channel.TxCommit();
	Console.WriteLine($" [x] Sent '{message}'");
}
catch (Exception e)
{
	// Rollback transaction
	channel.TxRollback();
	Console.WriteLine("An error occurred: " + e.Message);
}

Console.ReadLine();
Publisher Confirms Mechanism
The publisher confirms mechanism is a solution to ensure messages are pushed to RabbitMQ.
In contrast, a transaction mechanism is generally used to guarantee consistency, ensuring that message pushing and other operations succeed or fail at the same time, without inconsistency.
Here is the complete example code:
using IConnection connection = factory.CreateConnection();
using IModel channel = connection.CreateModel();

// Turn on publisher confirmation mode
channel.ConfirmSelect();

string exchangeName = "exchange_name";
string routingKey = "routing_key";

// Define the exchange
channel.ExchangeDeclare(exchange: exchangeName, type: ExchangeType.Direct);

// Send message
string message = "Hello, RabbitMQ!";
var body = Encoding.UTF8.GetBytes(message);

// Publish message
channel.BasicPublish(exchange: exchangeName,
					 routingKey: routingKey,
					 basicProperties: null,
					 body: body);

// Wait for confirmation that the message has been pushed to RabbitMQ
if (channel.WaitForConfirms())
{
	Console.WriteLine($" [x] Sent '{message}'");
}
else
{
	Console.WriteLine("Message delivery failed.");
}

Console.ReadLine();
The article ends here, exactly at ten thousand words.
For topics such as RabbitMQ clustering, operation, and maintenance, this article will not elaborate further.

文章评论