demo repository address: https://github.com/whuanle/yolo8_demo
Ultralytics YOLOv8 is a highly praised real-time object detection and image segmentation model, mainly featuring object recognition, segmentation of image objects, classification, pose recognition, and tracking, among others. Ultralytics supports training on both CPU and GPU, compatible with architectures such as x64 and arm64, and supports Apple’s M1/M2 chip, allowing for training and usage on edge devices.
Ultralytics is free for individuals under the [AGPL-3.0 license] and requires payment for enterprises.
Ultralytics is the name of the framework, while YOLOv8 refers to the version number of the model provided by the framework, which includes various models for different purposes. Typically, we select official models for training.
The object recognition capability of Ultralytics YOLOv8 is powerful, as seen in the figure below, which accurately identifies a made-up woman as a person, and even recognizes the bed.

When using Ultralytics, the process generally involves the following steps:
- Train mode: Fine-tune your model on a custom or preloaded dataset.
- Val mode: Validate the model’s performance after training.
- Predict mode: Release the model’s prediction capabilities on real-world data.
- Export mode: Prepare the model in various formats for deployment in a production environment.
- Track mode: Extend your object detection model to real-time tracking applications.
- Benchmark mode: Analyze the speed and accuracy of the model across different deployment environments.
Thus, this article will also follow this order to explain step by step.
Install Ultralytics
Generally, you can directly install it using pip.
# Install the ultralytics package from PyPI
pip install ultralytics
The installation methods in the official documentation are the most detailed, and other installation methods can refer directly to the official documentation.
Official installation documentation: https://docs.ultralytics.com/zh/quickstart/#ultralytics
After installing ultralytics, you can import YOLO from ultralytics in your project:
from ultralytics import YOLO
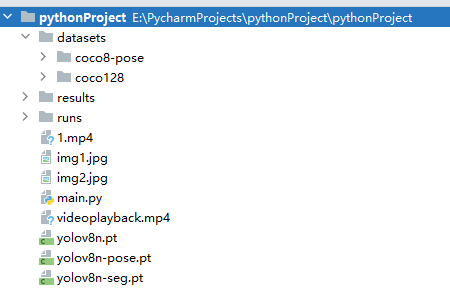
Ultralytics defaults to reading and writing the dataset and training models from the running directory, which can get disorganized.
You can modify the configuration at startup:
# Core model and training module
from ultralytics import YOLO
# Setting module
from ultralytics import settings

# Update settings
settings.update({'runs_dir': './', 'tensorboard': False})
Settings can also export configurations or load them from a file:
    def load(self):
        """Loads settings from the YAML file."""
        super().update(yaml_load(self.file))

    def save(self):
        """Saves the current settings to the YAML file."""
        yaml_save(self.file, dict(self))

    def update(self, *args, **kwargs):
        """Updates a setting value in the current settings."""
        super().update(*args, **kwargs)
        self.save()

    def reset(self):
        """Resets the settings to default and saves them."""
        self.clear()
        self.update(self.defaults)
        self.save()
All configurable settings in settings are as follows:
| Name | Example value | Data type | Description |
| :----------------- | :--------------------- | :------- | :---------------------------------- |
| settings_version | '0.0.4' | str | Ultralytics settings version |
| datasets_dir | '/path/to/datasets' | str | Directory to store datasets |
| weights_dir | '/path/to/weights' | str | Directory to store model weights |
| runs_dir | '/path/to/runs' | str | Directory to store experiment runs |
| uuid | 'a1b2c3d4' | str | Unique identifier for the current settings |
| sync | True | bool | Whether to sync analysis and crashes to HUB |
| api_key | '' | str | Ultralytics HUB API Key |
| clearml | True | bool | Whether to use ClearML tracking |
| comet | True | bool | Whether to use Comet ML for experiment tracking and visualization |
| dvc | True | bool | Whether to use DVC for experiment tracking and version control |
| hub | True | bool | Whether to use Ultralytics HUB integration |
| mlflow | True | bool | Whether to use MLFlow for experiment tracking |
| neptune | True | bool | Whether to use Neptune for experiment tracking |
| raytune | True | bool | Whether to use Ray Tune for hyperparameter tuning |
| tensorboard | True | bool | Whether to use TensorBoard for visualization |
| wandb | True | bool | Whether to use Weights & Biases for logging |
Training
Common file formats in Ultralytics include two types: model files ending with .pt and dataset files ending with .yaml.
You can train based on official models, or train from existing models, or even train your own model without any pre-existing model.
If you already have a model, there is no need to train again.
The demo in the official documentation is as follows:
The following code cannot be executed directly.
from ultralytics import YOLO

# Load a model
model = YOLO('yolov8n.yaml')  # Create a new model from YAML
model = YOLO('yolov8n.pt')    # Load a pre-trained model (recommended for training)
model = YOLO('yolov8n.yaml').load('yolov8n.pt')  # Create from YAML and transfer weights

# Train the model
results = model.train(data='coco128.yaml', epochs=100, imgsz=640)
The official
yolov8n.ptmodel andcoco128.yamldataset mainly contain images of people, animals, and common objects that can be used for object recognition.If you choose to use the official model, the first time you use it, it will automatically download
yolov8n.ptto the directory where the code is located.
Let’s first look at the parameters of the .train() method when training a model. epochs indicates how many rounds of training, generally 10 rounds are sufficient; 100 rounds take an extremely long time! imgsz indicates the image size. If the image sizes in the dataset are too large, you can reduce the pixel size appropriately; the official dataset image size is 640x480, which is already resized beforehand.
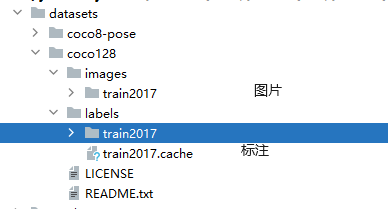
coco128.yaml is a dataset provided by the official sources with 128 images. On the first run of the program, it will automatically pull the dataset from the official repository and store it under datasets/coco128, which contains some images and annotations. Of course, we can also obtain more datasets from the open-source community, as well as create our own datasets for training the model.
Now returning to loading the model.
We can train a model from scratch using the official configuration file:
from ultralytics import YOLO

# Load a model
model = YOLO('yolov8n.yaml')  # Create a new model from YAML

# Train the model
results = model.train(data='coco128.yaml', epochs=10, imgsz=640)
Due to the author's use of an AMD 5600G with an integrated GPU, the training is particularly slow.
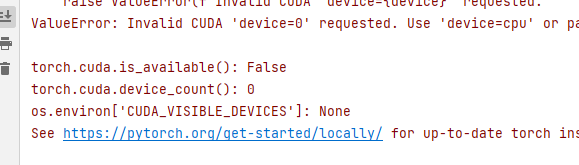
If you have specific multiple devices, you can specify when training:
results = model.train(data='coco128.yaml', epochs=10, imgsz=640, device=0)If not specified, the framework will automatically select the GPU.
The author is possibly using CPU for training due to the AMD CPU, which slows down the process.
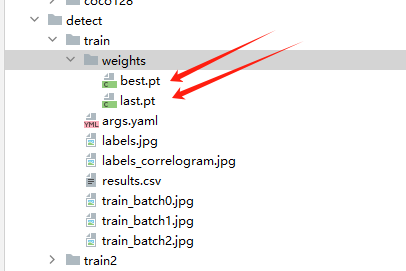
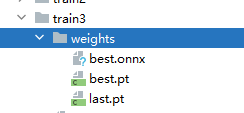
The trained model will be stored in the detect directory. The models trained in the other two ways will also be stored in the same directory.
We can also import an existing model:
# Load the official pre-trained model
# model = YOLO('yolov8n.pt')
# Trained model
model = YOLO('detect/train/weights/best.pt')
When using .train() to train the model, many parameters can be passed. A complete parameter description is as follows:
| Key | Value | Description |
| :----------------- | :------- | :---------------------------------------------------------- |
| model | None | Model file path, e.g., yolov8n.pt, yolov8n.yaml |
| data | None | Data file path, e.g., coco128.yaml |
| epochs | 100 | Number of training epochs |
| patience | 50 | Waiting epochs for early stopping |
| batch | 16 | Number of images per batch (-1 for automatic batch size) |
| imgsz | 640 | Input image size, represented as an integer |
| save | True | Save training checkpoint and prediction results |
| save_period | -1 | Save checkpoints every x epochs (disabled if <1) |
| cache | False | True/ram, disk or False
| 参数 | 默认值 | 描述 |
|------------------|------------|------------------------------------------------------------|
| cache | False | 使用缓存加载数据 |
| device | None | 运行设备,例如 cuda device=0 或 device=0,1,2,3 或 device=cpu |
| workers | 8 | 数据加载的工作线程数(如果DDP则为每个RANK) |
| project | None | 项目名称 |
| name | None | 实验名称 |
| exist_ok | False | 是否覆盖现有实验 |
| pretrained | True | (bool 或 str) 是否使用预训练模型(bool)或从中加载权重的模型(str) |
| optimizer | 'auto' | 使用的优化器,选择范围=[SGD, Adam, Adamax, AdamW, NAdam, RAdam, RMSProp, auto] |
| verbose | False | 是否打印详细输出 |
| seed | 0 | 随机种子,用于可重复性 |
| deterministic | True | 是否启用确定性模式 |
| single_cls | False | 将多类数据作为单类训练 |
| rect | False | 矩形训练,每批为最小填充整合 |
| cos_lr | False | 使用余弦学习率调度器 |
| close_mosaic | 10 | (int) 最后轮次禁用马赛克增强(0为禁用) |
| resume | False | 从最后检查点恢复训练 |
| amp | True | 自动混合精度(AMP)训练,选择范围=[True, False] |
| fraction | 1.0 | 训练的数据集比例(默认为1.0,即训练集中的所有图像) |
| profile | False | 在训练期间为记录器分析ONNX和TensorRT速度 |
| freeze | None | (int 或 list, 可选) 在训练期间冻结前n层,或冻结层索引列表 |
| lr0 | 0.01 | 初始学习率(例如 SGD=1E-2, Adam=1E-3) |
| lrf | 0.01 | 最终学习率 (lr0 * lrf) |
| momentum | 0.937 | SGD动量/Adam beta1 |
| weight_decay | 0.0005 | 优化器权重衰减5e-4 |
| warmup_epochs | 3.0 | 热身轮次(小数ok) |
| warmup_momentum| 0.8 | 热身初始动量 |
| warmup_bias_lr | 0.1 | 热身初始偏差lr |
| box | 7.5 | 框损失增益 |
| cls | 0.5 | cls损失增益(根据像素缩放) |
| dfl | 1.5 | dfl损失增益 |
| pose | 12.0 | 姿态损失增益(仅限姿态) |
| kobj | 2.0 | 关键点obj损失增益(仅限姿态) |
| label_smoothing| 0.0 | 标签平滑(小数) |
| nbs | 64 | 标称批大小 |
| overlap_mask | True | 训练期间掩码应重叠(仅限分割训练) |
| mask_ratio | 4 | 掩码降采样比率(仅限分割训练) |
| dropout | 0.0 | 使用dropout正则化(仅限分类训练) |
| val | True | 训练期间验证/测试 |
Model Validation
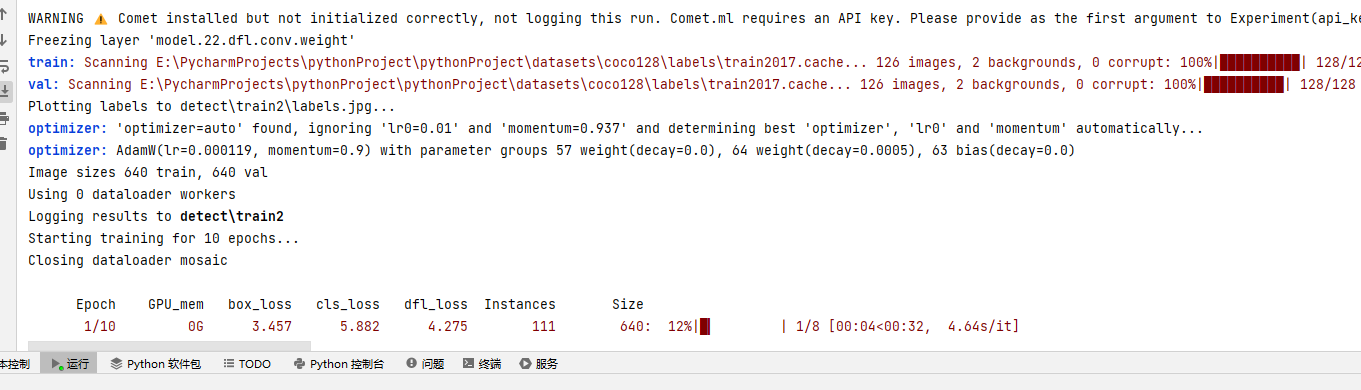
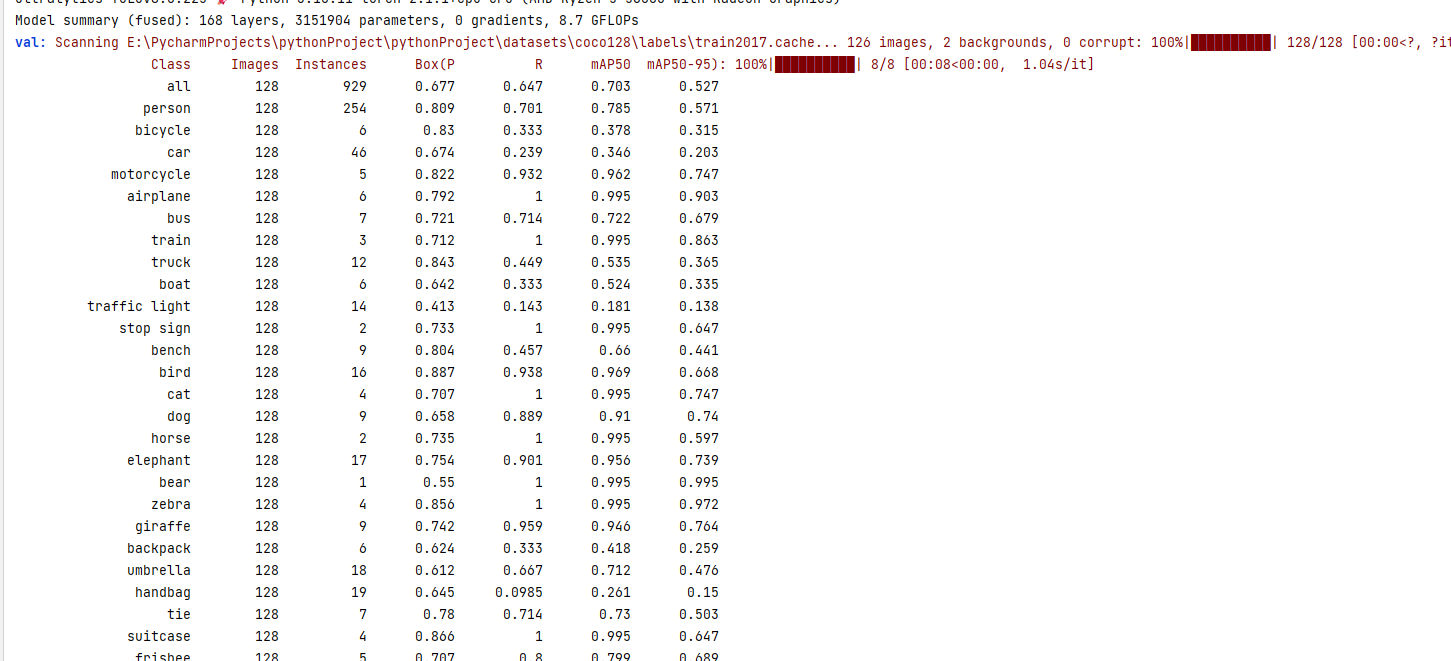
In the previous section, we trained using the official coco128.yaml dataset with 128 images. After the training is complete, we need to perform model validation to verify the accuracy of the trained model on the coco128.yaml dataset.
Additionally, the dataset is divided into several types:
- Training Set: Used to train and adjust model parameters.
- Validation Set: Used to validate model accuracy and adjust model parameters.
- Test Set: Used to verify the model's generalization ability.
For the model validation part, the official documentation does not provide much description. Meanwhile, this article serves as an introductory piece, so we will not delve into these details. We only need to remember to add the model validation code template to our self-trained models.
The template for validating an already trained model is as follows:
from ultralytics import YOLO

# Load the trained model
model = YOLO('detect/train3/weights/best.pt')

# Validate the model
metrics = model.val()  # No parameters needed, dataset and settings are remembered
metrics.box.map    # map50-95
metrics.box.map50  # map50
metrics.box.map75  # map75
metrics.box.maps   # Contains map50-95 list for each class
Typically, validation is performed immediately after training:
from ultralytics import YOLO

model = YOLO('yolov8n.pt')  # Load pre-trained model (recommended for training)

# Train the model
results = model.train(data='coco128.yaml', epochs=10, imgsz=640)

# Validate the model
metrics = model.val()  # No parameters needed, dataset and settings are remembered
metrics.box.map    # map50-95
metrics.box.map50  # map50
metrics.box.map75  # map75
metrics.box.maps   # Contains map50-95 list for each class
Validation Results:
As mentioned earlier, the coco128.yaml dataset mainly consists of images of people, animals, and common objects, hence the console lists the recognition validation results for each label (person, car, etc.).
Of course, as we are at the introductory stage, this information is not very beneficial to us.
Prediction & Recognition
We have arrived at the exciting stage, where we can use existing models or official models to recognize images.
You can download and save the following two images:

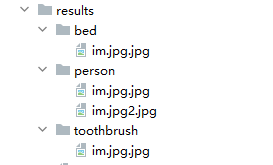
The following two images are the results after recognition by the code, which automatically marks the names of recognized objects in the images and uses rectangles to outline them.


from ultralytics import YOLO
from PIL import Image

# Load the trained model
model = YOLO('detect/train3/weights/best.pt')

# Import and recognize images, results contain the processed outcomes
results = model(['img1.jpg', 'img2.jpg'])

# Save the processed images to the directory
i = 0
for r in results:
    i += 1
    im_array = r.plot()  # Draw the BGR numpy array containing prediction results
    im = Image.fromarray(im_array[..., ::-1])  # RGB PIL image
    im.save('results/' + str(i) + '.jpg')  # Save image
Of course, we can also preview the image before processing:
im.show()  # Popup window to preview image
im.save('results/' + str(i) + '.jpg')  # Save image
If you only need to obtain recognition information without processing the image, you can print the information like this:
from ultralytics import YOLO
from PIL import Image

# Load the trained model
model = YOLO('detect/train3/weights/best.pt')

# Import and recognize images, results contain the processed outcomes
results = model(['img1.jpg', 'img2.jpg'])

# Process result list
for result in results:
    boxes = result.boxes  # Boxes object containing detected bounding boxes
    masks = result.masks  # Masks object containing detected masks
    keypoints = result.keypoints  # Keypoints object containing detected keypoints
    probs = result.probs  # Probs object containing classification probabilities
    print("Image Bounding Boxes")
    print(boxes)
    print("Segmentation Masks")
    print(masks)
    print("Pose Output")
    print(keypoints)
    print("Classification Output")
    print(probs)
Note that in the output above, apart from the bounding boxes having values, the others are all None, because we only recognized the images without performing classification, segmentation, or pose recognition.
As noted, results are the post-processed outcomes, and results is a Results object. The properties of the Results object are as follows:
| Property | Type | Description |
|-----------------|--------------------|---------------------------------------------------------------|
| orig_img | numpy.ndarray | Numpy array of the original image. |
| orig_shape | tuple | Shape of the original image, formatted as (height, width). |
| boxes | Boxes, optional | Boxes object containing detection bounding boxes. |
| masks | Masks, optional | Masks object containing detection masks. |
| probs | Probs, optional | Probs object containing probabilities for each class, used for classification tasks. |
| keypoints | Keypoints, optional | Keypoints object containing keypoints detected for each object. |
| speed | dict | Dictionary of pre-processing, inference, and post-processing speed for each image in milliseconds. |
| names | dict | Dictionary of class names. |
| path | str | Path of the image file. |
The Results object has the following methods:
| Method | Return Type | Description |
|-----------------------|------------------|-----------------------------------------------------------|
| __getitem__() | Results | Returns the Results object at the specified index. |
| __len__() | int | Returns the number of detections in the Results object. |
| update() | None | Updates the boxes, masks, and probs attributes of the Results object. |
| cpu() | Results | Returns a copy of the Results object with all tensors moved to CPU memory. |
| numpy() | Results | Returns a copy of the Results object with all tensors converted to numpy arrays. |
| cuda() | Results | Returns a copy of the Results object with all tensors moved to GPU memory. |
| to() | Results | Returns a copy of the Results object with tensors moved to the specified device and dtype. |
| new() | Results | Returns a new Results object with the same image, path, and name. |
| keys() | List[str] | Returns a list of non-empty property names. |
| plot() | numpy.ndarray | Draws detection results, returning a numpy array of the annotated image. |
| verbose() | str | Returns a log string for each task. |
| save_txt() | None | Saves predictions to a txt file. |
| save_crop() | None | Saves cropped predictions to save_dir/cls/file_name.jpg. |
| tojson() | None | Converts the object to JSON format. |
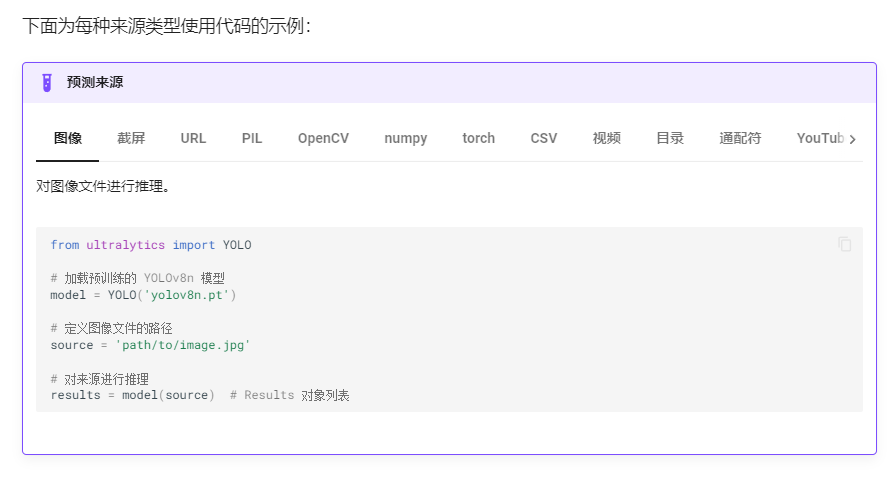
In addition to local images, ultralytics also supports video streams, allowing you to import resources to be recognized from local or online sources. The handling of video streams will be introduced in subsequent chapters of this article.
Other resources supported by ultralytics include:
| Source | Parameter | Type | Note |
|---------------|-------------------------------------------------|------------------|---------------------------------------------------------|
| Image | 'image.jpg' | str or Path | Single image file. |
| URL | 'https://ultralytics.com/images/bus.jpg' | str | URL address for the image. |
| Screenshot | 'screen' | str | Capture screenshot image. |
| PIL | Image.open('im.jpg') | PIL.Image | Image in RGB channel HWC format. |
| OpenCV | cv2.imread('im.jpg') | np.ndarray | Image in BGR channel HWC format uint8 (0-255). |
| Numpy | np.zeros((640,1280,3)) | np.ndarray | Image in BGR channel HWC format uint8 (0-255) |
| 功能 | 示例 | 类型 | 说明 |
|---------------|-----------------------------------------|----------------|-------------------------------------------------------|
| torch | torch.zeros(16,3,320,640) | torch.Tensor | Images in BCHW format with RGB channels as float32 (0.0-1.0). |
| CSV | 'sources.csv' | str or Path | A CSV file containing paths to images, videos, or directories. |
| video✅ | 'video.mp4' | str or Path | Video files in formats like MP4, AVI, etc. |
| directory✅ | 'path/' | str or Path | Directory path containing image or video files. |
| glob ✅ | 'path/*.jpg' | str | A wildcard pattern that matches multiple files using the * character. |
| YouTube ✅ | 'https://youtu.be/LNwODJXcvt4' | str | URL address of a YouTube video. |
| stream ✅ | 'rtsp://example.com/media.mp4' | str | URL for streaming protocols such as RTSP, RTMP, TCP, or IP addresses. |
| multi-stream✅ | 'list.streams' | str or Path | A text file with one stream URL per line for batch processing, e.g., 8 streams will run in a batch size of 8. |
For details on how to import each type of resource, you can visit https://docs.ultralytics.com/zh/modes/predict/#_4
This article will not repeat all import methods, but will later discuss resource identification such as video streams.
Export
Ultralytics supports exporting trained models to formats such as ONNX, TensorRT, and CoreML, allowing for use in other frameworks or languages, such as C#'s ML.NET framework.
from ultralytics import YOLO

# Load model from .pt file
model = YOLO('path/to/best.pt')

# Export to other model types
model.export(format='onnx')
When exporting to other models, corresponding support packages need to be installed. If not already installed locally, they will be automatically installed the first time.
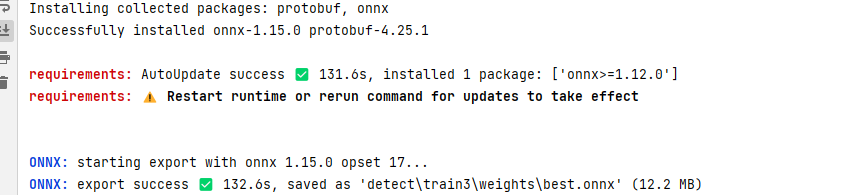
After executing the code, the console will print the location where the model file is exported:
Ultralytics supports exporting models in the following formats:
| Format | format parameter | Model | Metadata | Parameters |
|----------------------------------------------------------------|---------------------|----------------------------|----------|------------------------------------------------------|
| PyTorch | - | yolov8n.pt | ✅ | - |
| TorchScript | torchscript | yolov8n.torchscript | ✅ | imgsz, optimize |
| ONNX | onnx | yolov8n.onnx | ✅ | imgsz, half, dynamic, simplify, opset |
| OpenVINO | openvino | yolov8n_openvino_model/ | ✅ | imgsz, half |
| TensorRT | engine | yolov8n.engine | ✅ | imgsz, half, dynamic, simplify, workspace |
| CoreML | coreml | yolov8n.mlpackage | ✅ | imgsz, half, int8, nms |
| TF SavedModel | saved_model | yolov8n_saved_model/ | ✅ | imgsz, keras |
| TF GraphDef | pb | yolov8n.pb | ❌ | imgsz |
| TF Lite | tflite | yolov8n.tflite | ✅ | imgsz, half, int8 |
| TF Edge TPU | edgetpu | yolov8n_edgetpu.tflite | ✅ | imgsz |
| TF.js | tfjs | yolov8n_web_model/ | ✅ | imgsz |
| PaddlePaddle | paddle | yolov8n_paddle_model/ | ✅ | imgsz |
| ncnn | ncnn | yolov8n_ncnn_model/ | ✅ | imgsz, half |
Tracking
Ultralytics tracking can handle objects in videos. Previously, the author introduced object recognition through images, but it also supports pose recognition, image classification, and extracting objects from images, which will be covered in later chapters. Ultralytics tracking also supports object recognition and pose recognition. In this section, I will introduce how to identify and track objects in videos, and more examples will be introduced in subsequent chapters.
Ultralytics YOLO extends its object detection capabilities to provide robust and versatile object tracking:
- Real-Time Tracking: Seamlessly track objects in high frame rate videos.
- Support for Multiple Trackers: Choose from various mature tracking algorithms.
- Custom Tracker Configuration: Customize tracking algorithms by adjusting various parameters to meet specific needs.
Ultralytics has two default trackers.
- BoT-SORT - model file is
botsort.yaml, used by default without configuration. - ByteTrack - model file is
bytetrack.yaml.
The following code demonstrates loading a video file using cv2, identifying objects in the image frame by frame, and displaying each recognized frame on the desktop.
from ultralytics import YOLO
import cv2

# Load your trained object detection model
model = YOLO('detect/train3/weights/best.pt')
# Alternatively, use the officially trained object detection model
# model = YOLO('yolov8n.pt')

# Load video file using cv2
video_path = "1.mp4"
cap = cv2.VideoCapture(video_path)

# Loop through video frames
while cap.isOpened():
    # Read a frame from the video
    success, frame = cap.read()

    if success:
        # Run YOLOv8 tracking on the frame, continuously tracking objects between frames
        results = model.track(frame, persist=True)

        # Display results on the frame
        annotated_frame = results[0].plot()

        # Use cv2 to pop up a window and show the annotated frame
        # This means recognizing and playing the video simultaneously
        cv2.imshow("YOLOv8 Tracking", annotated_frame)

        # Exit the loop if 'q' is pressed
        if cv2.waitKey(1) & 0xFF == ord("q"):
            break
    else:
        # Exit the loop if video ends
        break

# Release video capture object and close display window
cap.release()
cv2.destroyAllWindows()
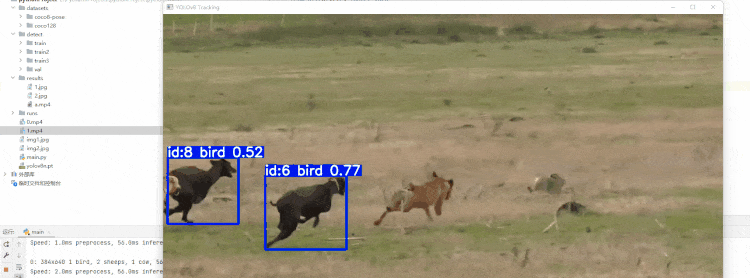
Of course, due to the video being of a lower quality and the training dataset being small, the recognized object names are not ideal, but the tracker is indeed impressive.
Image Segmentation Extraction
Image segmentation is used to extract objects from images after recognition.
Here is some sample code:
from ultralytics import YOLO

# Load the yolov8n-seg model
model = YOLO('yolov8n-seg.pt')

# Train the model
# results = model.train(data='coco128-seg.yaml', epochs=100, imgsz=640)

# Validation
# ... ...

# Process images
results = model(['img1.jpg', 'img2.jpg'])

# Save processed images to directory
i = 0
for r in results:
    i += 1
    im_array = r.save_crop(save_dir="results")
The extracted object images will be stored in:
If you do not need to extract objects, since ultralytics creates an image mask first, we can export images with the object mask.
from ultralytics import YOLO
from PIL import Image

# Load the yolov8n-seg model
model = YOLO('yolov8n-seg.pt')

# Train the model
# results = model.train(data='coco128-seg.yaml', epochs=100, imgsz=640)

# Validation
# ... ...

# Process images
results = model(['img1.jpg', 'img2.jpg'])

# Save processed images to directory
i = 0
for r in results:
    i += 1
    im_array = r.plot()  # BGR numpy array with predicted results
    im = Image.fromarray(im_array[..., ::-1])  # RGB PIL image
    im.save('results/' + str(i) + '.jpg')  # Save image

Classification
Is obviously used for classifying images.
To classify images, you need to use the official yolov8n-cls.pt model.
The official mnist160 dataset is provided, consisting of handwritten images from 0-9. After training, the model will also be used for handwritten digit recognition.
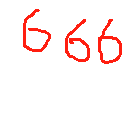
Here are three random numbers:
Due to the small dataset size, we can directly train and then use the trained model to extract text from images:
from ultralytics import YOLO
# Load yolov8n-cls model
model = YOLO('yolov8n-cls.pt')
# Train the model
results = model.train(data='mnist160', epochs=100, imgsz=64)
# Validation
# ... ...
# Process images
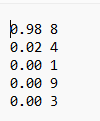
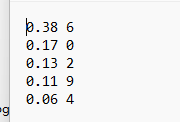
results = model(['666.png'])
# Save processed images to directory
i = 0
for r in results:
r.save_txt(txt_file="results/cls" + str(i) + '.txt')
i += 1
Since the training dataset contains only single digits, there are some issues with supporting multiple digits.
Changing to a large 6, recognizing again:
Pose Recognition
Pose recognition is used to mark dots and lines on the human body in images or videos, and then track changes in human poses.

Here is some sample code:
import cv2
from ultralytics import YOLO

# Load yolov8n-pose model and train
model = YOLO('yolov8n-pose.pt')
results = model.train(data='coco8-pose.yaml', epochs=10, imgsz=640)

# Open video file
video_path = "1.mp4"
cap = cv2.VideoCapture(video_path)

# Loop through video frames
while cap.isOpened():
    # Read a frame from the video
    success, frame = cap.read()

    if success:
        # Run YOLOv8 tracking on the frame, continuously tracking objects between frames
        results = model.track(frame, persist=True)

        # Display results on the frame
        annotated_frame = results[0].plot()

        # Show the annotated frame
        cv2.imshow("YOLOv8 Tracking", annotated_frame)

        # Exit the loop if 'q' is pressed
        if cv2.waitKey(1) & 0xFF == ord("q"):
            break
    else:
        # Exit the loop if video ends
        break

# Release video capture object and close display window
cap.release()
cv2.destroyAllWindows()
Trajectory Generation
When identifying and tracking objects in videos, it is also possible to track the trajectory of object movement.
There are no more videos for demonstration at hand, so this will have to suffice.

Example code is as follows:
from collections import defaultdict

import cv2
import numpy as np

from ultralytics import YOLO

# Load yolov8n.pt model, other models can also be used
model = YOLO('yolov8n.pt')

# Open video
video_path = "0.mp4"
cap = cv2.VideoCapture(video_path)

# Save history
track_history = defaultdict(lambda: [])

# Process each frame of the video
while cap.isOpened():
    success, frame = cap.read()

    if success:
        # Tracking
        results = model.track(frame, persist=True)

        # Read the bounding boxes of objects in the current frame
        boxes = results[0].boxes.xywh.cpu()
        # If no bounding boxes are detected in the image, ignore it
        if results[0].boxes.id is None:
            continue
        # Get the IDs of each tracked object
        track_ids = results[0].boxes.id.int().cpu().tolist()

        annotated_frame = results[0].plot()

        # Draw
        for box, track_id in zip(boxes, track_ids):
            x, y, w, h = box
            track = track_history[track_id]
            track.append((float(x), float(y)))
            if len(track) > 30:
                track.pop(0)

            points = np.hstack(track).astype(np.int32).reshape((-1, 1, 2))
            cv2.polylines(annotated_frame, [points], isClosed=False, color=(230, 230, 230), thickness=10)

        cv2.imshow("YOLOv8 Tracking", annotated_frame)

        if cv2.waitKey(1) & 0xFF == ord("q"):
            break
    else:
        break

cap.release()
cv2.destroyAllWindows()

文章评论