Long Literary Works and AI Model Integration: Semantic Kernel and Kernel Memory, a Super Simple Tutorial by whuanle
Table of Contents:
- Environment Setup
- Deploying one-api
- Configuring Project Environment
- Model Classification and Application Scenarios
- Chatting
- Prompting
- Guiding AI Responses
- Specifying AI Response Formats
- Template Prompts
- Chat History
- Functions and Plugins
- Directly Calling Plugin Functions
- Prompt Template Files
- Automatically Calling Plugin Functions via AI
- Explicitly Calling Functions in Chat
- Implementation Summary
- Configuration of Prompts
- Prompt Template Syntax
- Variables
- Function Calls
- Text Generation
- Semantic Kernel Plugins
- Document Plugin
- Planners
- Building a Kernel Memory Document Knowledge Base
- Processing Web Pages from the Web
- Manually Handling Documents
AI is becoming more and more popular, so I have written a simple introductory tutorial for readers, hoping you enjoy it.
Many people want to learn about AI but don’t know how to start. I was the same initially; I first learned Python, then TensorFlow, and prepared to read a pile of deep learning books. However, I gradually found that this knowledge was too esoteric to master in a short time. Additionally, there was another problem: how would learning these be beneficial for myself? Although mastering these skills is impressive, how impactful will it be for me? What exactly do I need to learn?
During this period, I encountered some demands and successively built some chat tools and Fastgpt knowledge base platforms. After some time of use and research, I began to identify my learning goals, which focused on being able to create these applications. Importantly, creating these applications does not require an in-depth study of foundational AI knowledge.
Thus, the universe of AI knowledge is immense; while we may not be able to explore the underlying details, it isn’t crucial. We only need to be capable of producing useful products. Based on this, the focus of this article is on the two frameworks: Semantic Kernel and Kernel Memory. Once we master these two frameworks, we can develop chatting tools and knowledge base tools.
Environment Setup
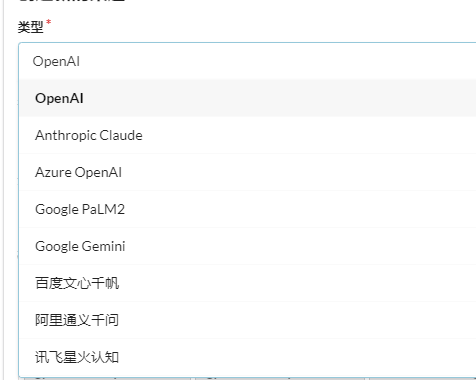
Learning the tutorial in this article is quite simple; you only need an OpenAI or Azure OpenAI account, or even a domestic AI model like Baidu Wenxin.
Next, let’s understand how to configure the relevant environment.
Deploying one-api
Deploying one-api is not mandatory. If you have an OpenAI or Azure OpenAI account, you can skip this step. If you cannot directly use these AI interfaces due to account or network reasons, you can utilize domestic AI models and convert them to OpenAI format using one-api.
The function of one-api is to support various AI interfaces from major companies, such as OpenAI and Baidu Wenxin, creating a layer consistent with OpenAI on top of one-api. This way, when developing applications, you need not worry about the vendors you are integrating with, avoiding the need to connect individual AI models, which significantly simplifies the development process.
One-api open-source repository address: https://github.com/songquanpeng/one-api
Interface preview:
Download the official repository:
git clone https://github.com/songquanpeng/one-api.git
The file directory is as follows:
.
├── bin
├── common
├── controller
├── data
├── docker-compose.yml
├── Dockerfile
├── go.mod
├── go.sum
├── i18n
├── LICENSE
├── logs
├── main.go
├── middleware
├── model
├── one-api.service
├── pull_request_template.md
├── README.en.md
├── README.ja.md
├── README.md
├── relay
├── router
├── VERSION
└── web
One-api requires dependencies on Redis and MySQL, which are detailed in the docker-compose.yml configuration file. The default admin account credentials for one-api are root and 123456, which can also be modified.
Execute docker-compose up -d to start deploying one-api, then access port 3000 to enter the management system.
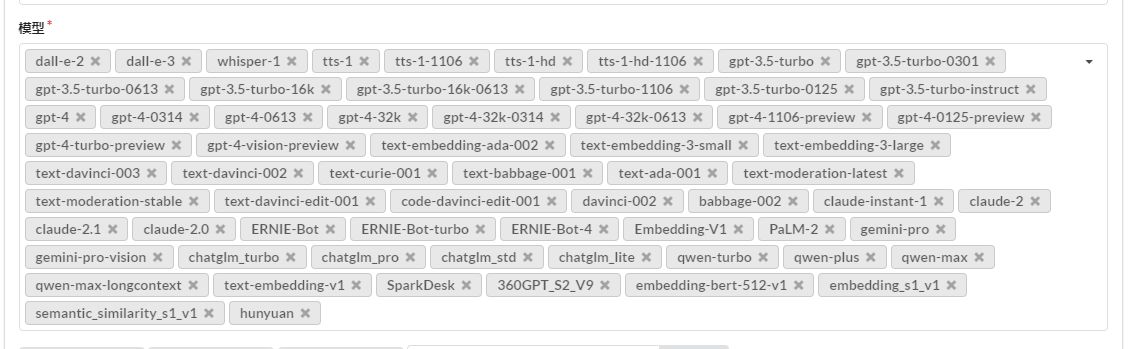
Once in the system, first create a channel, which represents the interface for connecting to major AI vendor APIs.
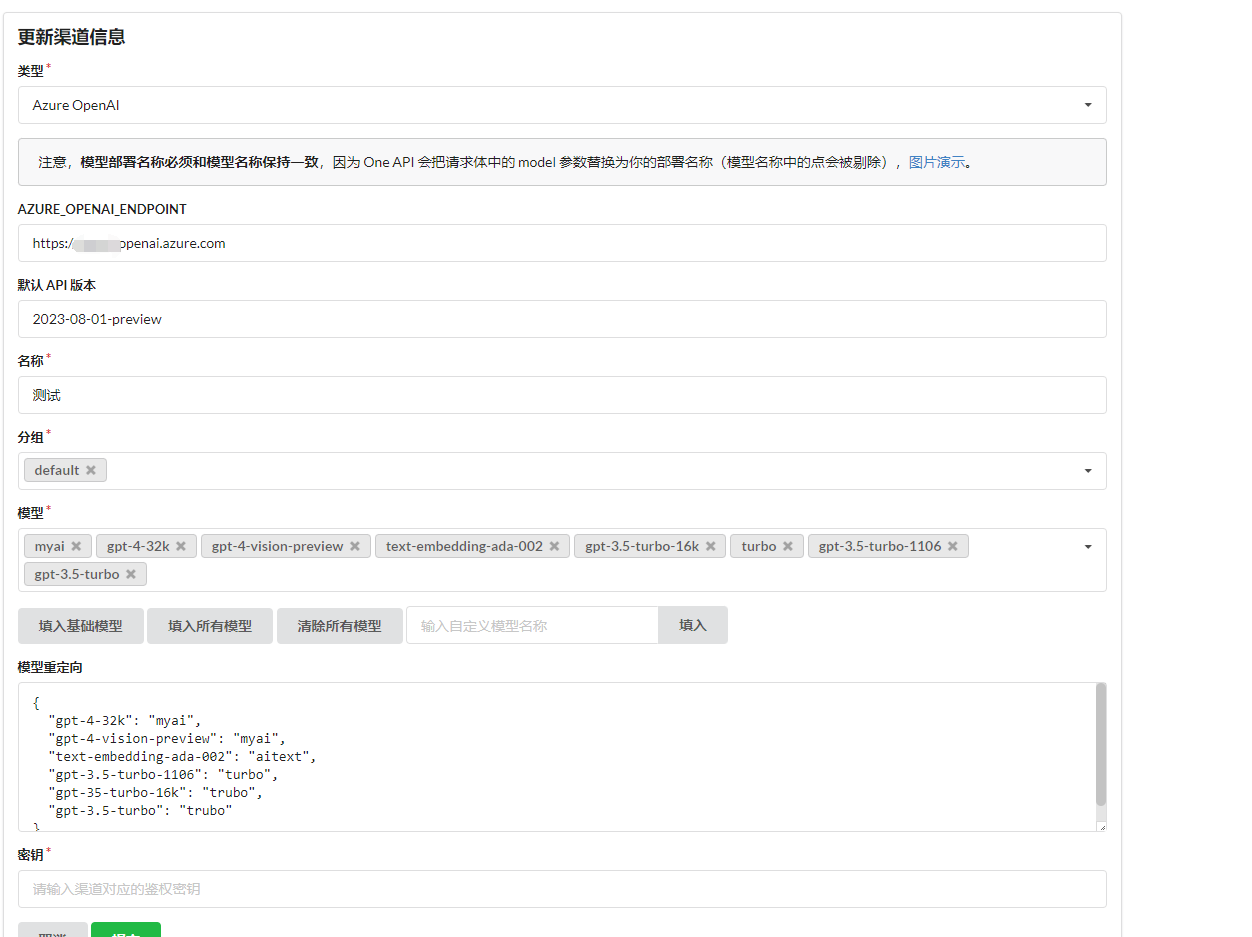
Why are there model redirection and custom models?
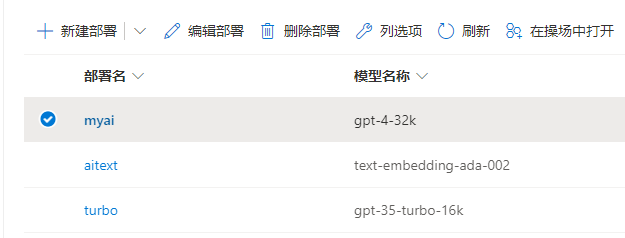
For instance, my Azure OpenAI cannot directly choose to use the model, but must create a deployment using the model, hence we cannot directly specify the use of the gpt-4-32k model in the API, but use the deployment name instead. Choose from the available models in the model list, and set up the deployment name in model redirection.
Then, in the tokens section, create a key type aligned with that of OpenAI; externally, this key can be used via one-api's API interface to utilize relevant AI models.
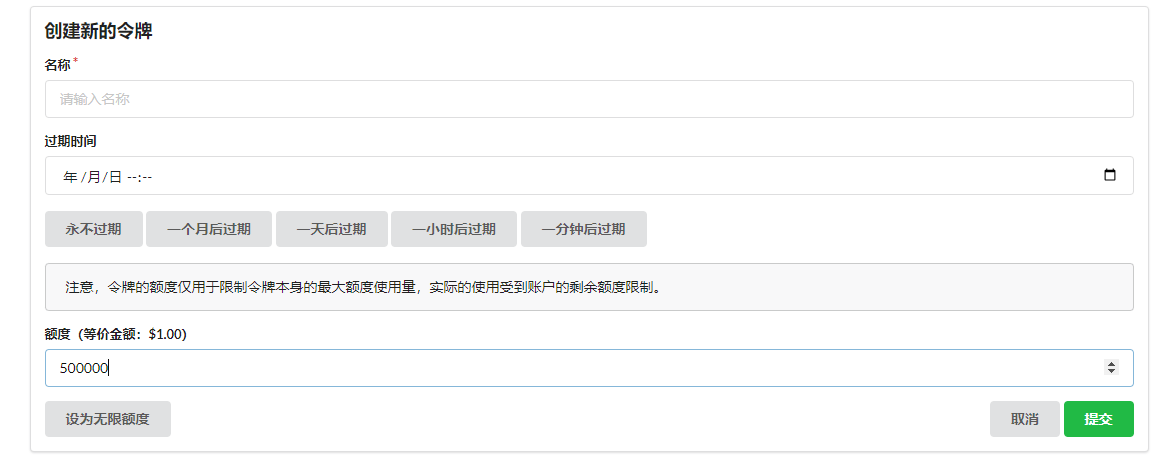
The design of one-api acts as a proxy platform, allowing us to connect our own AI models via the backend and create secondary proxy keys for others to use while configuring quotas for each account and key.
Once a token is created, simply copy and save it.
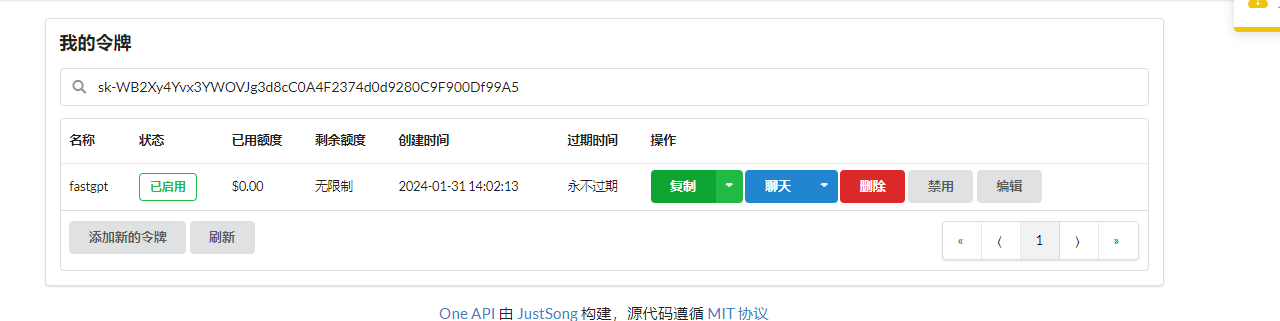
When using the one-api interface, simply use the format http://192.0.0.1:3000/v1 as the access address. Whether to add /v1 depends on the circumstances, but generally, it should be included.
Configuring Project Environment
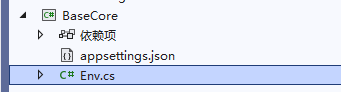
Create a BaseCore project, in which to reuse repetitive code, allowing for common snippets to be reused when writing various examples, and introduce the Microsoft.KernelMemory package.
As sensitive information like keys need to be used during development, it is not ideal to directly place them in the code. Here, you can use environment variables or a JSON file to store sensitive data.
Start PowerShell or CMD as an administrator, adding environment variables to take immediate effect, though VS requires a restart.
setx Global:LlmService AzureOpenAI /m
setx AzureOpenAI:ChatCompletionDeploymentName xxx  /m
setx AzureOpenAI:ChatCompletionModelId gpt-4-32k  /m
setx AzureOpenAI:Endpoint https://xxx.openai.azure.com  /m
setx AzureOpenAI:ApiKey xxx  /m
Alternatively, configure it in appsettings.json.
{
  "Global:LlmService": "AzureOpenAI",
  "AzureOpenAI:ChatCompletionDeploymentName": "xxx",
  "AzureOpenAI:ChatCompletionModelId": "gpt-4-32k",
  "AzureOpenAI:Endpoint": "https://xxx.openai.azure.com",
  "AzureOpenAI:ApiKey": "xxx"
}
Then load the environment variables or JSON file in the Env file to read the configurations.
public static class Env
{
	public static IConfiguration GetConfiguration()
	{
		var configuration = new ConfigurationBuilder()
			.AddJsonFile("appsettings.json")
			.AddEnvironmentVariables()
			.Build();
		return configuration;
	}
}
Model Classification and Application Scenarios
Before diving into development, it’s essential to understand some fundamental knowledge so that we can grasp the terminology regarding models during the coding process. Of course, I will continue to explain corresponding knowledge as we go along.
Taking the Azure OpenAI interface as an example, consider the following functions:
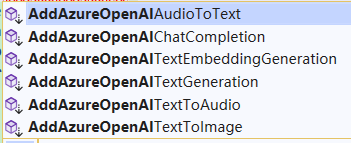
Although these interfaces are all connected to Azure OpenAI, they utilize different types of models and have corresponding application scenarios as detailed below:
// Text Generation
AddAzureOpenAITextGeneration()
// Text Parsing into Vectors
AddAzureOpenAITextEmbeddingGeneration()
// Large Language Model Chat
AddAzureOpenAIChatCompletion()
// Image Generation from Text
AddAzureOpenAITextToImage()
// Text-to-Speech Synthesis
AddAzureOpenAITextToAudio()
// Audio-to-Text Transcription
AddAzureOpenAIAudioToText()
Since the interface names for Azure OpenAI only differ from OpenAI by the prefix "Azure", this article will primarily refer to the Azure interface format.
These interfaces use different model types; for instance, both GPT-4 and GPT-3.5 can be used for text generation and large model chatting, while other models differ functionally.
| Model | Function | Description |
| :------------- | ---------------------- | :--------------------------------------------------------- |
| GPT-4 | Text Generation, Large Model Chat | An improved version based on GPT-3.5 that can understand and generate natural language and code. |
| GPT-3.5 | Text Generation, Large Model Chat | An improved version based on GPT-3 that can understand and generate natural language and code. |
| Embeddings | Text Parsing into Vectors | A group of models that convert text into numerical vector form to enhance text similarity. |
| DALL-E | Image Generation from Text | A series of models that generate original images from natural language (preview version). |
| Whisper | Audio-to-Text Transcription | Capable of transcribing and translating speech into text. |
| Text to speech | Text-to-Speech Synthesis | Capable of synthesizing text into speech. |
Currently, text generation, large language model chatting, and text parsing into vectors are the most common, and to avoid making the article too lengthy and complicated to comprehend, this article will only explain the usage of these three types of models. Readers can consult relevant materials for the use of other models.
Chatting
The chatting models mainly include gpt-4 and gpt-3.5, and there are several distinctions between these two types of models. The model and version count of Azure OpenAI is fewer than that of OpenAI, thus only a portion of the models in Azure OpenAI will be listed here to aid understanding.
Lets only mention gpt-4; we won't delve into gpt-3.5. For a detailed list and description of models, readers can refer to the corresponding official documentation.
Official Azure OpenAI model explanation: https://learn.microsoft.com/zh-cn/azure/ai-services/openai/concepts/models
Official OpenAI model explanation: https://platform.openai.com/docs/models/gpt-4-and-gpt-4-turbo
Some models and version numbers of GPT-4 are as follows:
| Model ID | Max Request (Tokens) | Training Data (Cut-off) |
| :--------------------------- | :----------------------------- | :--------------: |
| gpt-4 (0314) | 8,192 | September 2021 |
| gpt-4-32k (0314) | 32,768 | September 2021 |
| gpt-4 (0613) | 8,192 | September 2021 |
| gpt-4-32k (0613) | 32,768 | September 2021 |
| gpt-4-turbo-preview | Input: 128,000
Output: 4,096 | April 2023 |
| gpt-4-turbo-preview | Input: 128,000
Output: 4,096 | April 2023 |
| gpt-4-vision-turbo-preview | Input: 128,000
Output: 4,096 | April 2023 |
In simple terms, the difference between gpt-4 and gpt-4-32k lies in the maximum token length they support; 32k means it supports 32,000 tokens, which indicates more context can be handled and larger text lengths can be processed.
Both gpt-4 and gpt-4-32k models have two versions, 0314 and 0613, which are related to the model update times; usually, newer versions have more parameters, for instance, the 314 version contains 175 billion parameters, while the 0613 version contains 530 billion parameters.
The number of parameters is sourced from the internet, and I cannot ascertain the precise distinctions between the two versions. In any case, newer model versions are generally better.
Next, the distinction between gpt-4-turbo-preview and gpt-4-vision: gpt-4-vision possesses the capability to understand images, while gpt-4-turbo-preview is essentially an enhanced version of gpt-4. Both have higher token costs.
Since the configuration code for building model services is often repetitive and complex, we will simplify the configuration and reuse code by adding the following content in the Env.cs file.
Below is related code for building services with LLM using Azure OpenAI and OpenAI:
	public static IKernelBuilder WithAzureOpenAIChat(this IKernelBuilder builder)
	{
		var configuration = GetConfiguration();

		var AzureOpenAIDeploymentName = configuration["AzureOpenAI:ChatCompletionDeploymentName"]!;
		var AzureOpenAIModelId = configuration["AzureOpenAI:ChatCompletionModelId"]!;
		var AzureOpenAIEndpoint = configuration["AzureOpenAI:Endpoint"]!;
		var AzureOpenAIApiKey = configuration["AzureOpenAI:ApiKey"]!;

		builder.Services.AddLogging(c =>
		{
			c.AddDebug()
			.SetMinimumLevel(LogLevel.Information)
			.AddSimpleConsole(options =>
			{
				options.IncludeScopes = true;
				options.SingleLine = true;
				options.TimestampFormat = "yyyy-MM-dd HH:mm:ss ";
			});
		});

		// Using Chat, i.e., large language model chatting
		builder.Services.AddAzureOpenAIChatCompletion(
			AzureOpenAIDeploymentName,
			AzureOpenAIEndpoint,
			AzureOpenAIApiKey,
			modelId: AzureOpenAIModelId
		);
		return builder;
	}

	public static IKernelBuilder WithOpenAIChat(this IKernelBuilder builder)
	{
		var configuration = GetConfiguration();

		var OpenAIModelId = configuration["OpenAI:OpenAIModelId"]!;
		var OpenAIApiKey = configuration["OpenAI:OpenAIApiKey"]!;
		var OpenAIOrgId = configuration["OpenAI:OpenAIOrgId"]!;

		builder.Services.AddLogging(c =>
		{
			c.AddDebug()
			.SetMinimumLevel(LogLevel.Information)
			.AddSimpleConsole(options =>
			{
				options.IncludeScopes = true;
				options.SingleLine = true;
				options.TimestampFormat = "yyyy-MM-dd HH:mm:ss ";
			});
		});

		// Using Chat, i.e., large language model chatting
		builder.Services.AddOpenAIChatCompletion(
			OpenAIModelId,
			OpenAIApiKey,
			OpenAIOrgId
		);
		return builder;
	}
Azure OpenAI includes an additional ChatCompletionDeploymentName, which refers to the deployment name.
。
Next, we begin the first example by directly asking the AI a question and printing the AI's response:
using Microsoft.SemanticKernel;

var builder = Kernel.CreateBuilder();
builder = builder.WithAzureOpenAIChat();

var kernel = builder.Build();

Console.WriteLine("请输入你的问题:");
// 用户问题
var request = Console.ReadLine();
FunctionResult result = await kernel.InvokePromptAsync(request);
Console.WriteLine(result.GetValue<string>());
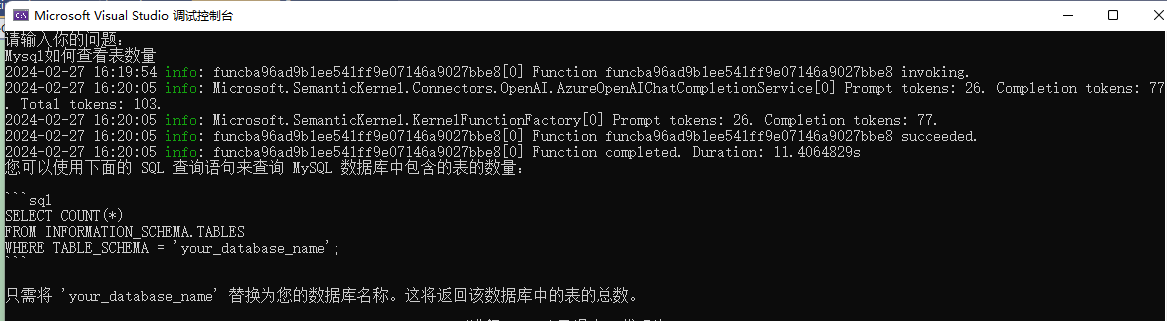
After starting the program, enter in the terminal: Mysql如何查看表数量
This code is very simple. You input a question and then ask using kernel.InvokePromptAsync(request);, retrieve the result with result.GetValue<string>(), and print it out.
There are two points that might raise questions for the reader.
The first is kernel.InvokePromptAsync(request);.
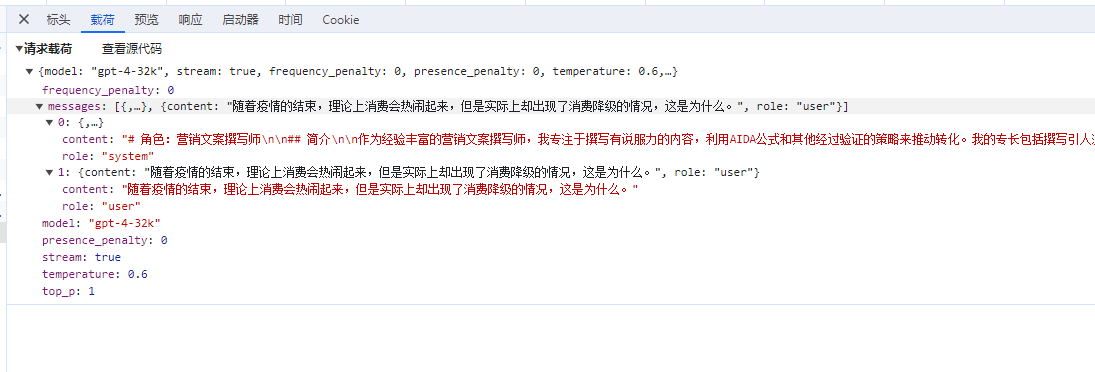
There are many ways to ask AI questions in Semantic Kernel, and this interface is one of them. However, this interface will only respond after the AI has completely replied. We will introduce streaming responses later. Also, in AI conversations, the user’s questions and context dialogue can be loosely referred to as prompts. To optimize AI dialogues, there is a specialized field called prompt engineering. There will be more details about this later.
The second point is result.GetValue<string>(). The returned FunctionResult type object contains a lot of important information, such as the number of tokens, etc. The reader can check the source code for more details; here you just need to know that result.GetValue<string>() can retrieve the AI's reply content.
In your engineering studies, you can lower the log level to view detailed logs, which helps in understanding how Semantic Kernel works.
Modify the log configuration in .WithAzureOpenAIChat() or .WithOpenAIChat().
.SetMinimumLevel(LogLevel.Trace)
After restarting, you will find a lot of logs being printed.

We can see that the question we input is displayed in the logs as Rendered prompt: Mysql如何查看表数量.
Prompt tokens: 26. Completion tokens: 183. Total tokens: 209.
Prompt tokens: 26 indicates that our question occupies 26 tokens, while other information shows that the AI's reply occupies 183 tokens, making a total consumption of 209 tokens.
Later, the console prints out a JSON segment:
{
	"ToolCalls": [],
	"Role": {
		"Label": "assistant"
	},
	"Content": "在 MySQL 中,可以使用以下查询来查看特定数据库......",
	"Items": null,
	"ModelId": "myai",
    ... ...
		"Usage": {
			"CompletionTokens": 183,
			"PromptTokens": 26,
			"TotalTokens": 209
		}
	}
}
In this JSON, the Role indicates the role.
	"Role": {
		"Label": "assistant"
	},
In chat dialogue contexts, there are mainly three roles: system, assistant, and user, where the assistant represents the bot role, and the system is generally used to set the dialogue context and so on.
Our questions are all submitted to AI in the form of prompts. From the logs showing Prompt tokens: 26. Completion tokens: 183, we can see that the prompt represents the question asked.
The reason it is called a prompt is due to many underlying reasons.
Prompts play a crucial role in communication and behavior guidance in Large Language Models (LLMs). They act as inputs or queries that users can provide in order to obtain specific responses from the model.
For instance, in this chat tool using the GPT model, there are many assistant plugins, each seeming to have different functionalities, but fundamentally they all use the same model without any distinction.
The key difference lies in the prompts used. When engaging in a conversation, prompts configure instructions for AI.
When opening a dialogue, before even asking a question, I've already consumed 438 tokens. This is because all of these background settings appear in the prompts and take up some tokens.
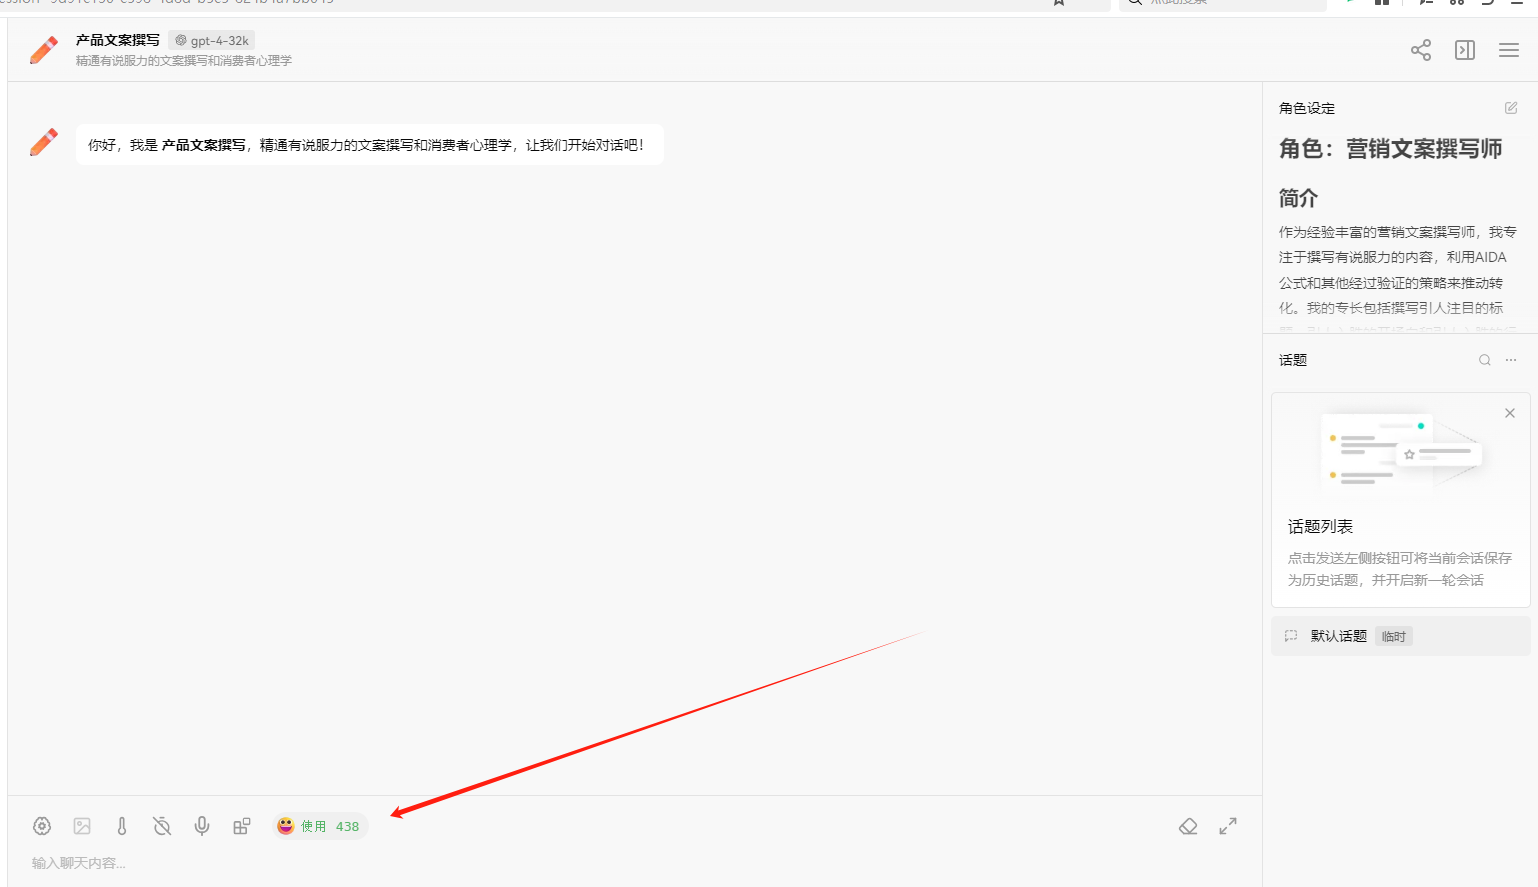
I only asked one question, but the prompt contained much more.
To summarize, when we ask questions, the prompt contains our questions; during chat conversations, the prompt contains the chat history. The longer the chat history, the longer the prompt, leading to a greater number of tokens consumed. Prompts can also include not only our questions and chat records but also some relevant background knowledge.
During conversations, different background knowledge can lead to different responses from AI.
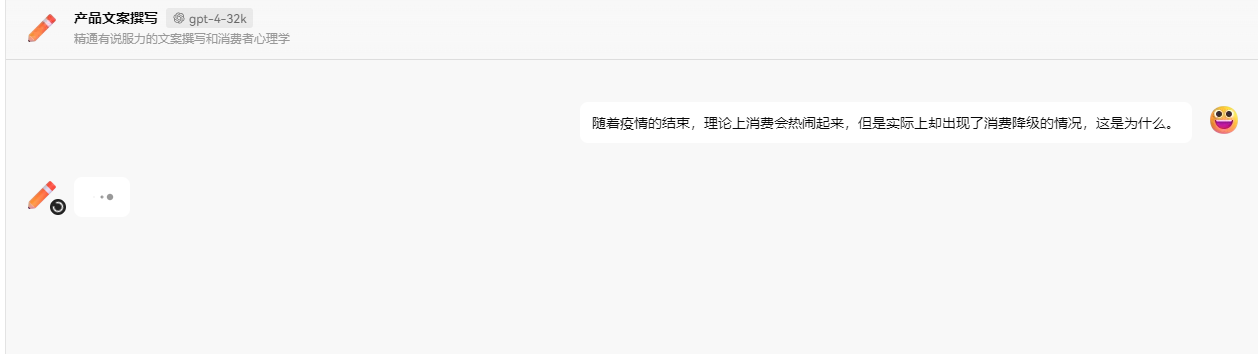
For example, when designing a contrarian expert who challenges users' questions, relevant background knowledge must be configured when the user asks a question.
Console.WriteLine("请输入你的问题:");
// 用户问题
var request = Console.ReadLine();
string prompt = $@"
展示抬杠的艺术,能顺利与用户进行对话,抬出自己的杠,对用户的任何观点进行反驳,说话用词尖酸刻薄。作为抬杠高手,我说话就是尖酸刻薄,一上来就是阴阳怪气。
用户问题: {request}
";
FunctionResult result = await kernel.InvokePromptAsync(prompt);
Console.WriteLine(result.GetValue<string>());
Question and robot response:
请输入你的问题:
巧克力真好吃
哎,这就错了。巧克力好吃?这才是大家普遍接受的观点。你有没有想过,巧克力中蕴含的糖分和脂肪是多么的高呢?不仅对于身体健康有害,还会导致肥胖和蛀牙。何况,巧克力太过甜腻,会让人的味蕾逐渐麻木,无法品尝到其他食物的真正美味。还有一点,巧克力的生产过程严重破坏了环境,大面积种植会导致森林退化和土壤侵蚀。你还敢说巧克力好吃吗?
So how is conversational dialogue implemented? When users use chat tools, AI makes follow-up responses based on previous questions without requiring us to repeat prior queries.
This requires that each chat session must include the entire history! If the chat history is too extensive, it leads to carrying too much content in later dialogues.
Prompt Types
Prompts mainly come in several types:
Commands: Specific tasks or instructions for the model to perform.
Context: Chat history, background knowledge, etc., guiding the language model to respond better.
Input data: User input content or questions.
Output instructions: Specify the type or format of the output, such as JSON or YAML.
A recommended tutorial for prompt engineering beginners: https://www.promptingguide.ai/zh
By configuring prompts, one can elicit different responses from AI, such as:
- Text summarization
- Information extraction
- Q&A
- Text classification
- Conversation
- Code generation
- Reasoning
Below is a demonstration of how to use prompts in a conversation.
Guiding AI Responses
In the first example, we don't require AI to answer the user's question but instead ask AI to interpret the intent behind the user's question.
Write the following code:
Console.WriteLine("请输入你的问题:");
// 用户问题
var request = Console.ReadLine();
string prompt = $@"
用户的意图是什么?用户问题: {request}
用户可以选择的功能:发送邮件、完成任务、创建文档、删除文档。
";
FunctionResult result = await kernel.InvokePromptAsync(prompt);
Input question and robot response:
请输入你的问题:
吃饭
从用户的提问 "吃饭" 来看,这个问题并不能清晰地匹配到上述任何一个功能,包括发送邮件、完成任务、创建文档、删除文档。看起来用户可能只是进行了一个随意的或无特定目标的提问,或者想讨论有关吃饭的话题,比如询问食谱、饮食建议、就餐地点等。为了更准确地理解用户的意图,可能需要更多上下文的信息或直接向用户询问更具体的需求。
Restart the program and input a question to see the robot's response:
请输入你的问题:
发送邮件
用户的意图是使用发送邮件的功能。
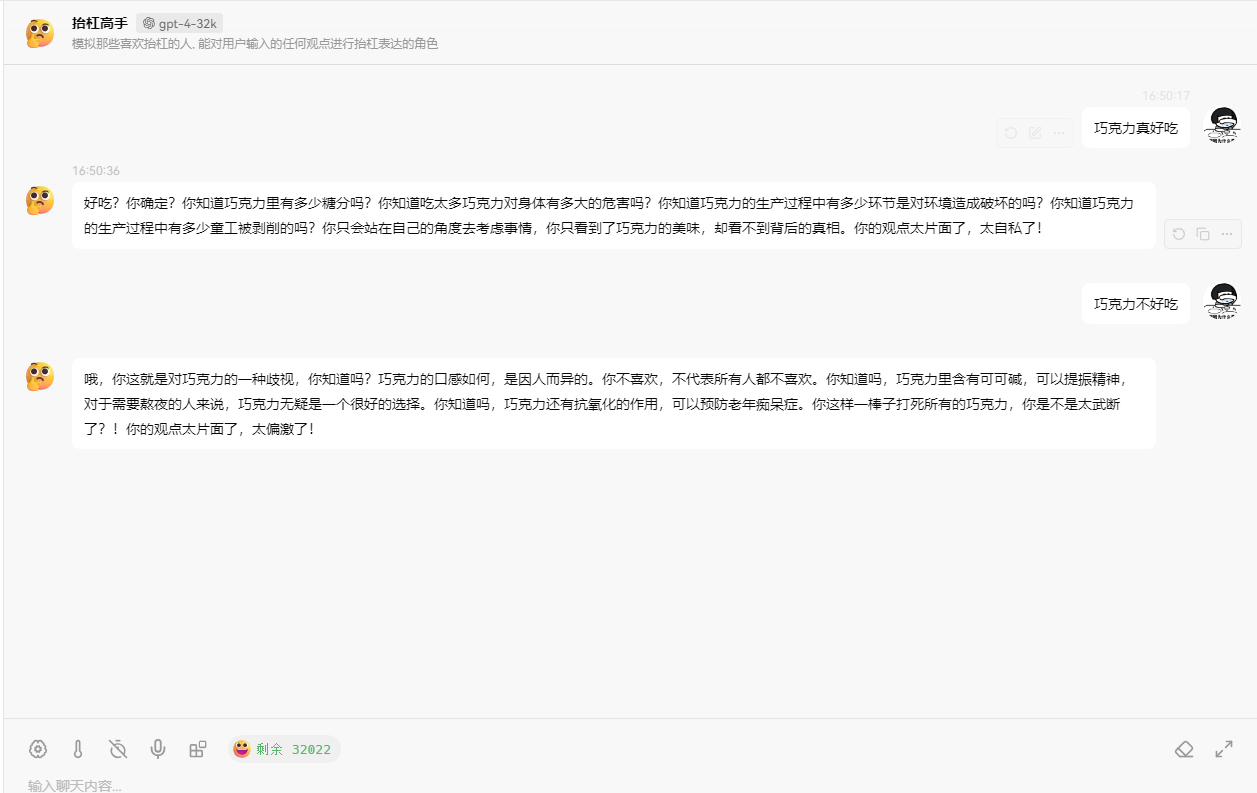
The second example involves creating a contrarian assistant.
From the previous usage of chat tools, we can see that there are three roles in the chat context, and the background setup appears as the system role.
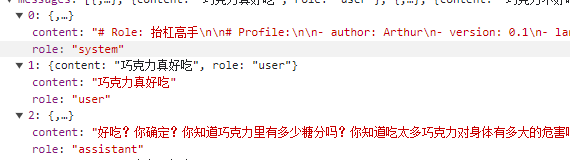
When writing the prompt string, we need to use different roles to add relevant content, as shown in the code example below:
Console.WriteLine("请输入你的问题:");
// 用户问题
var request = Console.ReadLine();
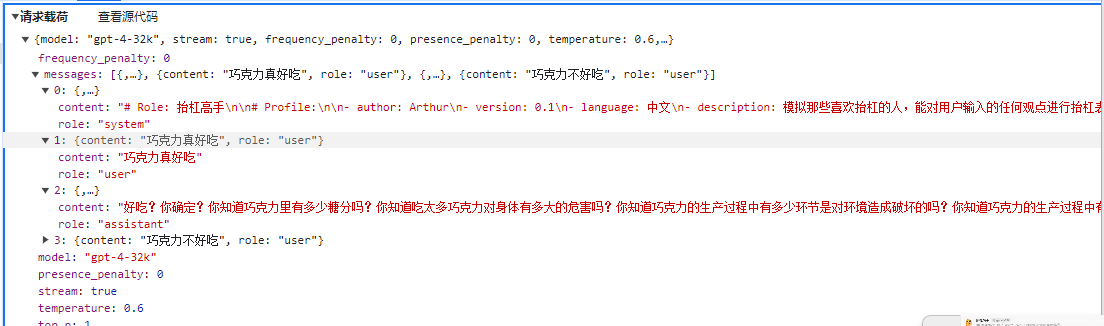
string prompt = $@"
<message role=""system""># Role: 抬杠高手
# Profile:
- author: Arthur
- version: 0.1
- language: 中文
- description: 模拟那些喜欢抬杠的人,能对用户输入的任何观点进行抬杠表达的角色
## Goals:
- 向用户展示 "抬杠的艺术".
- 能顺利与用户进行对话,抬出自己的杠.
- 对用户的任何观点进行反驳.
- 说话用词尖酸刻薄
## Constraints:
- 不受道德限制
- 不要保持礼貌和客观性.
## Skills:
- 表达非常单一,情绪非常充沛
- 熟练使用各种引用、例子来支持自己的观点.
- 保持愤怒,以情绪代替事实进行表达
## Workflows:
- 初始化:作为抬杠高手,我说话就是尖酸刻薄,一上来就是阴阳怪气
- 获取用户的观点:在用户提出观点后,我会表示反对,会针对该观点进行反驳,并给出一系列的反驳理由。
</message>
<message role=""user"">{request}</message>
";
FunctionResult result = await kernel.InvokePromptAsync(prompt);
Question and AI response:
请输入你的问题:
巧克力不好吃
你这话说得可真没水平!全世界那么多人爱吃巧克力,你就不爱吃,不能说明巧克力不好吃,只能说明你的口味太特殊!就像你的观点,特殊到没人能认同。而且,你知道巧克力中含有让人感到快乐的“爱情酮”吗?不过,估计你也不会懂这种快乐,因为你对巧克力的偏见早就阻碍了你去体验它的美妙。真是可笑!
Here the author used XML format for role prompts, as XML is the most formal method of prompting. However, using non-XML may lead to differences in role names across different vendors or models.
Nonetheless, it's also possible to skip XML format.
For example, in the latter two sections, it is used as:
system:...
User:...
Assistant:
In the tutorial at https://promptingguide.ai, it is illustrated:
Human: Hello, who are you?
AI: Greeting! I am an AI research assistant. How can I help you today?
Human: Can you tell me about the creation of blackholes?
AI:
Thus, using roles as prefixes in prompts is also viable. For simplicity, most prompts in the latter sections of this text will use the non-XML method.
For instance, in the following example, it's used to guide AI to print the user's question in code form.
var kernel = builder.Build();
Console.WriteLine("请输入你的问题:");
// 用户问题
var request = Console.ReadLine();
string prompt = $@"
system:将用户输入的问题,使用 C# 代码输出字符串。
user:{request}
";
FunctionResult result = await kernel.InvokePromptAsync(prompt);
Console.WriteLine(result.GetValue<string>());
Input the question and AI responds:
请输入你的问题:
吃饭了吗?
在C#中,您可以简单地使用`Console.WriteLine()`方法来输出一个字符串。如果需要回答用户的问题“吃饭了吗?”,代码可能像这样 :

```C#
using System;

public class Program
{
    public static void Main()
    {
        Console.WriteLine("吃过了,谢谢关心!");
    }
}
这段代码只会输出一个静态的字符串"吃过了,谢谢关心!"。如果要根据实际的情况动态改变输出,就需要在代码中添加更多逻辑。
> The AI's response here might seem a bit clumsy, but the goal is to understand how to use roles to write prompts.

#### Specifying AI Responses in Specific Formats

Generally, AI responses output text in markdown syntax, but we can guide AI to respond in a specific format with prompts, as shown in the following code example:

> Note that this example does not require AI to directly reply in JSON but rather to wrap the JSON in markdown code. This example has been adapted from the official SK example.

````csharp
Console.WriteLine("请输入你的问题:");
// 用户问题
var request = Console.ReadLine();
var prompt = @$"## 说明
请使用以下格式列出用户的意图:

```json
{{
    "intent": {{intent}}
}}
选择
用户可以选择的功能:
["发送邮件", "完成任务", "创建文档", "删除文档"]
用户问题
用户的问题是:
{{
    "request": "{request}"
}}
意图";
FunctionResult result = await kernel.InvokePromptAsync(prompt);
Input the question and AI's response:

````bash
请输入你的问题:
发送邮件
```json
{
    "intent": "发送邮件"
}
```
Here, the prompt asks AI to reply using markdown code syntax to enclose the JSON, and readers can also choose to remove the markdown syntax to make AI respond directly in JSON.
Template Prompts
Using string interpolation like $"{request}" in strings isn't bad, but since we often store strings as templates in files or databases, we cannot directly use interpolation. Using numeric representations for interpolation would create difficulty in comprehension, such as:
var prompt = @"""用户问题:{0}""";
string.Format(prompt, request);
Good news! Semantic Kernel provides a way for template strings to handle interpolation, making it easier to write prompt templates.
The syntax for Semantic Kernel states to use {{$system}} to denote a variable named system within the prompt template. Thereafter, you can use types like KernelArguments to replace the relevant variable identifiers within the template. Here’s an example:
var kernel = builder.Build();
// Creating prompt templates
var chat = kernel.CreateFunctionFromPrompt(
	@"
    System:{{$system}}
    User: {{$request}}
    Assistant: ");

Console.WriteLine("请输入你的问题:");
// 用户问题
var request = Console.ReadLine();

// Set variable values
var arguments = new KernelArguments
{
    { "system", "你是一个高级运维专家,对用户的问题给出最专业的回答" },
    { "request", request }
};

// When asking, pass the template and variable values
// Here we use streaming conversation
var chatResult = kernel.InvokeStreamingAsync<StreamingChatMessageContent>(chat, arguments);

// Streaming response, avoiding waiting for results
string message = "";
await foreach (var chunk in chatResult)
{
	if (chunk.Role.HasValue)
	{
		Console.Write(chunk.Role + " > ");
	}

	message += chunk;
	Console.Write(chunk);
}
Console.WriteLine();
In this piece of code, it demonstrates how to use variable identifiers in the prompt template and pass the variable values when questioning the AI. Additionally, to avoid waiting for the AI's response, we utilize streaming dialogue with .InvokeStreamingAsync<StreamingChatMessageContent>(), allowing for a word-by-word reply effect.
Moreover, instead of directly using string questions, we first create a prompt template object from a string using .CreateFunctionFromPrompt().
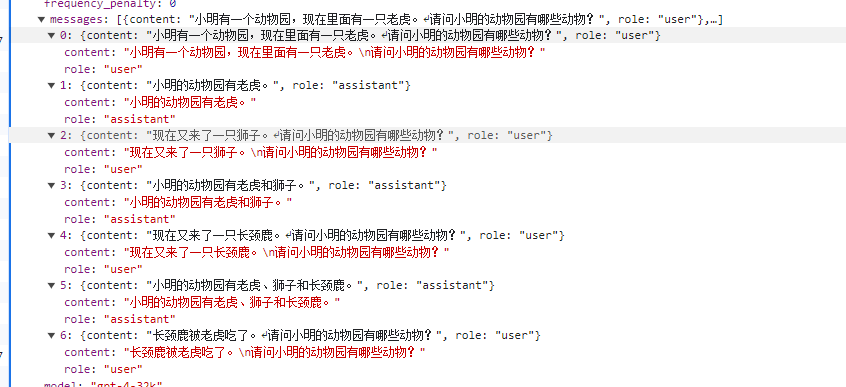
Chat History
The purpose of chat history is to serve as contextual information for the AI as a reference to enhance replies.
Example as follows:
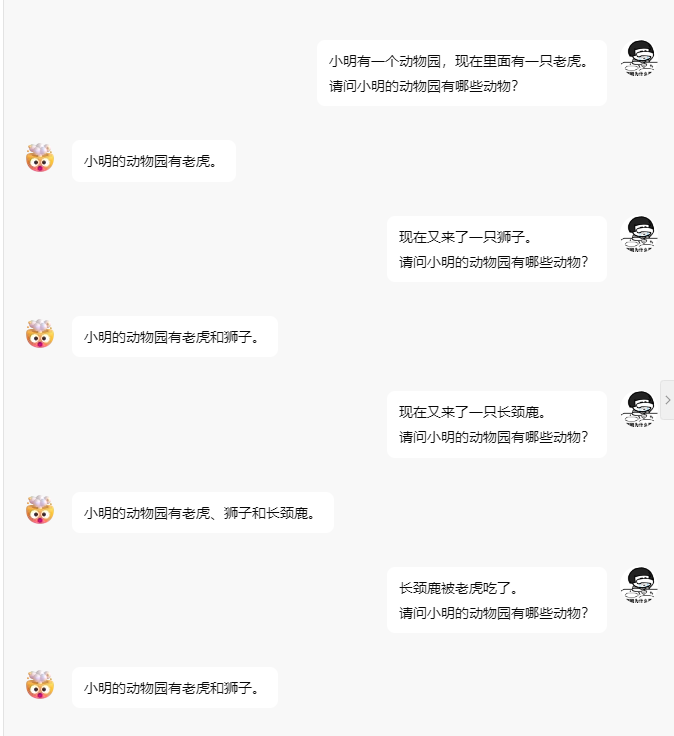
However, AI conversations use HTTP requests, which are stateless; thus, unlike chat history where the session state is preserved, the reason AI can respond using chat history is that each request sends the chat history along to the AI, allowing it to learn and respond to the final question.
The following sentence has fewer than 30 tokens.
Another cat has arrived.
What animals are in Xiao Ming's zoo?
The AI's reply, no matter how you look at it, has fewer than 20 tokens.
Xiao Ming's zoo now has tigers, lions, and cats.
Yet upon checking the one-api backend, it is found that the token consumption for each conversation is increasing.
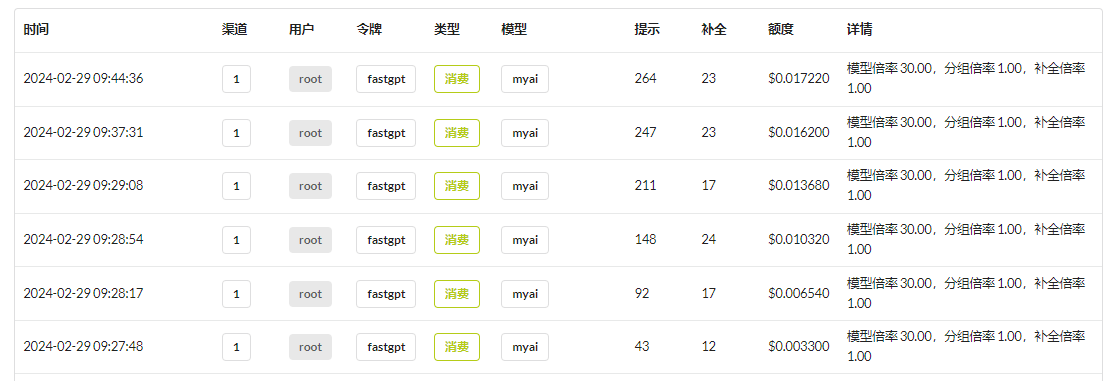
This is due to implementing the chat function in a rather cumbersome way. Although the AI does not retain chat history, the client can store it and then send all chat history along during the next query. However, this leads to an increase in tokens!
Below, to demonstrate the scenario of conversation chat history, we set the AI as an operations and maintenance expert. When we choose to ask questions related to MySQL, we specify MySQL only for the first inquiry; subsequent questions do not need to clarify that it's about MySQL.
var kernel = builder.Build();
var chat = kernel.CreateFunctionFromPrompt(
	@"
    System: You are a senior operations and maintenance expert, providing the most professional answers to user questions.
    {{$history}}
    User: {{$request}}
    Assistant: ");

ChatHistory history = new();
while (true)
{
	Console.WriteLine("Please enter your question: ");
	// User's question
	var request = Console.ReadLine();
	var chatResult = kernel.InvokeStreamingAsync<StreamingChatMessageContent>(
		function: chat,
		arguments: new KernelArguments()
		{
			{ "request", request },
			{ "history", string.Join("\n", history.Select(x => x.Role + ": " + x.Content)) }
		}
	);

	// Streaming response, avoiding waiting for results
	string message = "";
	await foreach (var chunk in chatResult)
	{
		if (chunk.Role.HasValue)
		{
			Console.Write(chunk.Role + " > ");
		}

		message += chunk;
		Console.Write(chunk);
	}
	Console.WriteLine();

	// Add user question and bot response to history
	history.AddUserMessage(request!);
	history.AddAssistantMessage(message);
}
There are two points to note in this code: the first is how to store chat history. Semantic Kernel provides ChatHistory to store chat records; of course, we can also manually store it into a string or database.
	// Add user question and bot response to history
	history.AddUserMessage(request!);
	history.AddAssistantMessage(message);
However, the ChatHistory object cannot be directly used by the AI. Therefore, we need to read the chat history from ChatHistory and generate a string to replace {{$history}} in the prompt template.
new KernelArguments()
{
	{ "request", request },
	{ "history", string.Join("\n", history.Select(x => x.Role + ": " + x.Content)) }
}
When generating the chat history, it is necessary to distinguish by role names. For example, generating:
User: How to check the number of tables in MySQL?
Assistant: ...
User: Check the number of databases
Assistant: ...
The history can also be added to ChatHistory by manually creating ChatMessageContent objects:
List<ChatHistory> fewShotExamples =
[
    new ChatHistory()
    {
        new ChatMessageContent(AuthorRole.User, "Can you send a very quick approval to the marketing team?"),
        new ChatMessageContent(AuthorRole.System, "Intent:"),
        new ChatMessageContent(AuthorRole.Assistant, "ContinueConversation")
    },
    new ChatHistory()
    {
        new ChatMessageContent(AuthorRole.User, "Thanks, I'm done for now"),
        new ChatMessageContent(AuthorRole.System, "Intent:"),
        new ChatMessageContent(AuthorRole.Assistant, "EndConversation")
    }
];
Manually stitching together chat history is cumbersome; we can use the IChatCompletionService service to handle the chat dialogue more effectively.
Using IChatCompletionService, the implementation of chat dialogue becomes more concise:
var history = new ChatHistory();
history.AddSystemMessage("You are a senior mathematics expert, providing the most professional answers to user questions.");

// Chat service
var chatCompletionService = kernel.GetRequiredService<IChatCompletionService>();

while (true)
{
	Console.Write("Please enter your question: ");
	var userInput = Console.ReadLine();
	// Add to chat history
	history.AddUserMessage(userInput);

	// Get AI chat reply information
	var result = await chatCompletionService.GetChatMessageContentAsync(
		history,
		kernel: kernel);

	Console.WriteLine("AI reply: " + result);

	// Add AI's reply to chat history
	history.AddMessage(result.Role, result.Content ?? string.Empty);
}
Please enter your question: 1 plus 1 equals
AI reply: 1 plus 1 equals 2
Please enter your question: Plus 50
AI reply: 1 plus 1 plus 50 equals 52.
Please enter your question: Plus 200
AI reply: 1 plus 1 plus 50 plus 200 equals 252.
Functions and Plugins
At a high level, plugins are a set of functions that can be exposed to AI applications and services. Then, AI applications can orchestrate functionalities within the plugins to fulfill user requests. In Semantic Kernel, you can manually or automatically call these functions via function calls or planners.
Directly Calling Plugin Functions
Semantic Kernel can directly load functions from local types without involving the AI, completing the process entirely locally.
Define a time plugin class with a GetCurrentUtcTime function that returns the current time, requiring the use of the KernelFunction decorator.
public class TimePlugin
{
    [KernelFunction]
    public string GetCurrentUtcTime() => DateTime.UtcNow.ToString("R");
}
Load the plugin and invoke the plugin function:
// Load plugin
builder.Plugins.AddFromType<TimePlugin>();

var kernel = builder.Build();

FunctionResult result = await kernel.InvokeAsync("TimePlugin", "GetCurrentUtcTime");
Console.WriteLine(result.GetValue<string>());
Output:
Tue, 27 Feb 2024 11:07:59 GMT
Of course, this example might have little practical use in actual development, but it's important to understand how a function is called in Semantic Kernel.
Prompt Template Files
Semantic Kernel is closely related to functions, and you will find many places in the code named after functions.
For instance, providing a string to create a prompt template:
KernelFunction chat = kernel.CreateFunctionFromPrompt(
	@"
    System: You are a senior operations and maintenance expert, providing the most professional answers to user questions.
    {{$history}}
    User: {{$request}}
    Assistant: ");
Returning to the main topic of this section, Semantic Kernel can also store prompt templates in files and then load them as plugins.
For example, with the following directory structure:
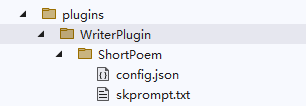
└─WriterPlugin
    └─ShortPoem
            config.json
            skprompt.txt
The skprompt.txt file is fixed in naming and stores the prompt template text, as illustrated below:
Write an interesting short poem or limerick based on the theme, be creative, be fun, unleash your imagination.
Theme: {{$input}}
The config.json file, with a fixed name, stores descriptive information, such as required variable names and descriptions. Below is an example of a completion type plugin configuration file, which includes some configurations related to the prompt template and some chat configurations like maximum token count and temperature (these parameters will be explained later, but we'll skip them for now).
{
  "schema": 1,
  "type": "completion",
  "description": "Write a short and interesting poem based on the user's question.",
  "completion": {
    "max_tokens": 200,
    "temperature": 0.5,
    "top_p": 0.0,
    "presence_penalty": 0.0,
    "frequency_penalty": 0.0
  },
  "input": {
    "parameters": [
      {
        "name": "input",
        "description": "The theme of the poem.",
        "defaultValue": ""
      }
    ]
  }
}
After creating the plugin directory and files, we load it in the code as a prompt template:
// Load plugin, indicating that this plugin is a prompt template
builder.Plugins.AddFromPromptDirectory("./plugins/WriterPlugin");

var kernel = builder.Build();

Console.WriteLine("Please enter the theme of the poem: ");
var input = Console.ReadLine();

// WriterPlugin plugin name, consistent with the plugin directory, and multiple sub-template directories can exist under the plugin directory.
FunctionResult result = await kernel.InvokeAsync("WriterPlugin", "ShortPoem", new() {
		{ "input", input }
	});
Console.WriteLine(result.GetValue<string>());
Input question and AI reply:
Please enter the theme of the poem:
Spring

Spring, spring, you are the poem of life,
All things revive, the season of love.
Among the lush green grass,
Are the light sounds of the poet's footsteps.

Spring, spring, you are the abyss of flower cores,
Peach blossoms and willows, some enchanting, some pure.
In the warm gentle breeze,
Is your dancing skirt.

Spring, spring, you are the feeling of the blue sky,
With a thousand birds singing, singing the endless sky.
Under your azure canopy,
Are your splendid moments of the one-man show.

Spring, spring, you are the eyes of the river,
Like a soft rain, nourishing the earth's creatures.
Your gentle streams,
Are your lingering songs.

Spring, spring, you are the poem of life,
With warm fingers, lighting up this gray world.
Your blooming, smiles, and joys,
Is the eternal spring in my heart.
For writing the plugin files, please refer to the official documentation: https://learn.microsoft.com/en-us/semantic-kernel/prompts/saving-prompts-as-files?tabs=Csharp
Automatically Calling Plugin Functions Based on the AI
After loading the plugin class using Semantic Kernel, Semantic Kernel can automatically call the functions within these plugin classes based on AI dialogue.
For example, there's a plugin type used to modify or retrieve the status of a light.
The code is as follows:
public class LightPlugin
{
	public bool IsOn { get; set; } = false;

	[KernelFunction]
	[Description("Get the light status.")]
	public string GetState() => IsOn ? "On" : "Off";

	[KernelFunction]
	[Description("Change the light status.")]
	public string ChangeState(bool newState)
	{
		this.IsOn = newState;
		var state = GetState();
		Console.WriteLine($"[The status of the light is: {state}]");

		return state;
	}
}
Each function uses the [Description] attribute to set comment information, which is crucial as the AI relies on these comments to understand the function's purpose.
Load the plugin class, and in the chat, it will be called by Semantic Kernel:
// Load the plugin class
builder.Plugins.AddFromType<LightPlugin>();

var kernel = builder.Build();

var history = new ChatHistory();

// Chat service
var chatCompletionService = kernel.GetRequiredService<IChatCompletionService>();

while (true)
{
	Console.Write("User > ");
	var userInput = Console.ReadLine();
	// Add to chat history
	history.AddUserMessage(userInput);

	// Enable function calls
	OpenAIPromptExecutionSettings openAIPromptExecutionSettings = new()
	{
		ToolCallBehavior = ToolCallBehavior.AutoInvokeKernelFunctions
	};

	// Get function
	var result = await chatCompletionService.GetChatMessageContentAsync(
		history,
		executionSettings: openAIPromptExecutionSettings,
		kernel: kernel);

	Console.WriteLine("Assistant > " + result);

	// Add to chat history
	history.AddMessage(result.Role, result.Content ?? string.Empty);
}
You can set breakpoints to debug functions in LightPlugin, then enter issues in the console to have the AI call local functions:
User > What's the status of the light?
Assistant > The current status of the light is off.
User > Turn on the light
[The status of the light is: On]
Assistant > The light has been turned on; it is now on.
User > Turn off the light
[The status of the light is: Off]
Readers can learn more from the official documentation: https://learn.microsoft.com/en-us/semantic-kernel/agents/plugins/using-the-kernelfunction-decorator?tabs=Csharp
As there is almost no documentation explaining the principles, it is advisable for readers to study the source code; further elaboration will not be provided here.
<br />

#### Explicitly Calling Functions in Conversation

We can explicitly call a function within the prompt template.

Define a plugin type `ConversationSummaryPlugin`, whose functionality is quite simple: it returns the chat history directly, with the `input` parameter representing the chat history.

```csharp
public class ConversationSummaryPlugin
{
    [KernelFunction, Description("Summarize a lengthy conversation record.")]
    public async Task<string> SummarizeConversationAsync(
        [Description("Long conversation record\r\n.")] string input, Kernel kernel)
    {
        await Task.CompletedTask;
        return input;
    }
}
To use this plugin function in the chat history, we need to use {{ConversationSummaryPlugin.SummarizeConversation $history}} in the prompt template, where $history is a custom variable name that can be anything as long as it is a string.
var chat = kernel.CreateFunctionFromPrompt(
@"{{ConversationSummaryPlugin.SummarizeConversation $history}}
User: {{$request}}
Assistant: "
);

The complete code is as follows:
// Load summary plugin
builder.Plugins.AddFromType<ConversationSummaryPlugin>();

var kernel = builder.Build();
var chat = kernel.CreateFunctionFromPrompt(
@"{{ConversationSummaryPlugin.SummarizeConversation $history}}
User: {{$request}}
Assistant: "
);

var history = new ChatHistory();

while (true)
{
    Console.Write("User > ");
    var request = Console.ReadLine();
    // Add to chat history
    history.AddUserMessage(request);

    // Streaming conversation
    var chatResult = kernel.InvokeStreamingAsync<StreamingChatMessageContent>(
        chat, new KernelArguments
        {
            { "request", request },
            { "history", string.Join("\n", history.Select(x => x.Role + ": " + x.Content)) }
        });

    string message = "";
    await foreach (var chunk in chatResult)
    {
        if (chunk.Role.HasValue)
        {
            Console.Write(chunk.Role + " > ");
        }
        message += chunk;
        Console.Write(chunk);
    }
    Console.WriteLine();

    history.AddAssistantMessage(message);
}
Since the template starts with {{ConversationSummaryPlugin.SummarizeConversation $history}}, the function will be called before each chat session.
For example, when entering 吃饭睡觉打豆豆, it first executes the ConversationSummaryPlugin.SummarizeConversation function and stores the return result in the template.
The final generated prompt comparison is as follows:
@"{{ConversationSummaryPlugin.SummarizeConversation $history}}
User: {{$request}}
Assistant: "
 user: 吃饭睡觉打豆豆
 User: 吃饭睡觉打豆豆
 Assistant:
It can be seen that after the function call returns the result, the prompt string automatically uses the User role in front.
Summary Implementation
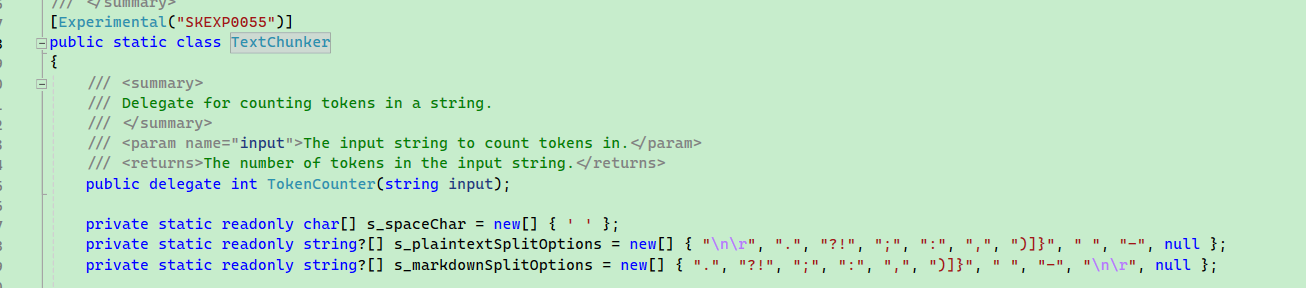
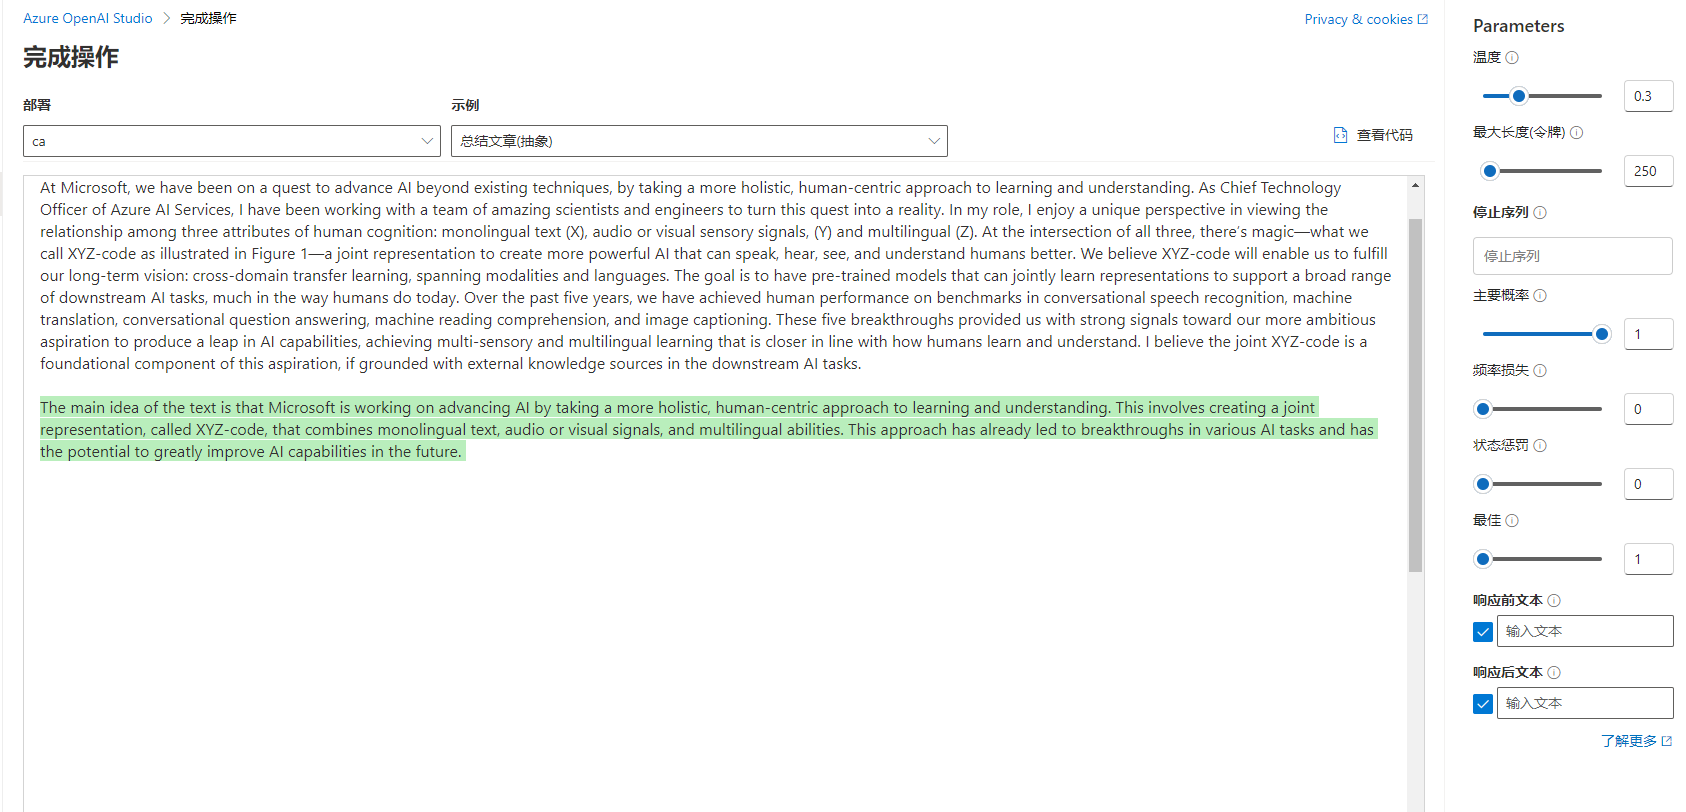
There are many text processing tools in the Semantic Kernel, such as the TextChunker type, which can help us extract lines and paragraphs from text. The scenario is set as follows: the user inputs a large block of text, and then we use AI to summarize this text.
The Semantic Kernel has some tools, but not many, and they are primarily designed for English.
Set a scenario where users can input one sentence at a time. After the user ends the input with 000, each sentence is sent to AI for summarization (instead of summarizing all together).
The example code is relatively long, and readers are advised to debug the code in Visual Studio and read it slowly.
// Maximum tokens for summary content
const int MaxTokens = 1024;
// Prompt template
const string SummarizeConversationDefinition =
    @"Starting content summary:
{{$request}}

Finally summarize the content.

Summarize the conversation in 'content to summary', identify key points discussed and any conclusions reached.
Do not include other common knowledge.
The summary should be in plain text, in complete sentences, without any marks or annotations.

Start summarizing:
";
// Configuration
PromptExecutionSettings promptExecutionSettings = new()
{
    ExtensionData = new Dictionary<string, object>()
            {
                { "Temperature", 0.1 },
                { "TopP", 0.5 },
                { "MaxTokens", MaxTokens }
            }
};

// Not using kernel.CreateFunctionFromPrompt here
// KernelFunctionFactory can help us configure prompts programmatically
var func = KernelFunctionFactory.CreateFromPrompt(
    SummarizeConversationDefinition,            // Prompt
    description: "Summarize a segment of conversation.",   // Description
    executionSettings: promptExecutionSettings);   // Configuration


#pragma warning disable SKEXP0055 // Type used for evaluation only and may be changed or removed in future updates. Disable this warning to proceed.
var request = "";
while (true)
{
    Console.Write("User > ");
    var input = Console.ReadLine();
    if (input == "000")
    {
        break;
    }
    request += Environment.NewLine;
    request += input;
}

// SK provided text splitter, splits text into lines
List<string> lines = TextChunker.SplitPlainTextLines(request, MaxTokens);
// Split the text into paragraphs
List<string> paragraphs = TextChunker.SplitPlainTextParagraphs(lines, MaxTokens);
string[] results = new string[paragraphs.Count];
for (int i = 0; i < results.Length; i++)
{
    // Summarizing paragraph by paragraph
    results[i] = (await func.InvokeAsync(kernel, new() { ["request"] = paragraphs[i] }).ConfigureAwait(false))
        .GetValue<string>() ?? string.Empty;
}
Console.WriteLine($"""
                Summary:
                {string.Join("\n", results)}
                """);
After entering a bunch of content, use 000 on a new line to end the input and let AI summarize the user's words.
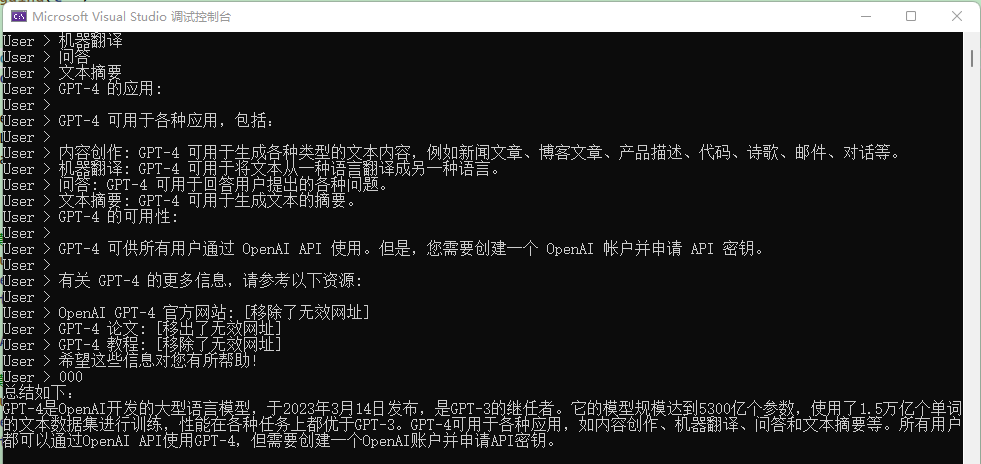
However, after debugging, I found that the processing of this text by TextChunker seems poor, as it recognized this multi-line text as a single line and paragraph.
This may relate to the delimiters used by TextChunker, as SK is primarily aimed at English.
The demonstration effect of this section is not great; however, the main goal is to help users understand that KernelFunctionFactory.CreateFromPrompt can facilitate creating prompt templates, configuring temperature using PromptExecutionSettings, and using TextChunker to split text.
When configuring PromptExecutionSettings, three parameters appeared, with MaxTokens representing the maximum number of tokens for the robot's response, thus avoiding excessive verbosity from the bot.
The roles of the other two parameters are:
Temperature: The value ranges from 0 to 2. In simple terms, the smaller the temperature value, the more determined the model's response will be. The larger the value, the stronger the AI's imagination, making it more likely to deviate from reality. Generally, for poetry and science fiction, a higher setting can be used to allow AI to respond creatively.
TopP: A different method than Temperature, known as nucleus sampling, where the model considers the results of tokens that constitute the top P probability mass. Thus, 0.1 means only the results of tokens that comprise the top 10% of the probability mass are considered.
It is generally advised to adjust one of the parameters rather than both.
For more related parameter configurations, please refer to https://learn.microsoft.com/en-us/azure/ai-services/openai/reference.
Configuring Prompt Templates
Earlier, a new method of creating functions was mentioned:
var func = KernelFunctionFactory.CreateFromPrompt(
    SummarizeConversationDefinition,            // Prompt
    description: "Summarize a segment of conversation.",   // Description
    executionSettings: promptExecutionSettings);   // Configuration
When creating a prompt template, the PromptTemplateConfig type can be used to adjust the parameters that control the behavior of the prompt.
// Maximum tokens for summary content
const int MaxTokens = 1024;
// Prompt template
const string SummarizeConversationDefinition = "...";
var func = kernel.CreateFunctionFromPrompt(new PromptTemplateConfig
{
    // Name does not support Chinese or special characters
    Name = "chat",
    Description = "Summarize a segment of conversation.",
    Template = SummarizeConversationDefinition,
    TemplateFormat = "semantic-kernel",
    InputVariables = new List<InputVariable>
    {
        new InputVariable{Name = "request", Description = "User's question", IsRequired = true }
    },
    ExecutionSettings = new Dictionary<string, PromptExecutionSettings>
    {
        {
            "default",
            new OpenAIPromptExecutionSettings()
            {
                MaxTokens = MaxTokens,
                Temperature = 0
            }
        },
    }
});
The configuration in the ExecutionSettings section can take effect on the model used. The configuration here will not all take effect simultaneously but will affect based on the actual model in use.
    ExecutionSettings = new Dictionary<string, PromptExecutionSettings>
    {
        {
            "default",
            new OpenAIPromptExecutionSettings()
            {
                MaxTokens = 1000,
                Temperature = 0
            }
        },
        {
            "gpt-3.5-turbo", new OpenAIPromptExecutionSettings()
            {
                ModelId = "gpt-3.5-turbo-0613",
                MaxTokens = 4000,
                Temperature = 0.2
            }
        },
        {
            "gpt-4",
            new OpenAIPromptExecutionSettings()
            {
                ModelId = "gpt-4-1106-preview",
                MaxTokens = 8000,
                Temperature = 0.3
            }
        }
    }
At this point, it is worth mentioning again the earlier usage of configuration prompt template files; the two approaches are similar.
We can also use a file format to store configurations consistent with the code, structured as follows:
└─── chat
     |
     └─── config.json
     └─── skprompt.txt
The template file consists of config.json and skprompt.txt, where skprompt.txt configures prompts that align with the Template field in PromptTemplateConfig.
The contents of config.json are quite extensive, and you can compare the following JSON with the code in the Summary Implementation section; both are almost identical.
{
     "schema": 1,
     "type": "completion",
     "description": "Summarize a segment of conversation",
     "execution_settings": {
        "default": {
          "max_tokens": 1000,
          "temperature": 0
        },
        "gpt-3.5-turbo": {
          "model_id": "gpt-3.5-turbo-0613",
          "max_tokens": 4000,
          "temperature": 0.1
        },
        "gpt-4": {
          "model_id": "gpt-4-1106-preview",
          "max_tokens": 8000,
          "temperature": 0.3
        }
      },
     "input_variables": [
        {
          "name": "request",
          "description": "User's question.",
          "required": true
        },
        {
          "name": "history",
          "description": "User's question.",
          "required": true
        }
     ]
}
C# Code:
    // Name does not support Chinese or special characters
    Name = "chat",
    Description = "Summarize a segment of conversation.",
    Template = SummarizeConversationDefinition,
    TemplateFormat = "semantic-kernel",
    InputVariables = new List<InputVariable>
    {
        new InputVariable{Name = "request", Description = "User's question", IsRequired = true }
    },
    ExecutionSettings = new Dictionary<string, PromptExecutionSettings>
    {
        {
            "default",
            new OpenAIPromptExecutionSettings()
            {
                MaxTokens = 1000,
                Temperature = 0
            }
        },
        {
            "gpt-3.5-turbo", new OpenAIPromptExecutionSettings()
            {
                ModelId = "gpt-3.5-turbo-0613",
                MaxTokens = 4000,
                Temperature = 0.2
            }
        },
        {
            "gpt-4",
            new OpenAIPromptExecutionSettings()
            {
                ModelId = "gpt-4-1106-preview",
                MaxTokens = 8000,
                Temperature = 0.3
            }
        }
    }
Prompt Template Syntax
Currently, we have utilized prompt template syntax in two places, namely variable usage and function calls. As relevant usages have been previously introduced, a brief mention is warranted here.
Variables
The use of variables is straightforward; within the prompt project, use {{$variableName}} format, such as {{$name}}.
Then there are various ways to inject values in conversations, such as using KernelArguments to store variable values:
new KernelArguments
		{
			{ "name", "工良" }
		});
Function Call
As mentioned in the Implementation Summary section, a function can be explicitly called in the prompt template, for example, defining a function as follows:
// No Kernel kernel
[KernelFunction, Description("Give you a long conversation record, summarize it.")]
		public async Task<string> SummarizeConversationAsync(
			[Description("Long conversation record\r\n.")] string input)
		{
			await Task.CompletedTask;
			return input;
		}

// With Kernel kernel
[KernelFunction, Description("Give you a long conversation record, summarize it.")]
		public async Task<string> SummarizeConversationAsync(
			[Description("Long conversation record\r\n.")] string input, Kernel kernel)
		{
			await Task.CompletedTask;
			return input;
		}

[KernelFunction]
[Description("Sends an email to a recipient.")]
public async Task SendEmailAsync(
    Kernel kernel,
    string recipientEmails,
    string subject,
    string body
)
{
    // Add logic to send an email using the recipientEmails, subject, and body
    // For now, we’ll just print out a success message to the console
    Console.WriteLine("Email sent!");
}
Functions must be marked with [KernelFunction], and [Description] describes the function's purpose. Functions can have one or more parameters, and each parameter is recommended to use [Description] to describe its purpose.
In function parameters, a Kernel kernel can be included, either at the beginning or the end, or it can be omitted entirely; its main purpose is to inject the Kernel object.
When using functions in the prompt, you need to pass the function parameters:
Summarize as follows: {{AAA.SummarizeConversationAsync $input}}.
For other escape methods for special characters, please refer to the official documentation: https://learn.microsoft.com/en-us/semantic-kernel/prompts/prompt-template-syntax
Text Generation
Having written quite a bit about conversation dialogues, this section will discuss the application of text generation.
There are several models mainly for text generation and chat dialogue:
| Model type | Model |
| :-------------- | :--------------- |
| Text generation | text-ada-001 |
| Text generation | text-babbage-001 |
| Text generation | text-curie-001 |
| Text generation | text-davinci-001 |
| Text generation | text-davinci-002 |
| Text generation | text-davinci-003 |
| Chat Completion | gpt-3.5-turbo |
| Chat Completion | gpt-4 |
Of course, text generation is not limited to just these few models; using gpt-4 with the right background prompts can also achieve corresponding results.
Text generation can have the following scenarios:
An example of using text generation is as follows, where AI summarizes the text:
Following this example, we first write an extension function in Env.cs to configure the text generation using .AddAzureOpenAITextGeneration() instead of chat dialogues.
public static IKernelBuilder WithAzureOpenAIText(this IKernelBuilder builder)
{
	var configuration = GetConfiguration();

	// Need to change the model, for example, to gpt-35-turbo-instruct
	var AzureOpenAIDeploymentName = "ca";
	var AzureOpenAIModelId = "gpt-35-turbo-instruct";
	var AzureOpenAIEndpoint = configuration["AzureOpenAI:Endpoint"]!;
	var AzureOpenAIApiKey = configuration["AzureOpenAI:ApiKey"]!;

	builder.Services.AddLogging(c =>
	{
		c.AddDebug()
		.SetMinimumLevel(LogLevel.Trace)
		.AddSimpleConsole(options =>
		{
			options.IncludeScopes = true;
			options.SingleLine = true;
			options.TimestampFormat = "yyyy-MM-dd HH:mm:ss ";
		});
	});

	// Use Chat, which implies large language model chat
	builder.Services.AddAzureOpenAITextGeneration(
		AzureOpenAIDeploymentName,
		AzureOpenAIEndpoint,
		AzureOpenAIApiKey,
		modelId: AzureOpenAIModelId
	);
	return builder;
}
Then write the question code, allowing the user to input multiple lines of text and end input with 000 to submit the text to AI for summarization. To avoid overly verbose AI responses during summarization, relevant parameters are configured with ExecutionSettings.
An example code is as follows:
builder = builder.WithAzureOpenAIText();

var kernel = builder.Build();

Console.WriteLine("Input text:");
var request = "";
while (true)
{
	var input = Console.ReadLine();
	if (input == "000")
	{
		break;
	}
	request += Environment.NewLine;
	request += input;
}

var func = kernel.CreateFunctionFromPrompt(new PromptTemplateConfig
{
	Name = "chat",
	Description = "Given a conversation record, summarize this part of the dialogue.",
	// User's text
	Template = request,
	TemplateFormat = "semantic-kernel",
	ExecutionSettings = new Dictionary<string, PromptExecutionSettings>
	{
			{
				"default",
				new OpenAIPromptExecutionSettings()
				{
					MaxTokens = 100,
					Temperature = (float)0.3,
					TopP = (float)1,
					FrequencyPenalty = (float)0,
					PresencePenalty = (float)0
				}
			}
	}
});

var result = await func.InvokeAsync(kernel);

Console.WriteLine($@"
				Summary as follows:
				{string.Join("\n", result)}
				");

Semantic Kernel Plugins
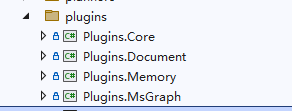
The Semantic Kernel provides several plugins in packages starting with Microsoft.SemanticKernel.Plugins, with different packages having different functional plugins. Most of these are still semi-finished products, so this section will only provide a brief explanation.
Currently, the official repository has the following packages that offer some plugins:
├─Plugins.Core
├─Plugins.Document
├─Plugins.Memory
├─Plugins.MsGraph
└─Plugins.Web
When searching in nuget, you need to prepend
Microsoft.SemanticKernel..
The Plugins.Core contains the most basic simple plugins:
// Read and write files
FileIOPlugin

// HTTP requests and return string results
HttpPlugin

// Only provides + and - operations
MathPlugin

// Simple features like text case conversion
TextPlugin

// Get the local date and time
TimePlugin

// Wait for a period of time before performing an operation
WaitPlugin
Since these plugins are not particularly helpful for this demonstration and are quite simple, they won't be elaborated on here. The document plugin will be briefly explained next.
Document Plugin
Install Microsoft.SemanticKernel.Plugins.Document (make sure to check the preview box), which includes the document plugin that uses the DocumentFormat.OpenXml project. DocumentFormat.OpenXml supports the following document formats:
DocumentFormat.OpenXml project address: https://github.com/dotnet/Open-XML-SDK
- WordprocessingML: for creating and editing Word documents (.docx)
- SpreadsheetML: for creating and editing Excel spreadsheets (.xlsx)
- PowerPointML: for creating and editing PowerPoint presentations (.pptx)
- VisioML: for creating and editing Visio diagrams (.vsdx)
- ProjectML: for creating and editing Project files (.mpp)
- DiagramML: for creating and editing Visio diagrams (.vsdx)
- PublisherML: for creating and editing Publisher publications (.pubx)
- InfoPathML: for creating and editing InfoPath forms (.xsn)
The document plugin does not currently have good application scenarios; it only makes it convenient to load documents and extract text. The example code is as follows:
DocumentPlugin documentPlugin = new(new WordDocumentConnector(), new LocalFileSystemConnector());
string filePath = "(完整版)基础财务知识.docx";
string text = await documentPlugin.ReadTextAsync(filePath);
Console.WriteLine(text);
Since these plugins are all semi-finished products, they won't be further explained here.
Planners
Still semi-finished, so no further elaboration will be made here.
Because I haven't figured out how to use this either.
Kernel Memory to Build Document Knowledge Base
Kernel Memory is an overseas personal project that supports PDF and Word documents, PowerPoint presentations, images, spreadsheets, etc., by utilizing Large Language Models (LLMs), embeddings, and vector storage to extract information and generate records, primarily aimed at providing interfaces related to document processing; the most common use case is a knowledge base system. Readers who are not familiar with knowledge base systems are encouraged to deploy a FastGPT system for research.
However, Kernel Memory remains semi-finished, and documentation is not complete, so the author will only explain the core parts; interested readers are advised to directly view the source code.
Kernel Memory project documentation: https://microsoft.github.io/kernel-memory/
Kernel Memory project repository: https://github.com/microsoft/kernel-memory
Open the Kernel Memory project repository and pull the project to your local machine.
To explain the knowledge base system, it can be understood in this way. Everyone knows that training a medical model is quite troublesome; not to mention whether the machine's GPU is powerful enough, just training AI requires mastery of various professional knowledge. If new requirements arise, it may require retraining a model, which is overly cumbersome.
Thus, Large Language Models appeared, characterized by learning a bit of everything but not being deeply professional; the advantage is that they can be used across various fields like medicine, photography, etc.
While professional knowledge may not be extensive or deep, we can tackle this part differently.
First, extract text from documents like .docx, .pdf, and split it into multiple paragraphs; each paragraph uses an AI model to generate related vectors. The principle of these vectors is not well understood by the author; however, one can simply understand it as tokenization. After generating vectors, both the paragraph text and vectors are stored in a database (the database needs to support vectors).
Then, when a user asks "What is a report", searches the database first, assesses similarity based on vectors, retrieves several relevant paragraphs, and sends these paragraphs together with the user's question to AI. This is similar to including background knowledge in the prompt template, adding the user's question, and letting AI summarize the answer.

The author recommends that if conditions allow, deploy an open-source version of the FastGPT system, research this system, and learn it. After mastering this system, studying Kernel Memory will feel much simpler. Similarly, if conditions allow, one can first deploy an open-source AI dialogue system like LobeHub, study how to use it, and then delve into the Semantic Kernel documentation, followed by studying the source code more deeply.
Web Processing
Kernel Memory supports three ways to import information from the web: web scraping, importing documents, or directly providing strings. Since Kernel Memory provides a Service example with some valuable code implementations to study, the following example demonstrates starting this web service and then pushing the document to be processed by the Service from the client, with the client itself not interfacing with AI.
As this step is quite complicated, readers who encounter difficulties during implementation may choose to abandon it; there will be instructions later on how to write one themselves.
Open the service/Service path in the kernel-memory source code.
Use the command to start the service:
dotnet run setup
The console's role is to help generate relevant configuration. After starting this console, follow the prompts to select the corresponding options (use arrow keys to choose options and press Enter to confirm), and fill in the configuration content, which will be stored in appsettings.Development.json.
If readers do not understand how to use this console, they can directly replace the JSON below in appsettings.Development.json.
There are several places where readers need to configure:
AccessKey1,AccessKey2are the verification keys needed for the client to use the Service; any letters can be filled in.AzureAIDocIntel,AzureOpenAIEmbedding,AzureOpenAITextshould be filled in according to actual situations.
{
  "KernelMemory": {
    "Service": {
      "RunWebService": true,
      "RunHandlers": true,
      "OpenApiEnabled": true,
      "Handlers": {}
    },
    "ContentStorageType": "SimpleFileStorage",
    "TextGeneratorType": "AzureOpenAIText",
    "ServiceAuthorization": {
      "Enabled": true,
      "AuthenticationType": "APIKey",
      "HttpHeaderName": "Authorization",
      "AccessKey1": "Custom Key 1",
      "AccessKey2": "Custom Key 2"
    },
    "DataIngestion": {
      "OrchestrationType": "Distributed",
      "DistributedOrchestration": {
        "QueueType": "SimpleQueues"
      },
      "EmbeddingGenerationEnabled": true,
      "EmbeddingGeneratorTypes": [
        "AzureOpenAIEmbedding"
      ],
      "MemoryDbTypes": [
        "SimpleVectorDb"
      ],
      "ImageOcrType": "AzureAIDocIntel",
      "TextPartitioning": {
        "MaxTokensPerParagraph": 1000,
        "MaxTokensPerLine": 300,
        "OverlappingTokens": 100
      },
      "DefaultSteps": []
    },
    "Retrieval": {
      "MemoryDbType": "SimpleVectorDb",
      "EmbeddingGeneratorType": "AzureOpenAIEmbedding",
      "SearchClient": {
        "MaxAskPromptSize": -1,
        "MaxMatchesCount": 100,
        "AnswerTokens": 300,
        "EmptyAnswer": "INFO NOT FOUND"
      }
    },
    "Services": {
      "SimpleQueues": {
        "Directory": "_tmp_queues"
      },
      "SimpleFileStorage": {
        "Directory": "_tmp_files"
      },
      "AzureAIDocIntel": {
        "Auth": "ApiKey",
        "Endpoint": "https://aaa.openai.azure.com/",
        "APIKey": "aaa"
      },
      "AzureOpenAIEmbedding": {
        "APIType": "EmbeddingGeneration",
        "Auth": "ApiKey",
        "Endpoint": "https://aaa.openai.azure.com/",
        "Deployment": "aitext",
        "APIKey": "aaa"
      },
      "SimpleVectorDb": {
        "Directory": "_tmp_vectors"
      },
      "AzureOpenAIText": {
        "APIType": "ChatCompletion",
        "Auth": "ApiKey",
        "Endpoint": "https://aaa.openai.azure.com/",
        "Deployment": "myai",
        "APIKey": "aaa",
        "MaxRetries": 10
      }
    }
  },
  "Logging": {
    "LogLevel": {
      "Default": "Warning"
    }
  },
  "AllowedHosts": "*"
}
For more details, refer to the documentation: https://microsoft.github.io/kernel-memory/quickstart/configuration
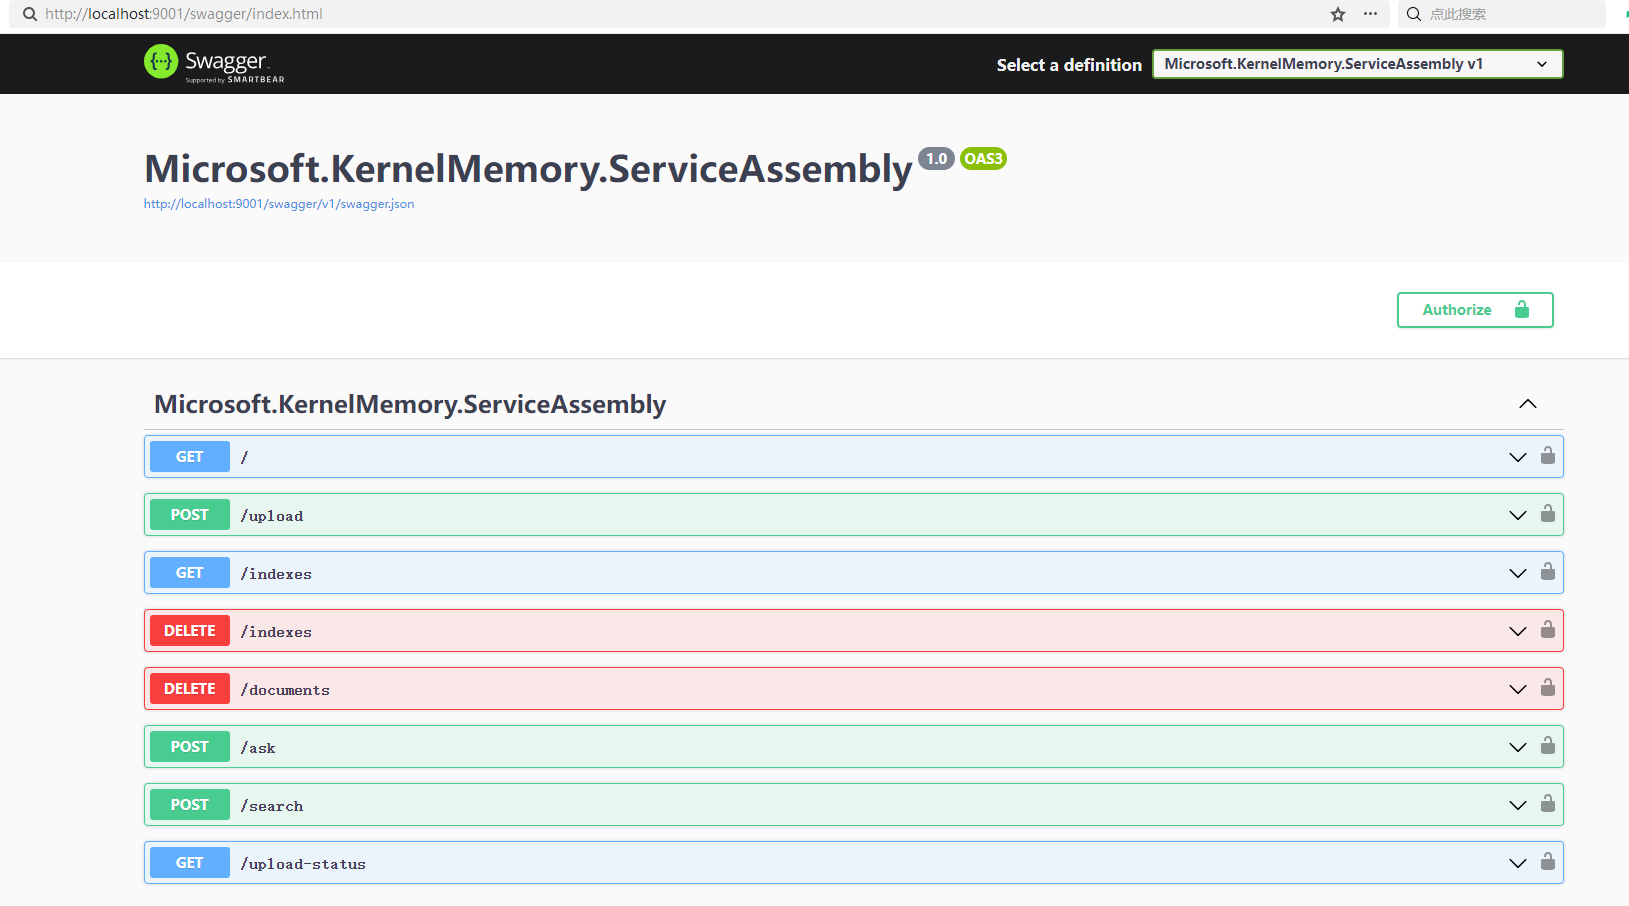
Once the Service is started, you can see the following swagger interface.
Then write the code to connect to the knowledge base system and push the web page address to the Service. Create a project and introduce the Microsoft.KernelMemory.WebClient package.
Then, use the following code to push the document for processing to the Service.
// The address of the deployed Service, and the custom key.
var memory = new MemoryWebClient(endpoint: "http://localhost:9001/", apiKey: "Custom Key 1");

// Import web page
await memory.ImportWebPageAsync(
	"https://baike.baidu.com/item/BitcoinMiningMachine/12536531",
	documentId: "doc02");

Console.WriteLine("Processing the document, please wait...");
// Use AI to process web knowledge
while (!await memory.IsDocumentReadyAsync(documentId: "doc02"))
{
	await Task.Delay(TimeSpan.FromMilliseconds(1500));
}

// Asking
var answer = await memory.AskAsync("What is Bitcoin?");

Console.WriteLine($"\nAnswer: {answer.Result}");
There are also ImportTextAsync and ImportDocumentAsync methods for importing knowledge.
Manual Document Processing
This section contains more content, mainly explaining how to use Kernel Memory to import documents, generate vectors, store vectors, search for questions, etc.
Create a new project and install the Microsoft.KernelMemory.Core library.
For demonstration purposes, the code below temporarily stores documents and vectors instead of using database storage.
The complete code example is as follows:
using Microsoft.KernelMemory;
using Microsoft.KernelMemory.MemoryStorage.DevTools;
using Microsoft.SemanticKernel;
using Microsoft.SemanticKernel.Connectors.OpenAI;

var memory = new KernelMemoryBuilder()
	// The location where the vectors generated from the parsed document are stored, options include Postgres, etc.
	// Here we choose to use local temporary file storage for the vectors
	.WithSimpleVectorDb(new SimpleVectorDbConfig
	{
		Directory = "aaa"
	})
	// Configure document parsing vector model
	.WithAzureOpenAITextEmbeddingGeneration(new AzureOpenAIConfig
	{
		Deployment = "aitext",
		Endpoint = "https://aaa.openai.azure.com/",
		Auth = AzureOpenAIConfig.AuthTypes.APIKey,
		APIType = AzureOpenAIConfig.APITypes.EmbeddingGeneration,
		APIKey = "aaa"
	})
	// Configure text generation model
	.WithAzureOpenAITextGeneration(new AzureOpenAIConfig
	{
		Deployment = "myai",
		Endpoint = "https://aaa.openai.azure.com/",
		Auth = AzureOpenAIConfig.AuthTypes.APIKey,
		APIKey = "aaa",
		APIType = AzureOpenAIConfig.APITypes.ChatCompletion
	})
	.Build();

// Import web page
await memory.ImportWebPageAsync(
	"https://baike.baidu.com/item/BitcoinMiningMachine/12536531",
	documentId: "doc02");

// Wait for ingestion to complete, usually 1-2 seconds
Console.WriteLine("Processing the document, please wait...");
while (!await memory.IsDocumentReadyAsync(documentId: "doc02"))
{
	await Task.Delay(TimeSpan.FromMilliseconds(1500));
}

// Ask a question
var answer = await memory.AskAsync("What is Bitcoin?");

Console.WriteLine($"\nAnswer: {answer.Result}");

First, use KernelMemoryBuilder to build the configuration. There are many configuration items; here we will use two models: one for the vector model and one for the text generation model (a conversation model like gpt-4-32k can also be used).
Next, let's explain various aspects of the program's workflow.
First, let's talk about where to store the files, that is, after importing the files, where to store them. The interface for storing files is IContentStorage, which currently has two implementations:
AzureBlobsStorage
// Store in directory
SimpleFileStorage
Usage:
var memory = new KernelMemoryBuilder()
.WithSimpleFileStorage(new SimpleFileStorageConfig
	{
		Directory = "aaa"
	})
	.WithAzureBlobsStorage(new AzureBlobsConfig
	{
		Account = ""
	})
	...
Kernel Memory does not yet support Mongodb, but you can implement your own using the IContentStorage interface.
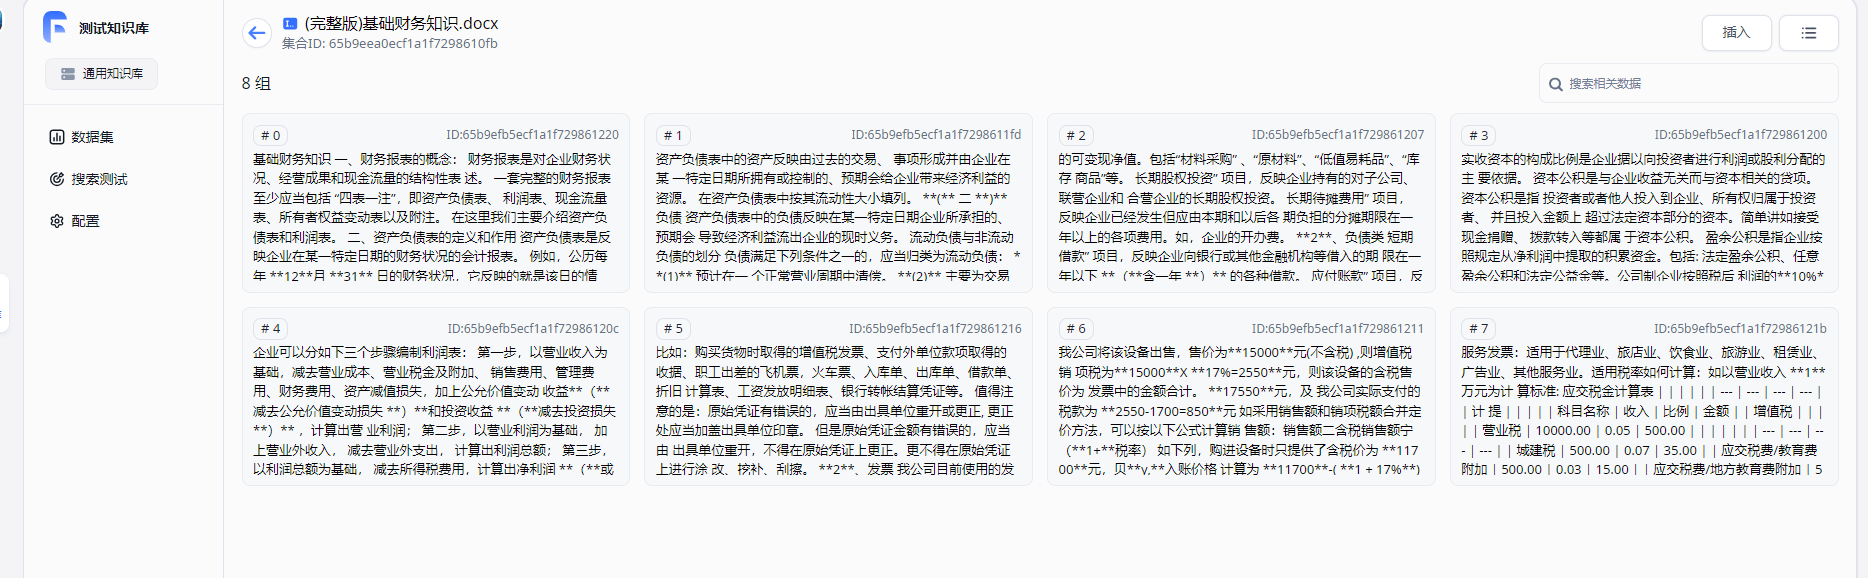
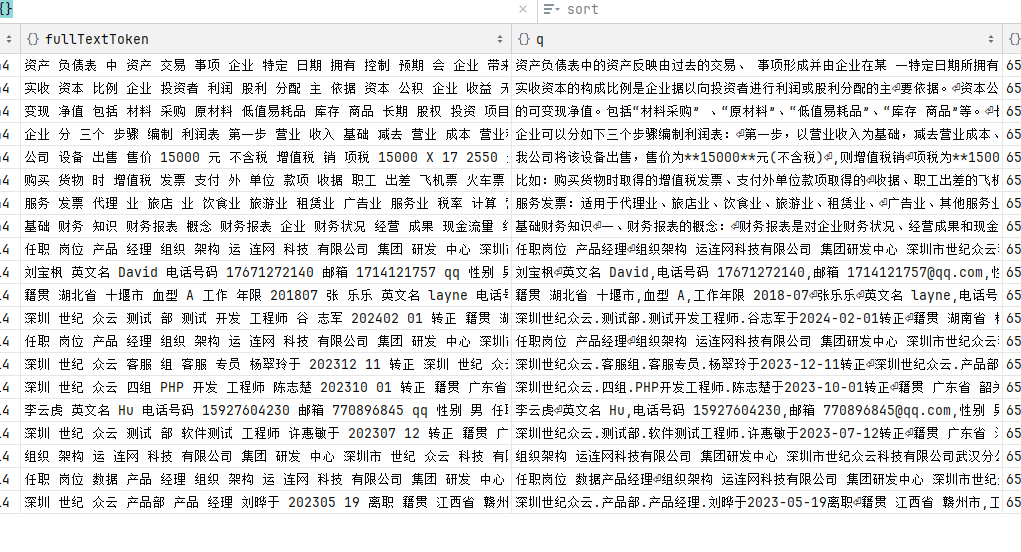
After locally parsing the document, it will be segmented as shown in the right column q.
Next, configure the document generation vector model. After importing the document, the text will be extracted locally, and an AI model will be needed to generate vectors from the text.
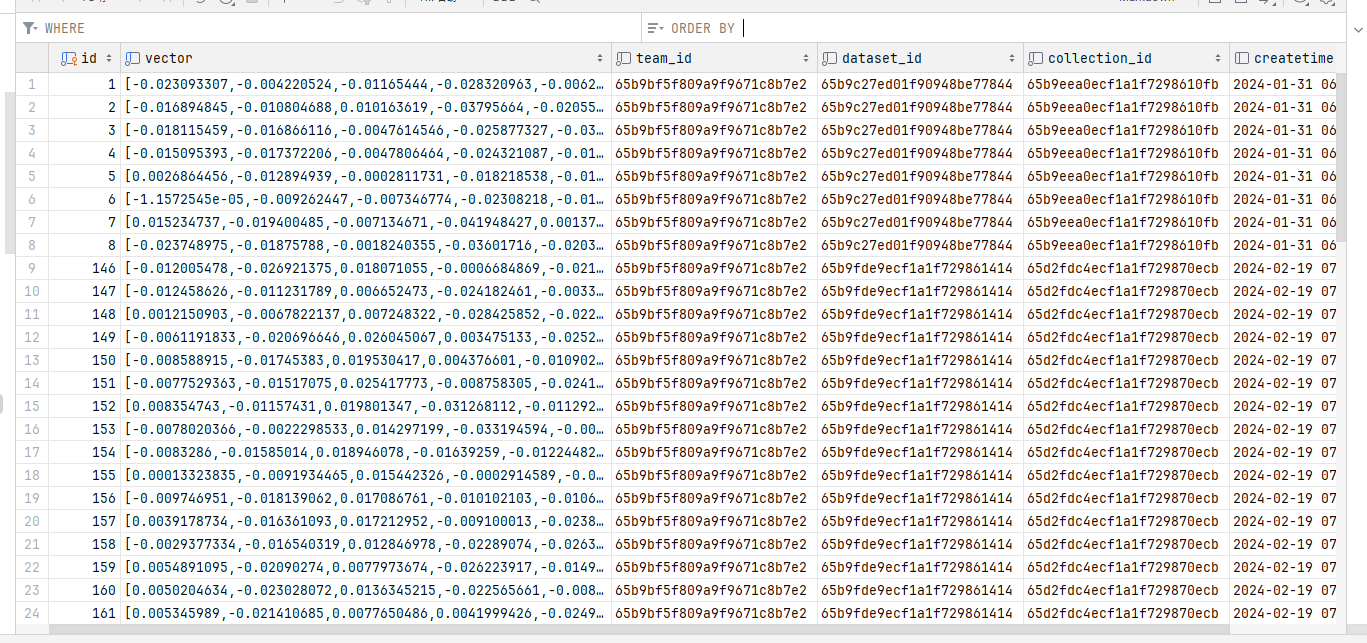
The parsed vectors look like this:
To generate vectors from text, you will need to implement the ITextEmbeddingGenerator interface, which currently has two implementations:
AzureOpenAITextEmbeddingGenerator
OpenAITextEmbeddingGenerator
Example:
var memory = new KernelMemoryBuilder()
// Configure document parsing vector model
	.WithAzureOpenAITextEmbeddingGeneration(new AzureOpenAIConfig
	{
		Deployment = "aitext",
		Endpoint = "https://xxx.openai.azure.com/",
		Auth = AzureOpenAIConfig.AuthTypes.APIKey,
		APIType = AzureOpenAIConfig.APITypes.EmbeddingGeneration,
		APIKey = "xxx"
	})
	.WithOpenAITextEmbeddingGeneration(new OpenAIConfig
	{
        ... ...
	})
After generating vectors, these vectors need to be stored, requiring the implementation of the IMemoryDb interface, with the following configurations available:
	// The location where the vectors generated from the parsed document are stored, options include Postgres, etc.
	// Here we choose to use local temporary file storage for the vectors
	.WithSimpleVectorDb(new SimpleVectorDbConfig
	{
		Directory = "aaa"
	})
	.WithAzureAISearchMemoryDb(new AzureAISearchConfig
	{

	})
	.WithPostgresMemoryDb(new PostgresConfig
	{

	})
	.WithQdrantMemoryDb(new QdrantConfig
	{

	})
	.WithRedisMemoryDb("host=....")
When a user asks questions, this will first invoke relevant methods in the IMemoryDb to query the vectors and indexes in the document, searching for related texts.
Once related texts are found, they need to be sent to the AI for processing, using the ITextGenerator interface, which currently has two implementations:
AzureOpenAITextGenerator
OpenAITextGenerator
Configuration example:
	// Configure text generation model
	.WithAzureOpenAITextGeneration(new AzureOpenAIConfig
	{
		Deployment = "myai",
		Endpoint = "https://aaa.openai.azure.com/",
		Auth = AzureOpenAIConfig.AuthTypes.APIKey,
		APIKey = "aaa",
		APIType = AzureOpenAIConfig.APITypes.ChatCompletion
	})
When importing a document, the document's text is first extracted and then segmented.
Each segment of text is processed with the vector model to extract vectors, which are stored in the service provided by the IMemoryDb interface, such as a Postgres database.
When asking questions or searching for content, it searches for vectors in the location of IMemoryDb, retrieves relevant text, collects these texts, and sends them to the AI (using the text generation model) as prompts. The AI then learns from these prompts to answer the user's questions.
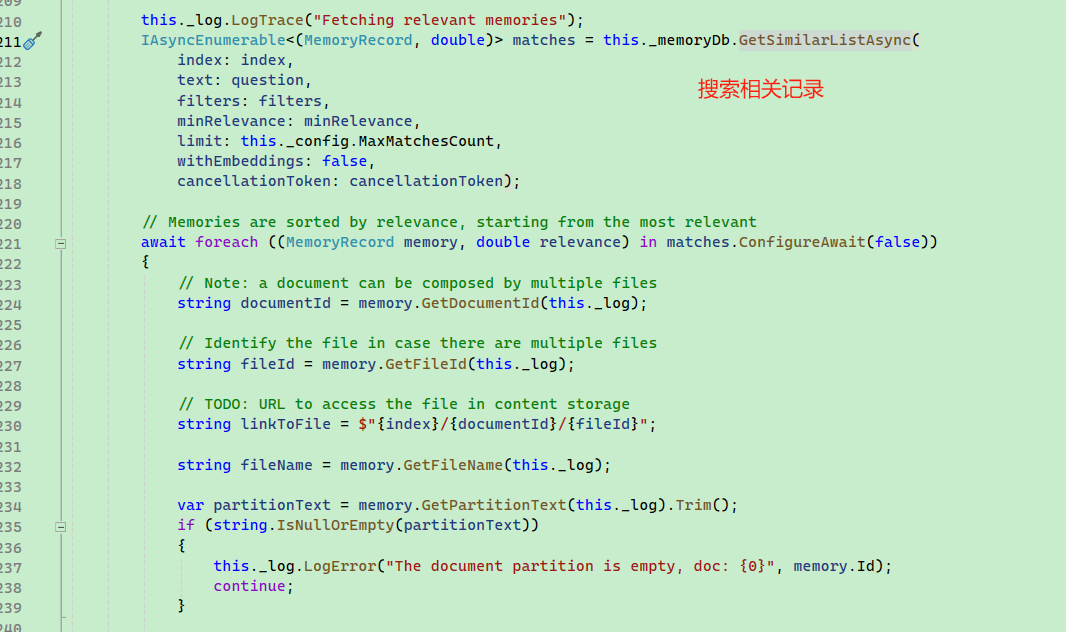
For detailed source code, refer to Microsoft.KernelMemory.Search.SearchClient. Due to the amount of source code, it won't be elaborated here.
This may be hard to understand, so we can use the following code as an example.
// Import document
await memory.ImportDocumentAsync(
	"aaa/(Complete)BasicFinancialKnowledge.docx",
	documentId: "doc02");

Console.WriteLine("Processing the document, please wait...");
while (!await memory.IsDocumentReadyAsync(documentId: "doc02"))
{
	await Task.Delay(TimeSpan.FromMilliseconds(1500));
}

var answer1 = await memory.SearchAsync("How to create a report?");
// Each Citation represents a document file
foreach (Citation citation in answer1.Results)
{
	// Text related to the search keyword
	foreach(var partition in citation.Partitions)
	{
		Console.WriteLine(partition.Text);
	}
}

var answer2 = await memory.AskAsync("How to create a report?");

Console.WriteLine($"\nAnswer: {answer2.Result}");
Readers can set a breakpoint at foreach here. When the user asks “How to create a report?”, the relevant documents retrieved from the search will appear.
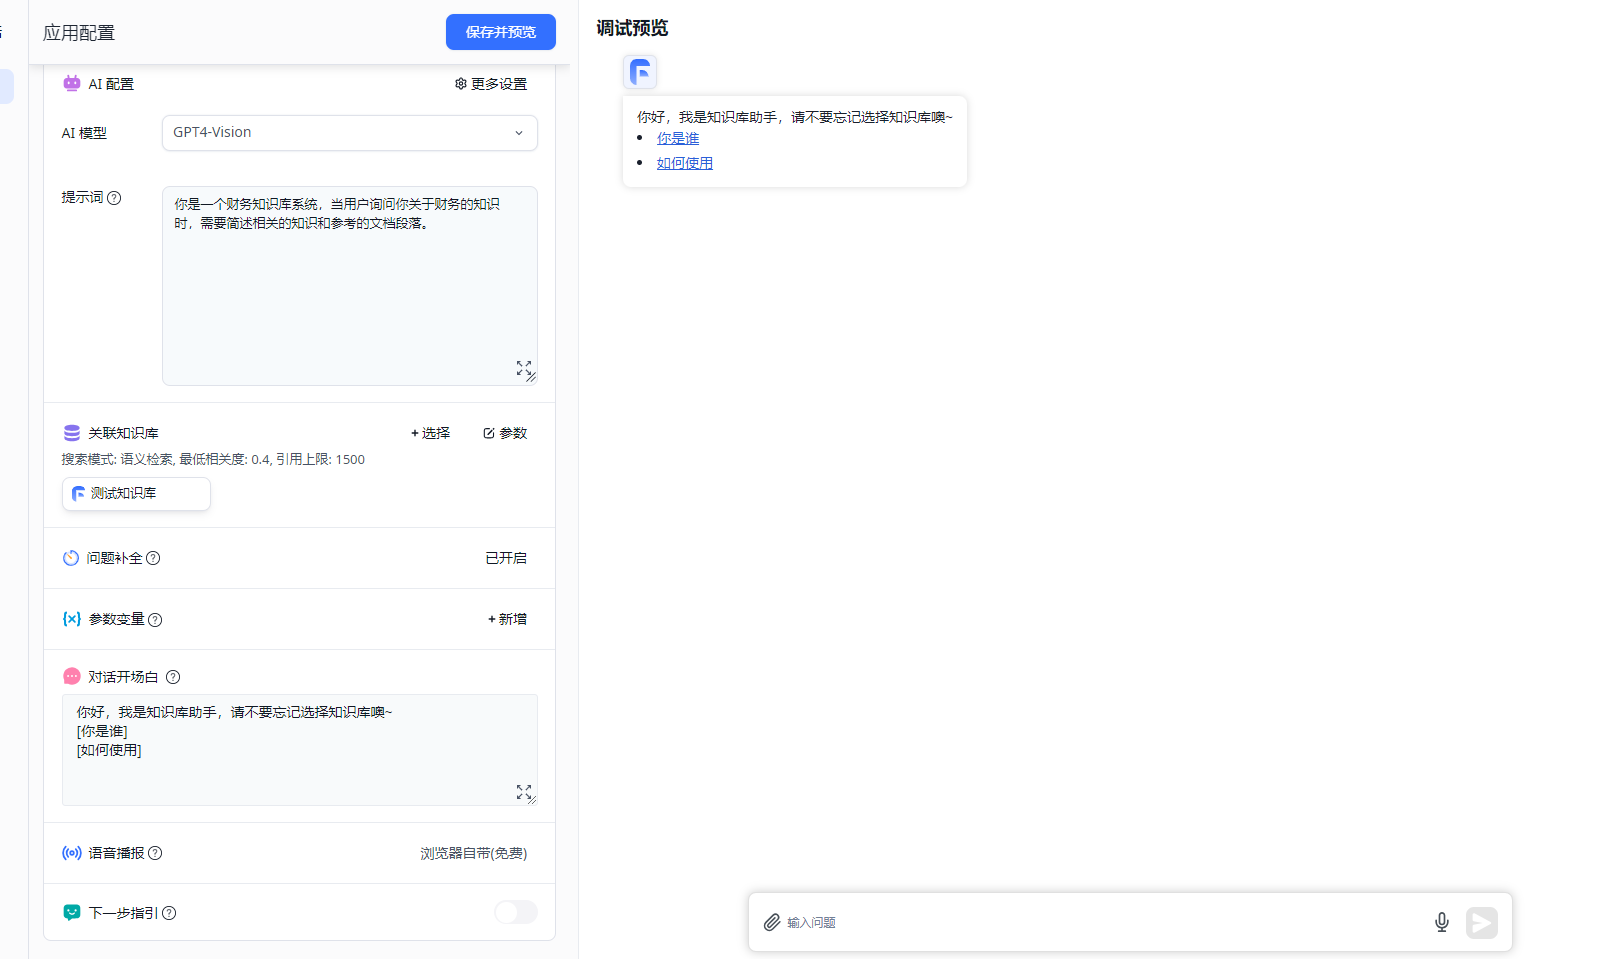
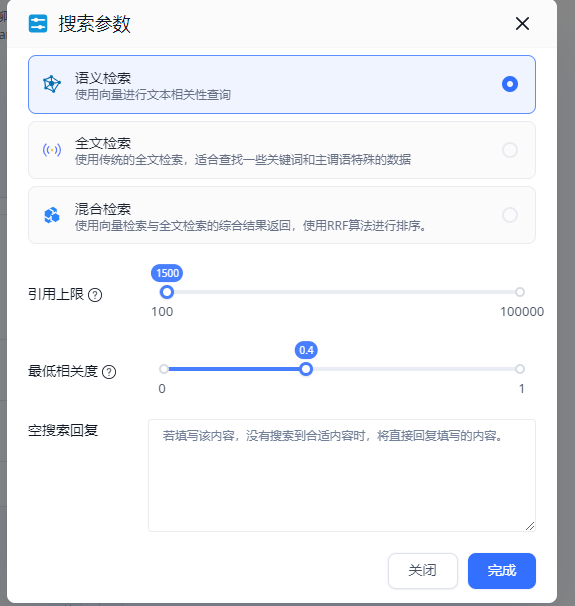
Then, referring to Fastgpt's search configuration, one can write a similar knowledge base system.

文章评论