关于从零设计 .NET 开发框架
作者:whuanle
教程说明:
仓库地址:https://github.com/whuanle/maomi
文档地址:https://maomi.whuanle.cn
作者博客:
https://www.whuanle.cn
https://www.cnblogs.com/whuanle
Modularization and Automatic Service Registration
The most famous web framework developed based on ASP.NET Core is ABP. One of the main features of ABP is the creation of a module class in each project (assembly) when developing different projects. The program loads each assembly, scans for all module classes, and then initializes the assembly through the module classes as entry points.
The benefit of using a modular approach to develop applications is that developers do not need to focus on how assemblies are loaded and configured. When developing an assembly, developers configure how to initialize and how to read configurations in the module class. The users only need to introduce the module class, and the framework automatically starts the module class.
Maomi.Core also provides the capability of modular development, along with easy-to-use automatic service registration. Maomi.Core is a very simple package that can be used in console, web, and WPF projects. When combined with MVVM in WPF projects, it can greatly reduce code complexity, making the code clearer and more straightforward.
Quick Start
There are two projects, Demo1.Api and Demo1.Application, each with a module class that needs to implement the IModule interface.
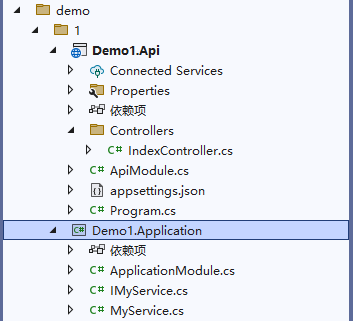
The content of the ApplicationModule.cs file in the Demo1.Application project is as follows:
    public class ApplicationModule : IModule
    {
        // Module class can use dependency injection
        private readonly IConfiguration _configuration;
        public ApplicationModule(IConfiguration configuration)
        {
            _configuration = configuration;
        }

        public void ConfigureServices(ServiceContext services)
        {
            // Module initialization code can be written here
        }
    }
To register services in the container, simply add the [InjectOn] attribute to the class.
    public interface IMyService
    {
        int Sum(int a, int b);
    }

    [InjectOn] // Automatic registration marker
    public class MyService : IMyService
    {
        public int Sum(int a, int b)
        {
            return a + b;
        }
    }
The ApiModule.cs in the upper module Demo1.Api can reference the lower module via attribute annotations.
    [InjectModule<ApplicationModule>]
    public class ApiModule : IModule
    {
        public void ConfigureServices(ServiceContext services)
        {
            // Module initialization code can be written here
        }
    }
Finally, configure the module entry point and initialize it during program startup.
var builder = WebApplication.CreateBuilder(args);
builder.Services.AddControllers();
builder.Services.AddEndpointsApiExplorer();
builder.Services.AddSwaggerGen();

// Register modular services, setting ApiModule as the entry point
builder.Services.AddModule<ApiModule>();

var app = builder.Build();
Modules can be Dependency Injected
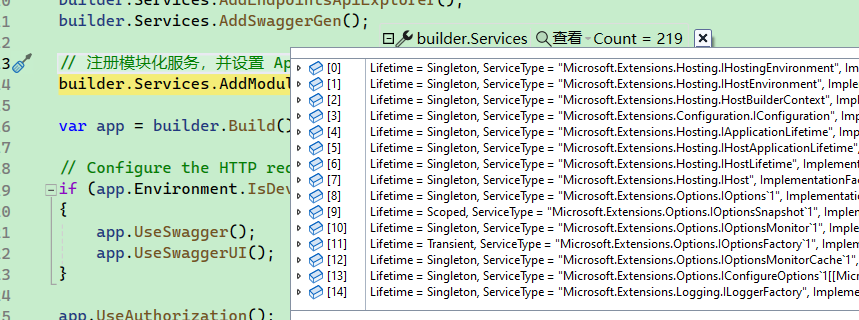
When configuring the Host in ASP.NET Core, some framework-dependent services, such as IConfiguration, are automatically injected. Thus, when .AddModule<ApiModule>() starts to initialize the module services, the module can access the already injected services.
Each module must implement the IModule interface, which is defined as follows:
    /// <summary>
    /// Module interface
    /// </summary>
    public interface IModule
    {
        /// <summary>
        /// Dependency injection in the module
        /// </summary>
        /// <param name="context">Module service context</param>
        void ConfigureServices(ServiceContext context);
    }
In addition to injecting services directly in the module constructor, services and configurations can also be accessed through ServiceContext context.
    /// <summary>
    /// Module context
    /// </summary>
    public class ServiceContext
    {
        private readonly IServiceCollection _serviceCollection;
        private readonly IConfiguration _configuration;

        internal ServiceContext(IServiceCollection serviceCollection, IConfiguration configuration)
        {
            _serviceCollection = serviceCollection;
            _configuration = configuration;
        }

        /// <summary>
        /// Dependency injection services
        /// </summary>
        public IServiceCollection Services => _serviceCollection;

        /// <summary>
        /// Configuration
        /// </summary>
        public IConfiguration Configuration => _configuration;
    }
Modularization
Because there will be dependency relationships between modules, Maomi.Core uses a tree to express these dependencies. When starting module services, Maomi.Core scans all module classes and stores the module dependencies in a module tree. It then initializes the modules one by one using a left-order traversal algorithm, meaning that it starts initializing from the lower-level modules.
Cycle Dependency Detection
Maomi.Core can identify cycle dependencies among modules.
For example, consider the following modules and dependencies:
[InjectModule<A>()]
[InjectModule<B()]
class C:IModule

[InjectModule<A()]
class B:IModule

// Here a cycle dependency occurs
[InjectModule<C()>
class A:IModule

// C is the entry module
services.AddModule<C>();
Since the C module depends on the A and B modules, A and B are child nodes of C, while A and B's parent node is C. After scanning the three modules and their dependencies, the following module dependency tree will be obtained.
As shown in the diagram, each module is indexed to indicate different dependencies. A module can appear multiple times; C1 -> A0 indicates that C depends on A.
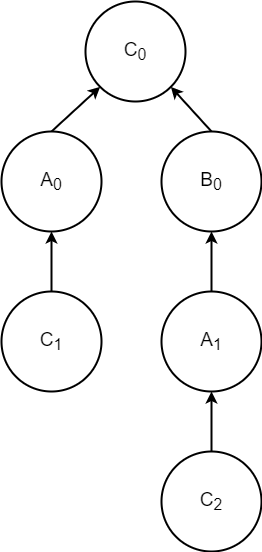
C0 starts without parent nodes, so there is no cycle dependency.
Starting from A0, A0 -> C0, this chain does not contain duplicate A modules.
Starting from C1, C1 -> A0 -> C0, in this chain, the C module appears repeatedly, indicating that a cycle dependency has emerged.
Starting from C2, C2 -> A1 -> B0 -> C0, again the C module is repeated, indicating a cycle dependency.
Module Initialization Order
After the module tree is generated, the initialization can be done through post-order traversal of the module tree.
For example, consider the following modules and dependencies.
[InjectModule<C()]
[InjectModule<D()]
class E:IModule

[InjectModule<A()]
[InjectModule<B()]
class C:IModule

[InjectModule<B()]
class D:IModule

[InjectModule<A()]
class B:IModule

class A:IModule

// E is the entry module
services.AddModule<E>();
The generated module dependency tree is as shown:

First, scanning begins from E0. Since E0 has child nodes C0, and D0, it will first scan C0 again. When reaching A0, as there are no child nodes under A0, the module corresponding to A0 will be initialized. According to the module dependency tree, the initialization order will be as follows (already initialized modules will be skipped):

Automatic Service Registration
Maomi.Core identifies services to be registered in the container through the [InjectOn] attribute, which is defined as follows:
    /// <summary>
    /// Dependency injection marker
    /// </summary>
    [AttributeUsage(AttributeTargets.Class, AllowMultiple = false, Inherited = false)]
    public class InjectOnAttribute : Attribute
    {
        /// <summary>
        /// Services to be injected
        /// </summary>
        public Type[]? ServicesType { get; set; }

        /// <summary>
        /// Lifetime
        /// </summary>
        public ServiceLifetime Lifetime { get; set; }

        /// <summary>
        /// Injection scheme
        /// </summary>
        public InjectScheme Scheme { get; set; }

        /// <summary>
        /// Whether to inject itself
        /// </summary>
        public bool Own { get; set; } = false;

        /// <summary>
        ///
        /// </summary>
        /// <param name="lifetime"></param>
        /// <param name="scheme"></param>
        public InjectOnAttribute(ServiceLifetime lifetime = ServiceLifetime.Transient, InjectScheme scheme = InjectScheme.OnlyInterfaces)
        {
            Lifetime = lifetime;
            Scheme = scheme;
        }
    }
When using [InjectOn], the default is to register the service with a Transient lifetime and to register all interfaces.
    [InjectOn]
    public class MyService : IAService, IBService
This is equivalent to:
services.AddTransient<IAService, MyService>();
services.AddTransient<IBService, MyService>();
If you want to only register IAService, you can set the registration pattern to InjectScheme.Some, and then specify the types to register:
    [InjectOn(
        lifetime: ServiceLifetime.Transient,
        Scheme = InjectScheme.Some,
        ServicesType = new Type[] { typeof(IAService) }
        )]
    public class MyService : IAService, IBService
You can also register itself in the container:
    [InjectOn(Own = true)]
    public class MyService : IMyService
This is equivalent to:
services.AddTransient<IAService, MyService>();
services.AddTransient<MyService>();
If the service inherits a class or interface, but you only want to register the base class, you can write:
    public class ParentService { }

    [InjectOn(
        Scheme = InjectScheme.OnlyBaseClass
        )]
    public class MyService : ParentService, IDisposable
This is equivalent to:
services.AddTransient<ParentService, MyService>();
services.AddTransient<MyService>();
If you only want to register itself, ignoring interfaces, you can use:
[InjectOn(ServiceLifetime.Scoped, Scheme = InjectScheme.None, Own = true)]
Design and Implementation of Modularization and Automatic Service Registration
In this section, we will begin designing a small framework that supports modularization and automatic service registration, starting with the design and implementation of Maomi.Core. In the upcoming chapters, we will learn more about designing and implementing technologies for frameworks, thus mastering the ability to write a framework from scratch.
Project Description
Create a class library project named Maomi.Core, which will include the core abstractions and implementation code of the framework.
To reduce the length of the namespace and facilitate the introduction of required namespaces during development, open the Maomi.Core.csproj file and add a line of configuration in the PropertyGroup element:
<RootNamespace>Maomi</RootNamespace>
After configuring the <RootNamespace> property, the types we create in the Maomi.Core project will start with the Maomi. namespace instead of Maomi.Core.
Next, add two dependency packages to the project to implement automatic dependency injection and provide configuration during module initialization.
Microsoft.Extensions.DependencyInjection
Microsoft.Extensions.Configuration.Abstractions
Modular Design
Once the code for this chapter is complete, we can implement a module, initialize the module, and introduce dependent modules. An example code is as follows:
    [InjectModule<ApplicationModule>]
    public class ApiModule : IModule
    {
        private readonly IConfiguration _configuration;
        public ApiModule(IConfiguration configuration)
        {
            _configuration = configuration;
        }

        public void ConfigureServices(ServiceContext context)
        {
            var configuration = context.Configuration;
            context.Services.AddCors();
        }
    }
From this code, I will interpret the technical points we need to implement in a top-down manner.
1. Module Dependency.
[InjectModule<ApplicationModule>] indicates which modules the current module depends on. If multiple modules need to be depended on, multiple attributes can be used, for example:
[InjectModule<DomainModule>]
[InjectModule<ApplicationModule>]
2. Module Interface and Initialization.
Each module must implement the IModule interface. The framework only processes types as module classes if they inherit from this interface. The IModule interface is straightforward and only contains one method: ConfigureServices(ServiceContext context), where module initialization code can be written. The ConfigureServices method has a parameter of type ServiceContext, which contains IServiceCollection and IConfiguration, enabling modules to obtain current container services, startup configurations, etc.
3. Dependency Injection
The constructor of each module can use dependency injection to inject the required services, allowing developers to initialize the module using these services during module initialization.
Based on these three points, we can first abstract the attribute classes, interfaces, etc. Since these types do not contain specific logic, we can start with these to implement it more simply, avoiding confusion when writing the framework and not knowing where to start.
创建一个 ServiceContext 类,用于在模块间传递服务上下文信息,其代码如下:
    public class ServiceContext
    {
        private readonly IServiceCollection _serviceCollection;
        private readonly IConfiguration _configuration;

        internal ServiceContext(IServiceCollection serviceCollection, IConfiguration configuration)
        {
            _serviceCollection = serviceCollection;
            _configuration = configuration;
        }

        public IServiceCollection Services => _serviceCollection;
        public IConfiguration Configuration => _configuration;
    }
根据实际需求,还可以在 ServiceContext 中添加日志等属性字段。
创建 IModule 接口。
    public interface IModule
    {
        void ConfigureServices(ServiceContext services);
    }
创建 InjectModuleAttribute 特性,用于引入依赖模块。
    [AttributeUsage(AttributeTargets.Class, AllowMultiple = true, Inherited = false)]
    public class InjectModuleAttribute : Attribute
    {
        // 依赖的模块
        public Type ModuleType { get; private init; }
        public InjectModuleAttribute(Type type)
        {
            ModuleType = type;
        }
    }

    [AttributeUsage(AttributeTargets.Class, AllowMultiple = true, Inherited = false)]
    public sealed class InjectModuleAttribute<TModule> : InjectModuleAttribute
        where TModule : IModule
    {
        public InjectModuleAttribute() : base(typeof(TModule)) {}
    }
泛型特性属于 C# 11 的新语法。
定义两个特性类后,我们可以使用 [InjectModule(typeof(AppModule))] 或 InjectModule<AppModule> 的方式定义依赖模块。
自动服务注册的设计
当完成本章的代码编写后,如果需要注入服务,只需要标记 [InjectOn] 特性即可。
// 简单注册
[InjectOn]
public class MyService : IMyService
// 注注册并设置生命周期为 scope
[InjectOn(ServiceLifetime.Scoped)]
public class MyService : IMyService

// 只注册接口,不注册父类
[InjectOn(InjectScheme.OnlyInterfaces)]
public class MyService : ParentService, IMyService
有时我们会有各种各样的需求,例如 MyService 继承了父类 ParentService 和接口 IMyService,但是只需要注册 ParentService,而不需要注册接口;又或者只需要注册 MyService,而不需要注册 ParentService 、 IMyService。
创建 InjectScheme 枚举,定义注册模式:
    public enum InjectScheme
    {
        // 注入父类、接口
        Any,

        // 手动选择要注入的服务
        Some,

        // 只注入父类
        OnlyBaseClass,

        // 只注入实现的接口
        OnlyInterfaces,

        // 此服务不会被注入到容器中
        None
    }
定义服务注册特性:
    // 依赖注入标记
    [AttributeUsage(AttributeTargets.Class, AllowMultiple = false, Inherited = false)]
    public class InjectOnAttribute : Attribute
    {
        // 要注入的服务
        public Type[]? ServicesType { get; set; }

        // 生命周期
        public ServiceLifetime Lifetime { get; set; }

        // 注入模式
        public InjectScheme Scheme { get; set; }

        // 是否注入自己
        public bool Own { get; set; } = false;

        public InjectOnAttribute(ServiceLifetime lifetime = ServiceLifetime.Transient,
                                 InjectScheme scheme = InjectScheme.OnlyInterfaces)
        {
            Lifetime = lifetime;
            Scheme = scheme;
        }
    }
模块依赖
因为模块之间会有依赖关系,因此为了生成模块树,需要定义一个 ModuleNode 类表示模块节点,一个 ModuleNode 实例标识一个依赖关系。
    /// <summary>
    /// 模块节点
    /// </summary>
    internal class ModuleNode
    {
        // 当前模块类型
        public Type ModuleType { get; set; } = null!;

        // 链表,指向父模块节点,用于循环引用检测
        public ModuleNode? ParentModule { get; set; }

        // 依赖的其它模块
        public HashSet<ModuleNode>? Childs { get; set; }

        // 通过链表检测是否出现了循环依赖
        public bool ContainsTree(ModuleNode childModule)
        {
            if (childModule.ModuleType == ModuleType) return true;
            if (this.ParentModule == null) return false;
            // 如果当前模块找不到记录,则向上查找
            return this.ParentModule.ContainsTree(childModule);
        }

        public override int GetHashCode()
        {
            return ModuleType.GetHashCode();
        }

        public override bool Equals(object? obj)
        {
            if (obj == null) return false;
            if (obj is ModuleNode module)
            {
                return GetHashCode() == module.GetHashCode();
            }
            return false;
        }
    }
框架在扫描所有程序集之后,通过 ModuleNode 实例将所有模块以及模块依赖组成一颗模块树,通过模块树来判断是否出现了循环依赖。
比如,有以下模块和依赖:
[InjectModule<A>()]
[InjectModule<B()>]
class C:IModule

[InjectModule<A()]]
class B:IModule

// 这里出现了循环依赖
[InjectModule<C>()]
class A:IModule

// C 是入口模块
services.AddModule<C>();
因为 C 模块依赖 A、B 模块,所以 A、B 是节点 C 的子节点,而 A、B 的父节点则是 C。
C.Childs = new (){ A , B }

A.ParentModule => C
B.ParentModule => C
当把 A、B、C 三个模块以及依赖关系扫描完毕之后,会得到以下的模块依赖树。一个节点即是一个 ModuleNode 实例,一个模块被多次引入,就会出现多次。

那么,如果识别到循环依赖呢?只需要调用 ModuleNode.ContainsTree() 从一个 ModuleNode 实例中,不断往上查找 ModuleNode.ParentModule 即可,如果该链表中包含相同类型的模块,即为循环依赖,需要抛出异常。
比如从 C0 开始,没有父节点,则不存在循环依赖。
从 A0 开始,A0 -> C0 ,该链路中也没有出现重复的 A 模块。
从 C1 开始,C1 -> A0 -> C0 ,该链路中 C 模块重复出现,则说明出现了循环依赖。
所以,是否出现了循环依赖判断起来是很简单的,我们只需要从 ModuleNode.ContainsTree() 往上查找即可。
在生成模块树之后,通过对模块树进行后序遍历即可。
比如,有以下模块以及依赖。
[InjectModule<C()]
[InjectModule<D()]
class E:IModule

[InjectModule<A()]
[InjectModule<B()]
class C:IModule

[InjectModule<B()]
class D:IModule

[InjectModule<A()]
class B:IModule

class A:IModule

// E 是入口模块
services.AddModule<E>();
生成模块依赖树如图所示:

首先从 E0 开始扫描,因为 E0 下存在子节点 C0、 D0,那么就会先顺着 C0 再次扫描,扫描到 A0 时,因为 A0 下已经没有子节点了,所以会对 A0 对应的模块 A 进行初始化。根据上图模块依赖树进行后序遍历,初始化模块的顺序是(已经被初始化的模块会跳过):

伪代码示例如下:
		private static void InitModuleTree(ModuleNode moduleNode)
		{
			if (moduleNode.Childs != null)
			{
				foreach (var item in moduleNode.Childs)
				{
					InitModuleTree(item);
				}
			}

            // 如果该节点已经没有子节点
			// 如果模块没有处理过
			if (!moduleTypes.Contains(moduleNode.ModuleType))
			{
				InitInjectService(moduleNode.ModuleType);
			}
		}
实现模块化和自动服务注册
本小节的代码都在 ModuleExtensions.cs 中。
当我们把接口、枚举、特性等类型定义之后,接下来我们便要思考如何实例化模块、检测模块的依赖关系,实现自动服务注册。为了简化设计,我们可以将模块化自动服务注册写在一起,当初始化一个模块时,框架同时会扫描该程序集中的服务进行注册。如果程序集中不包含模块类,那么框架不会扫描该程序集,也就不会注册服务。
接下来,我们思考模块化框架需要解决哪些问题或支持哪些功能:
-
如何识别和注册服务;
-
框架能够识别模块的依赖,生成模块依赖树,能够检测到循环依赖等问题;
-
多个模块可能引用了同一个模块 A,但是模块 A 只能被实例化一次;
-
初始化模块的顺序;
-
模块类本身要作为服务注册到容器中,实例化模块类时,需要支持依赖注入,也就是说模块类的构造函数可以注入其它服务;
我们先解决第一个问题,
因为自动服务注册是根据模块所在的程序集扫描标记类,识别所有使用了 InjectOnAttribute 特性的类型,所以我们可以先编写一个程序集扫描方法,该方法的功能是通过程序集扫描所有类型,然后根据特性配置注册服务。
/// <summary>
/// Automatic Dependency Injection
/// </summary>
/// <param name="services"></param>
/// <param name="assembly"></param>
/// <param name="injectTypes">Injected services</param>
private static void InitInjectService(IServiceCollection services, Assembly assembly, HashSet<Type> injectTypes)
{
	// Only scan instantiable classes, not scanning static classes, interfaces, abstract classes, nested classes, non-public classes, etc.
	foreach (var item in assembly.GetTypes().Where(x => x.IsClass && !x.IsAbstract && !x.IsNestedPublic))
	{
		var inject = item.GetCustomAttributes().FirstOrDefault(x => x.GetType() == typeof(InjectOnAttribute)) as InjectOnAttribute;
		if (inject == null) continue;

		if (injectTypes.Contains(item)) continue;
		injectTypes.Add(item);

		// Inject itself if needed
		if (inject.Own)
		{
			switch (inject.Lifetime)
			{
				case ServiceLifetime.Transient: services.AddTransient(item); break;
				case ServiceLifetime.Scoped: services.AddScoped(item); break;
				case ServiceLifetime.Singleton: services.AddSingleton(item); break;
			}
		}

		if (inject.Scheme == InjectScheme.None) continue;

		// Inject all interfaces
		if (inject.Scheme == InjectScheme.OnlyInterfaces || inject.Scheme == InjectScheme.Any)
		{
			var interfaces = item.GetInterfaces();
			if (interfaces.Count() == 0) continue;
			switch (inject.Lifetime)
			{
				case ServiceLifetime.Transient: interfaces.ToList().ForEach(x => services.AddTransient(x, item)); break;
				case ServiceLifetime.Scoped: interfaces.ToList().ForEach(x => services.AddScoped(x, item)); break;
				case ServiceLifetime.Singleton: interfaces.ToList().ForEach(x => services.AddSingleton(x, item)); break;
			}
		}

		// Inject base class
		if (inject.Scheme == InjectScheme.OnlyBaseClass || inject.Scheme == InjectScheme.Any)
		{
			var baseType = item.BaseType;
			if (baseType == null) throw new ArgumentException($"{item.Name} injection scheme {nameof(inject.Scheme)} did not find the base class!");
			switch (inject.Lifetime)
			{
				case ServiceLifetime.Transient: services.AddTransient(baseType, item); break;
				case ServiceLifetime.Scoped: services.AddScoped(baseType, item); break;
				case ServiceLifetime.Singleton: services.AddSingleton(baseType, item); break;
			}
		}
		if (inject.Scheme == InjectScheme.Some)
		{
			var types = inject.ServicesType;
			if (types == null) throw new ArgumentException($"{item.Name} injection scheme {nameof(inject.Scheme)} did not find services!");
			switch (inject.Lifetime)
			{
				case ServiceLifetime.Transient: types.ToList().ForEach(x => services.AddTransient(x, item)); break;
				case ServiceLifetime.Scoped: types.ToList().ForEach(x => services.AddScoped(x, item)); break;
				case ServiceLifetime.Singleton: types.ToList().ForEach(x => services.AddSingleton(x, item)); break;
			}
		}
	}
}
Define two extension methods for injecting the entry module.
		/// <summary>
		/// Register modular services
		/// </summary>
		/// <typeparam name="TModule">Entry module</typeparam>
		/// <param name="services"></param>
		public static void AddModule<TModule>(this IServiceCollection services)
			where TModule : IModule
		{
			AddModule(services, typeof(TModule));
		}


		/// <summary>
		/// Register modular services
		/// </summary>
		/// <param name="services"></param>
		/// <param name="startupModule">Entry module</param>
		public static void AddModule(this IServiceCollection services, Type startupModule)
		{
			if (startupModule?.GetInterface(nameof(IModule)) == null)
			{
				throw new TypeLoadException($"{startupModule?.Name} is not a valid module class");
			}

			IServiceProvider scope = BuildModule(services, startupModule);
		}
The framework needs to start searching for dependent module assemblies from the entry module assembly, and then initialize each module through post-order traversal, scanning the services within that module assembly.
Create a BuildModule function. BuildModule is responsible for building the module dependency tree and initializing the module to create the environment in advance.
		/// <summary>
		/// Build module dependency tree and initialize module
		/// </summary>
		/// <param name="services"></param>
		/// <param name="startupModule"></param>
		/// <returns></returns>
		/// <exception cref="InvalidOperationException"></exception>
		private static IServiceProvider BuildModule(IServiceCollection services, Type startupModule)
		{
			// Generate root module
			ModuleNode rootTree = new ModuleNode()
			{
				ModuleType = startupModule,
				Childs = new HashSet<ModuleNode>()
			};

			// Other modules that the root module depends on
			// IModule => InjectModuleAttribute
			var rootDependencies = startupModule.GetCustomAttributes(false)
				.Where(x => x.GetType().IsSubclassOf(typeof(InjectModuleAttribute)))
				.OfType<InjectModuleAttribute>();

			// Build module dependency tree
			BuildTree(services, rootTree, rootDependencies);

			// Build an IoC instance to initialize the module class
			var scope = services.BuildServiceProvider();

			// Initialize all module classes
			var serviceContext = new ServiceContext(services, scope.GetService<IConfiguration>()!);

			// Record modules, assemblies, and services that have been processed to avoid duplication
			HashSet<Assembly> moduleAssemblies = new HashSet<Assembly> { startupModule.Assembly };
			HashSet<Type> moduleTypes = new HashSet<Type>();
			HashSet<Type> injectTypes = new HashSet<Type>();

            // Post-order traversal tree and initialize each module
			InitModuleTree(scope, serviceContext, moduleAssemblies, moduleTypes, injectTypes, rootTree);

			return scope;
		}
The first step is to build the module dependency tree.
		/// <summary>
		/// Build module dependency tree
		/// </summary>
		/// <param name="services"></param>
		/// <param name="currentNode"></param>
		/// <param name="injectModules">Dependent modules</param>
		private static void BuildTree(IServiceCollection services, ModuleNode currentNode, IEnumerable<InjectModuleAttribute> injectModules)
		{
			services.AddTransient(currentNode.ModuleType);
			if (injectModules == null || injectModules.Count() == 0) return;
			foreach (var childModule in injectModules)
			{
				var childTree = new ModuleNode
				{
					ModuleType = childModule.ModuleType,
					ParentModule = currentNode
				};

				// Detect circular dependency
				// Check if the current module (parentTree) depends on the module (childTree) has appeared before; if so, it indicates a circular dependency
				var isLoop = currentNode.ContainsTree(childTree);
				if (isLoop)
				{
					throw new OverflowException($"Detected circular dependency reference or repeated reference! The {currentNode.ModuleType.Name} module depends on the {childModule.ModuleType.Name} module that has appeared in its parent module!");
				}

				if (currentNode.Childs == null)
				{
					currentNode.Childs = new HashSet<ModuleNode>();
				}

				currentNode.Childs.Add(childTree);
				// Other modules that the child module depends on
				var childDependencies = childModule.ModuleType.GetCustomAttributes(inherit: false)
					.Where(x => x.GetType().IsSubclassOf(typeof(InjectModuleAttribute))).OfType<InjectModuleAttribute>().ToHashSet();
				// Child modules also depend on other modules
				BuildTree(services, childTree, childDependencies);
			}
		}
During post-order traversal when identifying dependencies, since a module may appear multiple times, it is necessary to check whether the module has already been initialized during initialization, and then initialize the module and scan all types in the module assembly to register services.
		/// <summary>
		/// Traverse the module tree
		/// </summary>
		/// <param name="serviceProvider"></param>
		/// <param name="context"></param>
		/// <param name="moduleTypes">Module classes already registered in the container</param>
		/// <param name="moduleAssemblies">Assemblies where module classes are located</param>
		/// <param name="injectTypes">Services already registered in the container</param>
		/// <param name="moduleNode">Module node</param>
		private static void InitModuleTree(IServiceProvider serviceProvider,
			ServiceContext context,
			HashSet<Assembly> moduleAssemblies,
			HashSet<Type> moduleTypes,
			HashSet<Type> injectTypes,
			ModuleNode moduleNode)
		{
			if (moduleNode.Childs != null)
			{
				foreach (var item in moduleNode.Childs)
				{
					InitModuleTree(serviceProvider, context, moduleAssemblies, moduleTypes, injectTypes, item);
				}
			}

			// If the module has not been processed
			if (!moduleTypes.Contains(moduleNode.ModuleType))
			{
				moduleTypes.Add(moduleNode.ModuleType);

				// Instantiate this module
				// Scan the services that need dependency injection in this module (assembly)
				var module = (IModule)serviceProvider.GetRequiredService(moduleNode.ModuleType);
				module.ConfigureServices(context);
				InitInjectService(context.Services, moduleNode.ModuleType.Assembly, injectTypes);
				moduleAssemblies.Add(moduleNode.ModuleType.Assembly);
			}
		}
Thus, all the code of Maomi.Core has been explained. Through the practice in this chapter, we have a framework that features modularity and automatic service registration. However, do not rejoice too early; how should we verify that the framework is reliable? The answer is unit testing. After completing the Maomi.Core project, the author immediately wrote the Maomi.Core.Tests unit testing project, and only after all unit tests passed could the author confidently put the code into the book. Writing unit tests for projects is a good habit, especially for framework projects. We need to write a large number of unit tests to verify the reliability of the framework, while the numerous examples within the unit tests serve as an excellent reference for other developers to understand and get started with the framework.
Publish to NuGet
We have developed a framework that supports modularity and automatic service registration, developing modular applications through Maomi.Core.
Once the code is finished, we need to share it with others, and we can use the NuGet package method to do so.
After developing the class library, we can package it into a NuGet file and upload it to nuget.org, or an internal private repository, for other developers to use.
In the Maomi.Core.csproj project's PropertyGroup, add the following configuration to enable NuGet package generation when publishing the library.
		<IsPackable>true</IsPackable>
		<PackageVersion>1.0.0</PackageVersion>
		<Title>Cat Framework</Title>
		<GeneratePackageOnBuild>True</GeneratePackageOnBuild>
Or right-click the project -> Properties -> Packaging.
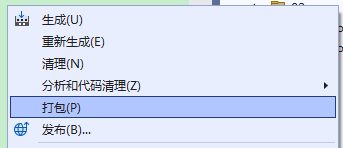
Of course, you can also click the project right click properties in Visual Studio and configure it visually in the panel.
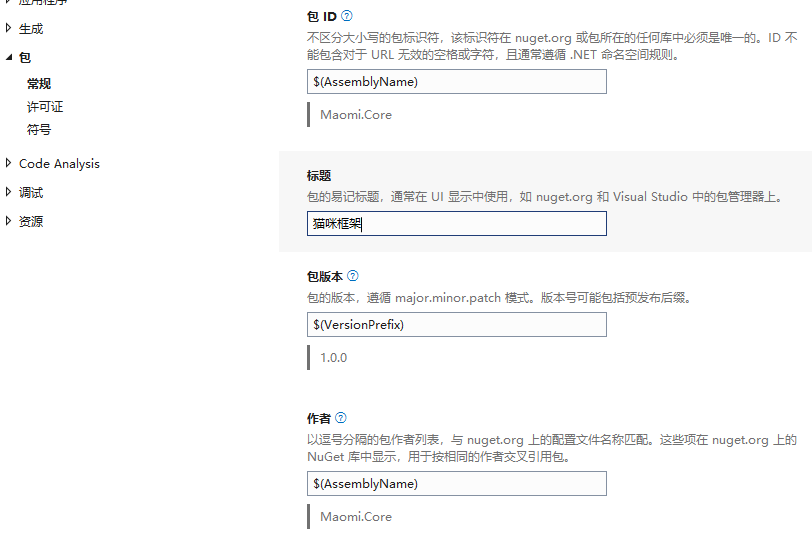
You can configure the project's GitHub address, release notes, open source license, etc.
After the configuration is completed, you can use Visual Studio to publish the project, or use the command dotnet publish -c Release to publish the project.
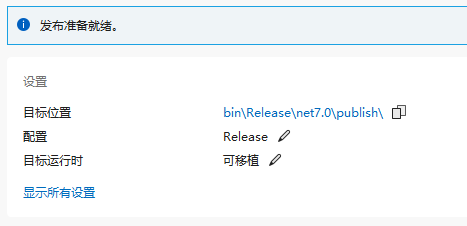
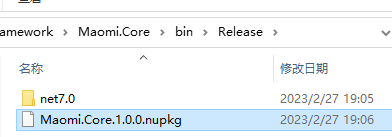
After publishing the project, you can find the .nupkg file in the output directory.
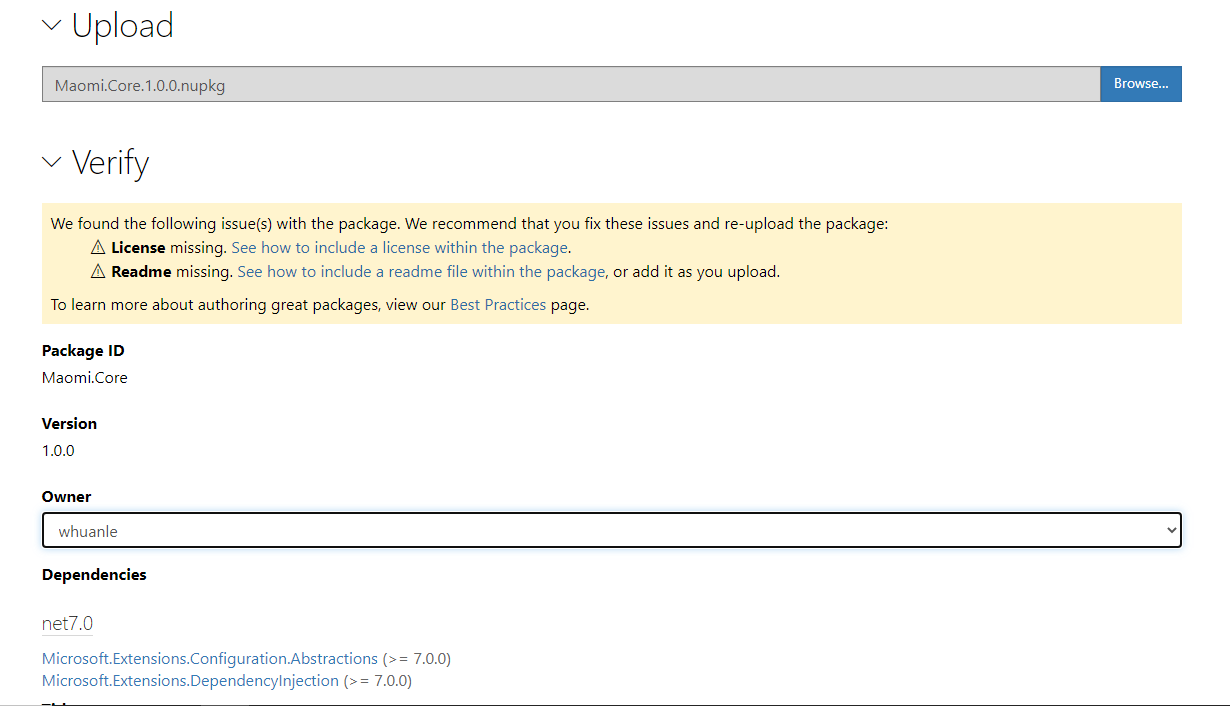
Open https://www.nuget.org/packages/manage/upload, log in and upload the .nupkg file.
<br />
### Creating a Template Project
When installing the .NET SDK, some project templates are included by default. You can view the installed project templates on your machine using the command `dotnet new list`, and you can quickly create an application using a template with the command `dotnet new {template name}`.
Creating an application using a template is quite convenient, as the project template organizes the project structure and code files in advance. Developers only need to provide a name when using the template, and a complete application can be generated. In this section, I will introduce how to create your own project template and package it into NuGet, sharing it with more developers. Of course, in enterprise development, architects can plan the basic code and design the project architecture before creating template projects. When business developers need to create new projects, they can instantly generate them from the enterprise's basic project template, allowing for rapid project development.
The sample code for this section is located in `demo/1/templates`.
Let's experience the project template that I have created by executing the following command to install the template from NuGet.
```bash
dotnet new install Maomi.Console.Templates::2.0.0
After the command is executed, the console will display:
Template Name      Short Name  Language  Tags
----------------  ----------- ----      ----------------
Maomi Console      maomi       [C#]     Common/Console
Use the template name maomi to create a project with a custom name:
dotnet new maomi --name MyTest
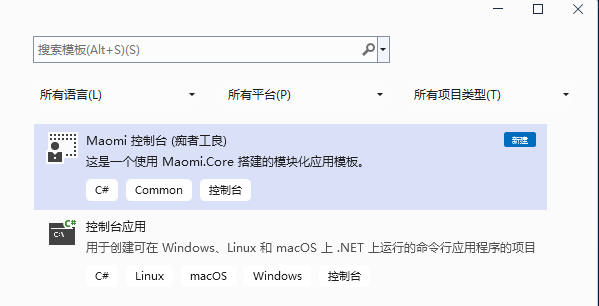
Open Visual Studio, and you can see the recently installed template from NuGet.
Next, let’s get started on creating our own template.
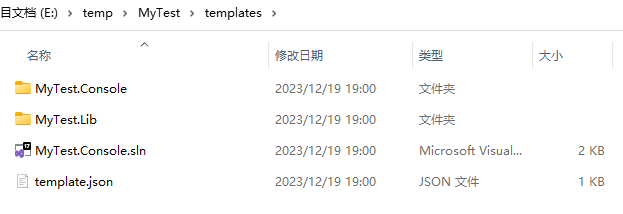
Open the demo/1/templates directory, and you can see the file organization as shown below:
.
│  MaomiPack.csproj
│
└─templates
    │  Maomi.Console.sln
    │  template.json
    │
    ├─Maomi.Console
    │      ConsoleModule.cs
    │      Maomi.Console.csproj
    │      Program.cs
    │
    └─Maomi.Lib
            IMyService.cs
            LibModule.cs
            Maomi.Lib.csproj
            MyService.cs
Create a MaomiPack.csproj file (the name can be customized), this file is used to package code into a NuGet package; otherwise, the dotnet cli would compile the project first before packaging it into a NuGet package.
<Project Sdk="Microsoft.NET.Sdk">
  <PropertyGroup>
    <PackageType>Template</PackageType>
    <PackageVersion>2.0.0</PackageVersion>
    <PackageId>Maomi.Console.Templates</PackageId>
    <PackageTags>dotnet-new;templates;contoso</PackageTags>

    <Title>Maomi Framework Console Template</Title>
    <Authors>whuanle</Authors>
    <Description>Template project package for demonstrating the Maomi framework.</Description>

    <TargetFramework>net8.0</TargetFramework>

    <IncludeContentInPack>true</IncludeContentInPack>
    <IncludeBuildOutput>false</IncludeBuildOutput>
    <ContentTargetFolders>content</ContentTargetFolders>
    <NoWarn>$(NoWarn);NU5128</NoWarn>
  </PropertyGroup>

  <ItemGroup>
    <Content Include="templates\**\*" Exclude="templates\**\bin\**;templates\**\obj\**" />
    <Compile Remove="**\*" />
  </ItemGroup>

</Project>
PackageVersion: Template version number.PackageId: Template ID, unique in nuget.org.PackageTags: Tags for the NuGet package.Title: Title of the NuGet package.Authors: Author name.Description: Description of the NuGet package.
Create an empty directory to store the project code, which is generally named templates. You can refer to the solution in demo/1/templates/templates. Next, create a template.json file in that directory with the following content:
{
  "$schema": "http://json.schemastore.org/template",
  "author": "whuanle",
  "classifications": [
    "Common",
    "Console"
  ],
  "identity": "Maomi.Console",
  "name": "Maomi Console",
  "description": "This is a modular application template built using Maomi.Core.",
  "shortName": "maomi",
  "tags": {
    "language": "C#",
    "type": "project"
  },
  "sourceName": "Maomi",
  "preferNameDirectory": true
}
The template.json file is used to configure project template properties, and relevant information will be displayed in the Visual Studio project template list after installing the template. It also automatically replaces the Maomi prefix with the custom name when creating projects.
author: Author name.classifications: Project type, such as Console, Web, Wpf, etc.identity: Unique identifier for the template.name: Template name.description: Template description information.shortName: Abbreviation, used to simplify the template name when using thedotnet new {shortName}command.tags: Specifies the language and project type used by the template.sourceName: A replaceable name, for example,Maomi.Consolewill be replaced withMyTest.Console, all file names and string contents in the template will be replaced.
After organizing the template, execute the command dotnet pack in the directory where MaomiPack.csproj is located to package the project into a NuGet package. Finally, upload the generated NuGet file to nuget.org as prompted.

文章评论