Tutorial Name: Getting Started with Deep Learning using C#
Author: whuanle
Tutorial Address: https://torch.whuanle.cn
E-book Repository: https://github.com/whuanle/cs_pytorch
Maomi.Torch Project Repository: https://github.com/whuanle/Maomi.Torch
Getting Started with Torch
The content of this chapter is primarily based on the official Pytorch introductory tutorial, using C# code instead of Python. It mainly includes processing data, creating models, optimizing model parameters, saving models, and loading models. Readers will start to understand how to use the TorchSharp framework through this chapter.
Official Tutorial:
https://pytorch.org/tutorials/beginner/basics/quickstart_tutorial.html
Preparation
Create a console project, with sample code referencing example2.2, and introduce the following libraries through NuGet:
TorchSharp
TorchSharp-cuda-windows
TorchVision
Maomi.Torch
First, add the following code to find the optimal working mode for the current device, primarily selecting the GPU development framework, such as CUDA, MPS, or CPU. If there is a GPU, use it; otherwise, fall back to the CPU.
using Maomi.Torch;

Device defaultDevice = MM.GetOpTimalDevice();
torch.set_default_device(defaultDevice);

Console.WriteLine($"Currently using {defaultDevice}");
Downloading the Dataset
One of the most important steps in training a model is preparing the data. However, preparing a dataset can be a very complex and time-consuming task, making it unrealistic for beginners. Therefore, the Pytorch framework integrates some commonly used datasets, allowing developers to directly use these pre-processed datasets and labels via API.
Pytorch uses torch.utils.data.Dataset to represent the abstract interface for datasets, which stores the samples and corresponding labels. torch.utils.data.DataLoader represents the abstract interface for loading datasets, primarily providing an iterator. These two interfaces are very important; for custom datasets, developers need to implement both interfaces and customize the method for loading datasets.
Pytorch has three main libraries: TorchText, TorchVision, and TorchAudio. These libraries come with a number of common open-source datasets, but the .NET community repository only provides TorchVision, which leaves the ecosystem significantly lagging behind Pytorch. TorchVision is a toolkit that can download datasets like Fashion-MNIST and perform some data type conversions.
In this chapter, we will use the dataset called FashionMNIST. Pytorch provides many datasets; interested readers can refer to: https://pytorch.org/vision/stable/datasets.html
Now let’s explain how to load the FashionMNIST dataset using the TorchSharp framework. First, add the references:
using TorchSharp;
using static TorchSharp.torch;
using datasets = TorchSharp.torchvision.datasets;
using transforms = TorchSharp.torchvision.transforms;
Then, load the training and test datasets through the interface:
// Specify the training dataset
var training_data = datasets.FashionMNIST(
    root: "data",   // Directory where the dataset is located
    train: true,    // Load this dataset for training
    download: true, // Whether to download if the dataset does not exist
    target_transform: transforms.ConvertImageDtype(ScalarType.Float32) // Specify feature and label transformation, converting labels to Float32
);

// Specify the test dataset
var test_data = datasets.FashionMNIST(
    root: "data",   // Directory where the dataset is located
    train: false,   // Load this dataset for testing
    download: true, // Whether to download if the dataset does not exist
    target_transform: transforms.ConvertImageDtype(ScalarType.Float32) // Specify feature and label transformation, converting labels to Float32
);
Some parameter explanations are as follows:
rootis the path where the training/testing data is stored.trainspecifies whether it's the training or testing dataset.download=Trueindicates to download the data from the internet if there’s no data inroot.transformandtarget_transformspecify feature and label transformations.
Note that, unlike the Python version, the official Pytorch provides the ToTensor() function to convert images to torch.Tensor type. However, since this function is not available in the C# version, we have to manually specify a converter.
When you start the project, it will automatically download the dataset, and a data directory will be created in the program's running directory, which contains the dataset files, including data used for training and testing.

The file contents are as follows, where the test_data subdirectory contains the test dataset for assessing the model's training and optimization.
│   t10k-images-idx3-ubyte.gz
│   t10k-labels-idx1-ubyte.gz
│   train-images-idx3-ubyte.gz
│   train-labels-idx1-ubyte.gz
│
└───test_data
        t10k-images-idx3-ubyte
        t10k-labels-idx1-ubyte
        train-images-idx3-ubyte
        train-labels-idx1-ubyte
Displaying Images
The dataset is of type Dataset, inheriting from Dataset<Dictionary<string, Tensor>>. Essentially, the Dataset is a list, with each item in the Dataset referred to as data, and each item being a dictionary type, consisting of two keys: data and label.
In the previous section, we have already written how to load the dataset, separating the loading of training data and test data. To understand the Dataset structure, you can print the structure of the dataset to the console with the following code.
for (int i = 0; i < training_data.Count; i++)
{
    var dic = training_data.GetTensor(i);
    var img = dic["data"];
    var label = dic["label"];
    label.print();
}
By observing the console, you can see that every data element is a dictionary, each dictionary consists of the keys data and label, where dic["data"] is an image and the label represents the textual value of the image.
The Maomi.Torch framework provides methods to convert tensors into images and display them, for instance, displaying the first three images in the dataset window:
for (int i = 0; i < training_data.Count; i++)
{
    var dic = training_data.GetTensor(i);
    var img = dic["data"];
    var label = dic["label"];

    if (i > 2)
    {
        break;
    }

    img.ShowImage();
}
Using the Maomi.ScottPlot.Winforms library, you can also display images in a window format using the
img.ShowImageToForm()interface.
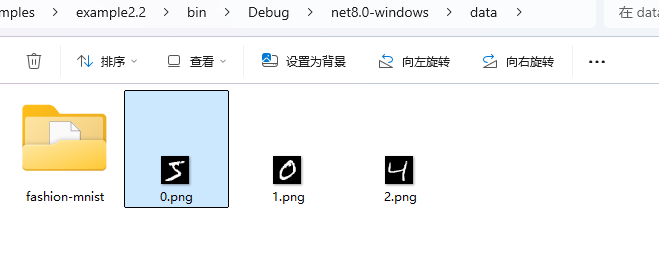
You can also directly save it as an image:
img.SavePng($"data/{i}.png");
Loading the Dataset
Since the FashionMNIST dataset contains 60,000 images, loading all images at once can be memory-intensive and require a high GPU capacity for training. Therefore, we need to process the dataset in batches.
torch.utils.data provides a data loader that helps us load batches of images into memory, allowing developers to directly read using an iterator without focusing on the batching situation.
As shown below, we can load the dataset in batches, with a batch size of 64 images.
// Load images in batches, shuffling the order
var train_loader = torch.utils.data.DataLoader(training_data, batchSize: 64, shuffle: true, device: defaultDevice);

// Load images in batches without shuffling the order
var test_loader = torch.utils.data.DataLoader(test_data, batchSize: 64, shuffle: false, device: defaultDevice);
Note that the batching occurs internally within the DataLoader, which we can understand as a buffer size; developers do not need to be concerned about batching situations.
Defining the Network
Next, define a neural network, which consists of multiple layers that train data through a neural network. This training yields parameters, weights, and other information that will be saved in the model. When loading the model, the corresponding network structure must be present, meaning the number of layers in the neural network must match, and each layer's structure must be consistent.
The network takes in images of size 28*28 and outputs 10 classification values, each with its corresponding probability. The classification result with the highest probability is considered the recognized result.
Store the following code in NeuralNetwork.cs.
using TorchSharp.Modules;
using static TorchSharp.torch;
using nn = TorchSharp.torch.nn;

public class NeuralNetwork : nn.Module<Tensor, Tensor>
{
    // The parameter passed to the base class is the name of the model
    public NeuralNetwork() : base(nameof(NeuralNetwork))
    {
        flatten = nn.Flatten();
        linear_relu_stack = nn.Sequential(
            nn.Linear(28 * 28, 512),
            nn.ReLU(),
            nn.Linear(512, 512),
            nn.ReLU(),
            nn.Linear(512, 10));

        // The C# version requires this function to register the model's components
        RegisterComponents();
    }

    Flatten flatten;
    Sequential linear_relu_stack;

    public override Tensor forward(Tensor input)
    {
        // Process the input layer by layer, passing it to the next layer
        var x = flatten.call(input);
        var logits = linear_relu_stack.call(x);
        return logits;
    }
}
Note, fields can only be defined in the network; do not define properties; do not use
_to start field definitions;
Then continue writing code in Program to initialize the neural network and load it using GPU.
var model = new NeuralNetwork();
model.to(defaultDevice);
Optimizing Model Parameters
To train the model, a loss function and optimizer need to be defined. The primary role of the loss function is to measure the difference between the model's predicted results and the actual labels, i.e., the error or loss. With the loss function established, the optimizer can guide the adjustment of the model parameters, helping the predicted results to converge gradually toward the true values, thus improving the model's performance. Pytorch comes with many loss functions; here we will use the one that computes cross-entropy loss.
// Define the loss function, optimizer, and learning rate
var loss_fn = nn.CrossEntropyLoss();
var optimizer = torch.optim.SGD(model.parameters(), learningRate: 1e-3);
Moreover, the optimizer is also crucial, as it is used to adjust model parameters to minimize the loss function.
Although there are many loss functions, there are relatively few optimizers, so here is a brief list of some built-in optimizers in Pytorch.
- SGD (Stochastic Gradient Descent): Updates weights linearly based on the gradient of the loss function;
- Adam (Adaptive Moment Estimation): An optimization algorithm that adjusts learning rates adaptively based on first and second moment estimates; performs well for most problems;
- RMSprop: Suitable for handling non-stationary targets and automatically adjusts the learning rate;
- AdamW (Adam with Weight Decay): Adds weight decay to Adam to prevent overfitting.
Training the Model
Now let’s explain the steps for training the model, as shown in the following code.
Here are the detailed steps:
- For each image read, use the neural network for recognition (
.call()function), wherepredis the recognition result; - Use the loss function to assess the error between the network's recognition result and the true label;
- Backpropagate using the loss function to compute network gradients, etc.;
- Use the SGD optimizer to update weights according to the gradients of the loss function.
optimizer.step()will adjust the model's weights based on computed gradients to move closer to the optimization target. - Since data is processed in batches, after computing the gradients for the current batch, use
optimizer.zero_grad()to reset all gradients. - Compute the training results, which include printing the current training progress and loss value.
static void Train(DataLoader dataloader, NeuralNetwork model, CrossEntropyLoss loss_fn, SGD optimizer)
{
    var size = dataloader.dataset.Count;
    model.train();

    int batch = 0;
    foreach (var item in dataloader)
    {
        var x = item["data"];
        var y = item["label"];

        // Step One
        // Train with the current image
        var pred = model.call(x);

        // Get the error against the true result using the loss function
        var loss = loss_fn.call(pred, y);

        // Step Two, backpropagation
        loss.backward();

        // Compute the gradients and optimize the parameters
        optimizer.step();

        // Clear the current gradients in the optimizer
        optimizer.zero_grad();

        // Print the loss value and number of images trained every 100 iterations
        if (batch % 100 == 0)
        {
            loss = loss.item<float>();

            // The Pytorch framework stores the current position in x.shape[0]
            var current = (batch + 1) * x.shape[0];

            Console.WriteLine($"loss: {loss.item<float>(),7}  [{current,5}/{size,5}]");
        }

        batch++;
    }
}
Note that the
.shapeproperty of torch.Tensor type is special; it's an array mainly used to store the structure of the current type. Understanding it requires context, for example, in the current training,x.shapetakes the value[64,1,28,28], whereshape[1]is the channel for the image (1 for grayscale, 3 for RGB), andshape[2]andshape[3]are the length and height of the image, respectively.
From the above steps, we can see that "training" is a literal term, quite different from human learning, where the model first recognizes an image, calculates the error, updates model parameters and weights, then proceeds to the next adjustment.
While training the model, we also need to evaluate metrics such as model accuracy, which requires using test images to validate the training results.
static void Test(DataLoader dataloader, NeuralNetwork model, CrossEntropyLoss loss_fn)
{
    var size = (int)dataloader.dataset.Count;
    var num_batches = (int)dataloader.Count;

    // Set the model to evaluation mode
    model.eval();

    var test_loss = 0F;
    var correct = 0F;

    using (var n = torch.no_grad())
    {
        foreach (var item in dataloader)
        {
            var x = item["data"];
            var y = item["label"];

            // Use the trained parameters to predict the test data
            var pred = model.call(x);

            // Compute the loss value
            test_loss += loss_fn.call(pred, y).item<float>();
            correct += (pred.argmax(1) == y).type(ScalarType.Float32).sum().item<float>();
        }
    }

    test_loss /= num_batches;
    correct /= size;
    Console.WriteLine($"Test Error: \n Accuracy: {(100 * correct):F1}%, Avg loss: {test_loss:F8} \n");
}
The following is a log of training progress printed later on, showing the accuracy gradually increasing.
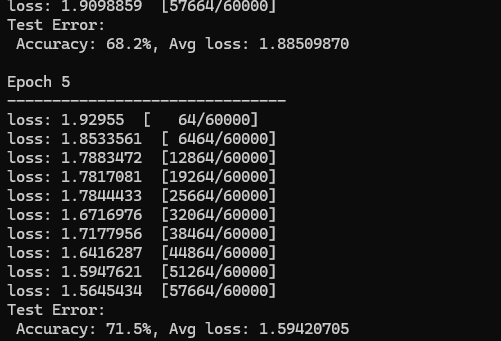
Add training code to the Program, where we will use the training dataset for five rounds, outputting the recognition results for each round.
// Number of training epochs
var epochs = 5;

foreach (var epoch in Enumerable.Range(0, epochs))
{
    Console.WriteLine("Epoch {epoch + 1}\n-------------------------------");
    Train(train_loader, model, loss_fn, optimizer);
    Test(train_loader, model, loss_fn);
}

Console.WriteLine("Done!");
Saving and Loading the Model
After training, the model can be easily saved and loaded with simple code as shown below:
model.save("model.dat");
Console.WriteLine("Saved PyTorch Model State to model.dat");

model.load("model.dat");
Using the Model to Recognize Images
To use the model for recognizing images, simply use var pred = model.call(x);. However, since the model does not directly output the recognition result but instead outputs probabilities to each neuron based on the network structure, each neuron represents the current probability. In the previously defined network, nn.Linear(512, 10) will output 10 classification results, each with an associated probability. Therefore, taking the result with the highest probability is equivalent to the recognition result of the image.
The following code illustrates this process, explained as follows:
- Since the model and network do not use strings to represent each classification result, a classification table must be manually configured.
- Then, select the first image and label from the test dataset, recognize the image, and obtain the index.
- Retrieve the classification name from the classification string using the index.
var classes = new string[] {
    "T-shirt/top",
    "Trouser",
    "Pullover",
    "Dress",
    "Coat",
    "Sandal",
    "Shirt",
    "Sneaker",
    "Bag",
    "Ankle boot",
};

// Set to evaluation mode
model.eval();

// Load the first image and its label from the test data
var x = test_data.GetTensor(0)["data"];
var y = test_data.GetTensor(0)["label"];

using (torch.no_grad())
{
    x = x.to(defaultDevice);
    var pred = model.call(x);
    var predicted = classes[pred[0].argmax(0).ToInt32()];
    var actual = classes[y.ToInt32()];
    Console.WriteLine($"Predicted: \"{predicted}\", Actual: \"{actual}\"");
}
Of course, using the Maomi.Torch interface makes it convenient to read images and use the model for recognition:
var img = MM.LoadImage("0.png");
using (torch.no_grad())
{
    img = img.to(defaultDevice);
    var pred = model.call(img);

    // Convert to normalized probabilities
    var array = torch.nn.functional.softmax(pred, dim: 0);
    var max = array.ToFloat32Array().Max();
    var predicted = classes[pred[0].argmax(0).ToInt32()];

    Console.WriteLine($"Recognition Result: {predicted}, Probability: {max * 100}%");
}

文章评论