[TOC]
Tutorial Title: Getting Started with Deep Learning using C#
Author: whuanle
Tutorial URL: https://torch.whuanle.cn
E-book Repository: https://github.com/whuanle/cs_pytorch
Maomi.Torch Project Repository: https://github.com/whuanle/Maomi.Torch
Training a Model using Torch
This chapter mostly references Chapter 4 of "Deep Learning Unlocked," where we will implement a digit classifier that includes data loading and processing, model training and saving, and loading pre-trained models. The content is similar to the Getting Started with Torch chapter, but with different dataset and network definitions. This chapter's case will help readers further understand TorchSharp and master the steps and basics of model training.
Please refer to example2.3 for the code in this chapter.
General steps to build a neural network:

In the previous section, we learned about the relevant processes through examples, so this chapter will continue to explain some details and steps based on the previous foundation.
In the last chapter, we learned how to download and load datasets. If we export the images from the dataset, we can find that they are all single digits.
You can use the extension method in the Maomi.Torch package to export the dataset to a local directory.
for (int i = 0; i < training_data.Count; i++)
{
    var dic = training_data.GetTensor(i);
    var img = dic["data"];
    var label = dic["label"];

    img.SaveJpeg("imgs/{i}.jpg");
}
As shown in the figure:
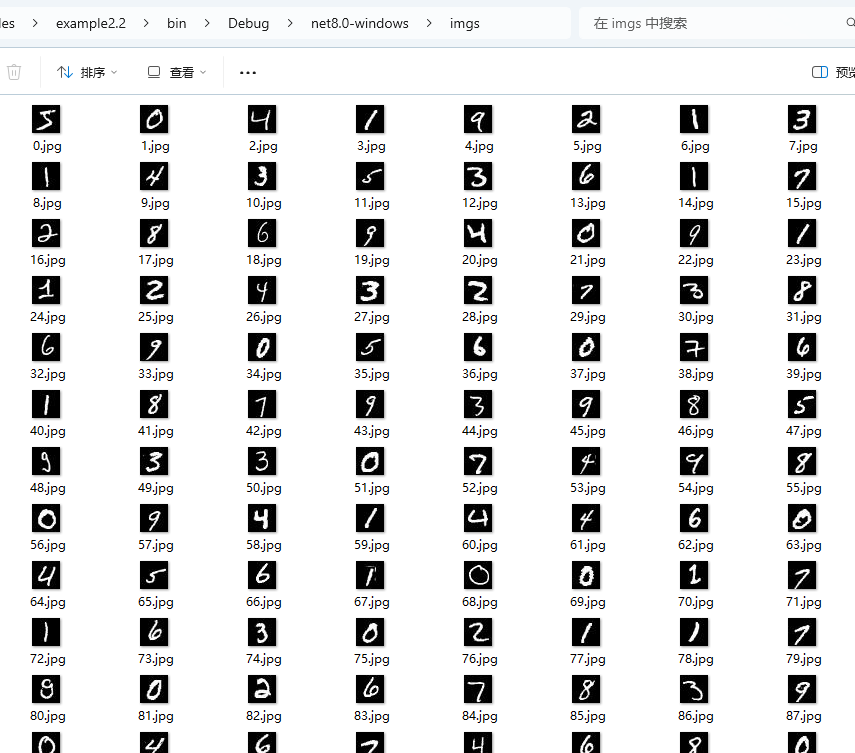
The size of each image is 28*28=784, so the input layer size of the neural network is 784.
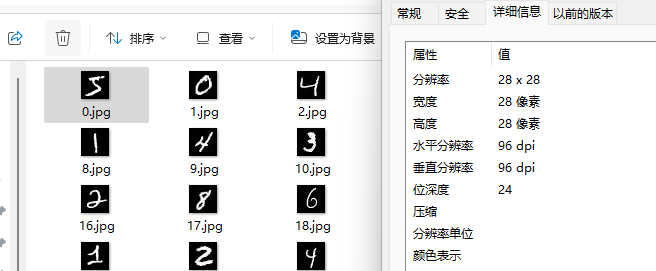
It is directly known that since the images in the dataset are digits from 0-9 and are grayscale images (without color), the output of the model training result should be 10, meaning that the number of output neurons in the neural network is 10.
The input layer of the neural network is fixed in size, representing a fixed number of input neurons. A neural network cannot receive images of arbitrary sizes; these images must be processed by certain algorithms to generate images that match the size of the neural network's input layer.
Defining the Neural Network
The first step is to define our network model, which is a fully connected network consisting of activation functions and three linear layers.
This network model does not specify the sizes of the input and output layers, allowing the model to adapt to different image classification tasks. Developers can specify the sizes of the input and output layers when training and loading the model.
The code is as follows:
using TorchSharp;
using static TorchSharp.torch;

using nn = TorchSharp.torch.nn;

public class MLP : nn.Module<Tensor, Tensor>, IDisposable
{
    private readonly int _inputSize;
    private readonly int _hiddenSize;
    private readonly int _numClasses;

    private TorchSharp.Modules.Linear fc1;
    private TorchSharp.Modules.ReLU relu;
    private TorchSharp.Modules.Linear fc2;
    private TorchSharp.Modules.Linear fc3;

    /// <summary></summary>
    /// <param name="inputSize">Input layer size, width * height of the image.</param>
    /// <param name="hiddenSize">Hidden layer size.</param>
    /// <param name="outputSize">Output layer size, e.g., number of classifications.</param>
    /// <param name="device"></param>
    public MLP(int inputSize, int hiddenSize, int outputSize) : base(nameof(MLP))
    {
        _inputSize = inputSize;
        _hiddenSize = hiddenSize;
        _numClasses = outputSize;

        // Define activation function and linear layers
        relu = nn.ReLU();
        fc1 = nn.Linear(inputSize, hiddenSize);
        fc2 = nn.Linear(hiddenSize, hiddenSize);
        fc3 = nn.Linear(hiddenSize, outputSize);

        RegisterComponents();
    }

    public override torch.Tensor forward(torch.Tensor input)
    {
        // Layer-by-layer passing
        // The first layer reads the input, then passes it to the activation function,
        // The second layer reads the output from the first layer, then passes it to the activation function,
        // The third layer reads the output from the second layer and generates the output result
        var @out = fc1.call(input);
        @out = relu.call(@out);
        @out = fc2.call(@out);
        @out = relu.call(@out);
        @out = fc3.call(@out);
        return @out;
    }

    protected override void Dispose(bool disposing)
    {
        base.Dispose(disposing);
        fc1.Dispose();
        relu.Dispose();
        fc2.Dispose();
        fc3.Dispose();
    }
}
First, fc1 serves as the first network layer, where the input image needs to be converted into a one-dimensional structure, mainly used for data reception and preprocessing. Since drawing is too complicated, we will explain simply in words; for example, an image of 28*28, which has 28 pixels per row and a total of 28 rows, can use an array of size 784 to connect each row into a one-dimensional array.
Since the images are all grayscale, a black-and-white pixel value ranges from 0 to 255 (byte type). If expressed between [0.0,1.0] for black and white (float32 type), then the input pixel represents grayscale, where the value 0.0 indicates white, 1.0 indicates black, and intermediate values represent varying shades of gray.
In most cases, or in this tutorial, the pixel of the image is represented using float32 type, meaning that the image information stored in torch.Tensor represents each pixel in float32 type.
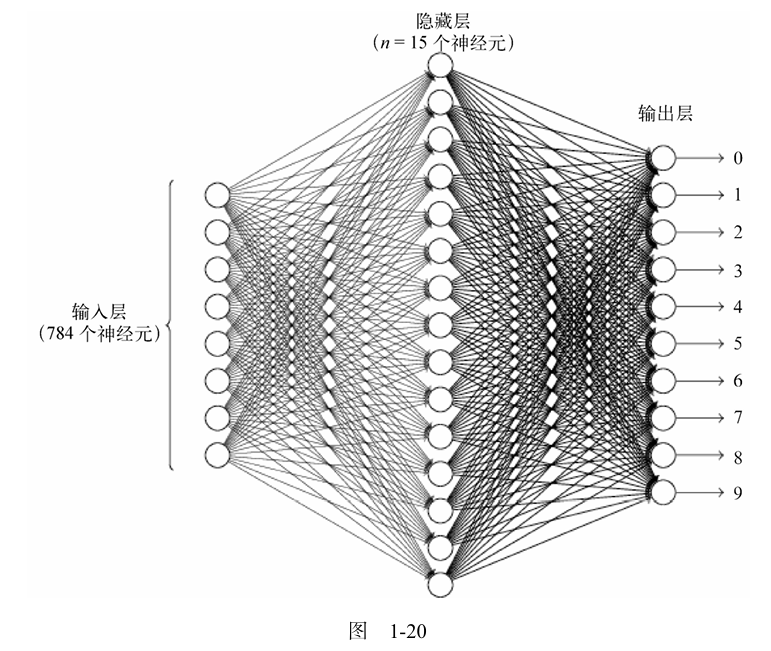
Image from "Understanding Neural Networks and Deep Learning."
fc2 serves as the hidden layer, and in the network model demonstrated in this chapter, there is only one hidden layer with a size of 15 neurons, responsible for feature extraction and non-linear transformations. The number of neurons in the hidden layer is variable, primarily set based on experience and adjusted according to the performance of the trained model.
fc3 serves as the output layer, pushing the output to 10 neurons based on extracted features, with each neuron representing a digit. Each neuron will receive messages, but due to the different features and weight values for different digits, the values of each neuron will be different, and the values received represent the probability of the current digit.
Loading the Dataset
The code example for loading the dataset is as follows. Since this was already explained in the previous chapter, it will not be further elaborated here.
// 1. Load the dataset

// Download data from the MNIST dataset or load already downloaded data
using var train_data = datasets.MNIST("./mnist/data", train: true, download: true, target_transform: transforms.ConvertImageDtype(ScalarType.Float32));
using var test_data = datasets.MNIST("./mnist/data", train: false, download: true, target_transform: transforms.ConvertImageDtype(ScalarType.Float32));

Console.WriteLine("Train data size: " + train_data.Count);
Console.WriteLine("Test data size: " + test_data.Count);

var batch_size = 100;
// Load images in batches, shuffle the order
var train_loader = torch.utils.data.DataLoader(train_data, batchSize: batch_size, shuffle: true, defaultDevice);

// Load images in batches without shuffling
var test_loader = torch.utils.data.DataLoader(test_data, batchSize: batch_size, shuffle: false, defaultDevice);
Creating the Network Model
Since the images in the MNIST dataset are all 28*28, we define the input layer to be of size 784 when creating the network model instance.
// Input layer size, calculated as width * height of the images
var input_size = 28 * 28;

// Hidden layer size, which is not fixed and can be adjusted
var hidden_size = 15;

// Manually specify the number of classification results
var num_classes = 10;

var model = new MLP(input_size, hidden_size, num_classes);
model.to(defaultDevice);
Defining the Loss Function
Create the loss function and optimizer. The learning rate size is also set based on experience and performance, with no specific rules. The role of the learning rate can be referred to in the context of gradient descent algorithms.
// Create the loss function
var criterion = nn.CrossEntropyLoss();

// Learning rate
var learning_rate = 0.001;

// Optimizer
var optimizer = optim.Adam(model.parameters(), lr: learning_rate);
Training
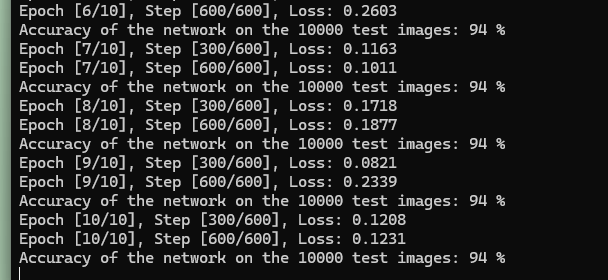
Start training the model. The dataset will undergo 10 epochs of training, and the training results will be output at each epoch. Here, instead of testing accuracy on individual images, we recognize all images at once (ten thousand in total) and calculate the average accuracy.
foreach (var epoch in Enumerable.Range(0, num_epochs))
{
    model.train();
    int i = 0;
    foreach (var item in train_loader)
    {
        var images = item["data"];
        var lables = item["label"];

        images = images.reshape(-1, 28 * 28);
        var outputs = model.call(images);

        var loss = criterion.call(outputs, lables);

        optimizer.zero_grad();

        loss.backward();

        optimizer.step();

        i++;
        if ((i + 1) % 300 == 0)
        {
            Console.WriteLine($"Epoch [{(epoch + 1)}/{num_epochs}], Step [{(i + 1)}/{train_data.Count / batch_size}], Loss: {loss.ToSingle():F4}");
        }
    }

    model.eval();
    using (torch.no_grad())
    {
        long correct = 0;
        long total = 0;

        foreach (var item in test_loader)
        {
            var images = item["data"];
            var labels = item["label"];

            images = images.reshape(-1, 28 * 28);
            var outputs = model.call(images);

            var (_, predicted) = torch.max(outputs, 1);
            total += labels.size(0);
            correct += (predicted == labels).sum().item<long>();
        }
        Console.WriteLine($"Accuracy of the network on the 10000 test images: {100 * correct / total} %");
    }
}
Save the trained model:
model.save("mnist_mlp_model.dat");
Training Information:
Recognizing Handwritten Images
The image shown below is a handwritten digit.

Reload the model:
model.save("mnist_mlp_model.dat");
model.load("mnist_mlp_model.dat");

// Set the model to evaluation mode
model.eval();
Use Maomi.Torch to import the image and convert it to a Tensor, then reshape 28*28 to one-dimensional 784.
Note that the default image loading is in color, so it needs to be converted to grayscale, i.e.,
channels=1.
// Load the image as a tensor
var image = MM.LoadImage("5.jpg", channels: 1);
image = image.to(defaultDevice);
image = image.reshape(-1, 28 * 28);
Recognize the image and output the result:
using (torch.no_grad())
{
    var output = model.call(image);
    var prediction = output.argmax(dim: 1, keepdim: true);
    Console.WriteLine("Predicted Digit: " + prediction.item<long>().ToString());
}
Of course, for corresponding color images, they can also be processed through grayscale conversion, followed by layer normalization to obtain the corresponding structure of torch.Tensor.
image = image.reshape(-1, 28 * 28);

var transform = transforms.ConvertImageDtype(ScalarType.Float32);
var img = transform.call(image).unsqueeze(0);
As shown in the following image, I've arbitrarily drawn a number, with the image size being 212*212, and the format being jpg.
Note that since the images in the dataset are all in jpg format, the images to be recognized also need to use jpg format.
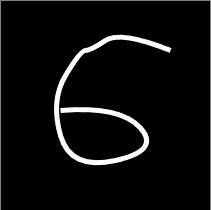
The code below first loads the image using Maomi.Torch and then resizes the image to 28*28 to match the input layer size of the network model.
// Load the image as a tensor
image = MM.LoadImage("6.jpg", channels: 1);
image = image.to(defaultDevice);

// Resize the image to 28*28
image = transforms.Resize(28, 28).call(image);
image = image.reshape(-1, 28 * 28);

using (torch.no_grad())
{
    var output = model.call(image);
    var prediction = output.argmax(dim: 1, keepdim: true);
    Console.WriteLine("Predicted Digit: " + prediction.item<long>().ToString());
}

文章评论